Dark Ground Illumination
One of the most spectacular methods of
improving visibility and resolution of many types of specimens is by using
dark ground, or dark field, illumination. This technique produces brightly
lit objects on a dark (black) background - greatly increasing contrast.
Ideally suited for microscopes using an
Abbe Illuminator, dark ground is best used with the lower power objectives,
and achieves stunning results with pond life subjects.

The Technique
What we need to
do is produce a hollow cone of light instead of a solid one. By excluding
all the direct light in the cone, we end up seeing only reflected light
from the surfaces of the specimen. The technique therefore produces
the best result when yer specimen has the greatest mis-match between the
refractive indices of its two surfaces.
You can purchase
patch stops but really there is no need - they're easy to make!
We need to make a
small disc (disk) wide enough to cover the objective lens and about 10%
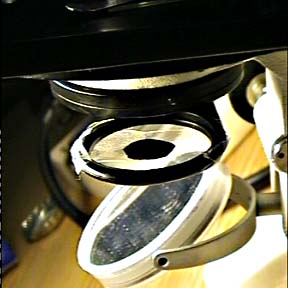
more. It must be placed below the stage close to the underside of the substage
condenser - which, itself - is normally raised to adjust it for shorter
focus of the light rays in this method.
We call the small
disc (disk) a patch stop.

Making a Patch
Stop
This must be one of the cheapest accessories
yer'll (you will) ever have for yer microscope. Almost any black material
will do to make the stop - providing light don't show through it. I made
mine from a black piece of thick paper.
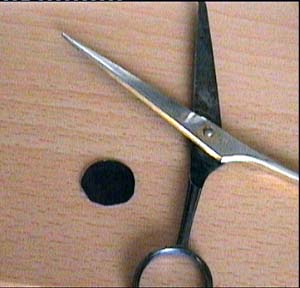 Yer can see me (my) cutting wasn't very good
'cos (because) I didn't mark out the circle first one the paper before
cutting. Its best to try and get a nice round disk not one like mine here.
I'm gonna (going to) use this one though just to show you the best you
can get with the worst disk you make. Yours will be better - it only takes
a few minutes to make one.
Yer can see me (my) cutting wasn't very good
'cos (because) I didn't mark out the circle first one the paper before
cutting. Its best to try and get a nice round disk not one like mine here.
I'm gonna (going to) use this one though just to show you the best you
can get with the worst disk you make. Yours will be better - it only takes
a few minutes to make one.

How big?
What size should the disk be? Well - experimenting
will tell you what size for yer low power objectives but for my microscope
and me 10x objective, I used a disk that was
about 13 mm in diameter - give or take
me bad cutting!

Where do yer put
it?
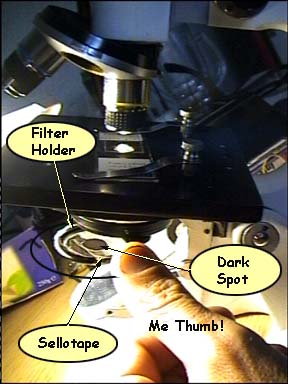
I reckon me picture
below will show you where to stick yer disk. My microscope has a filter
carrier and if I took a little time, I could have stuck me disk onto a
disk of clear transparent plastic - such that the entire thing sat perfectly
centred in the filter holder.

I didn't do this
though because I wanted to test off several size patch stops quickly until
I found the right size. So I just stuck it on with sellotape, judging and
adjusting how centred it was, by swinging the filter holder back into place
and looking at a specimen under the microscope. I re-cut the disk and re-centred
it several times until I got one to achieve the dark ground effect.
You could do this
too until you get the perfect patch stop to then stick onto transparent
plastic for a permanent solution.
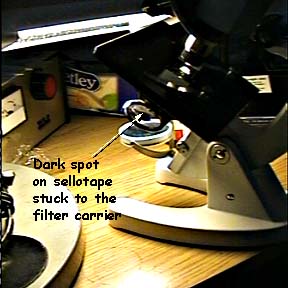
 Once yer manage to get yer disk centred up,
don't forget to swing yer filter holder back into position. If yer don't
have a filter holder - yer should try sticking the disk somewhere else
in the light cone before the light passes through the condenser. Yer will
have to vary the size of yer disk until yer get it to work. Remember it
must be big enough to block the light at the objective plus 10% more (wider)!
Once yer manage to get yer disk centred up,
don't forget to swing yer filter holder back into position. If yer don't
have a filter holder - yer should try sticking the disk somewhere else
in the light cone before the light passes through the condenser. Yer will
have to vary the size of yer disk until yer get it to work. Remember it
must be big enough to block the light at the objective plus 10% more (wider)!
 Results
Now's yer moment
to find out how useful dark ground illumination is. Take a few of yer slides
or a drop of pond water and take a look with and without yer patch stop.
Here's a couple I looked at with mine!
Hippuric Acid
(normally a good slide for trying out polarized light but good for testing
dark field (dark ground) illumination too!
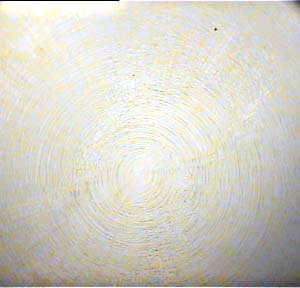 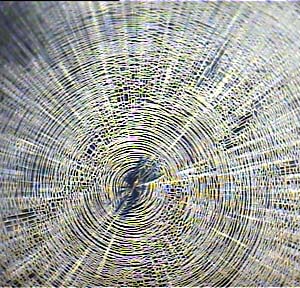
Normal Illumination  Dark
Ground Illumination Dark
Ground Illumination
Plant Hairs
(normally another specimen which benefits from viewing in Polarized light
but a good subject for dark ground illumination too - a seen below).
 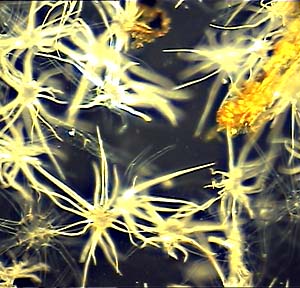 Normal Illumination Dark
Ground Illumination
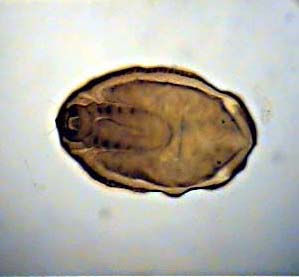
Mite
Didn't get this one quite right so dark ground image on right still shows
a background that's too bright. Mind you - the technique shows up all the
dust and debris in me slide :))
Normal Illumination Dark
Ground Illumination
Mite
Didn't get this one quite right so dark ground image on right still shows
a background that's too bright. Mind you - the technique shows up all the
dust and debris in me slide :))
  Normal Illumination Dark
Ground Illumination
Normal Illumination Dark
Ground Illumination
Mixing Techniques
Don't forget that
yer can also use dark ground illumination and overhead lighting together-
that is: try using over lighting to pick up additional detail not revealed
by dark ground. I've taken some good piccies using a high powered halogen
torch as my over light to brighten up detail missing in a dark ground lit
dustmite!
Right... shall we
move on to polarized lighting techniques? |