Quick
look: Near
infrared microscopy with a Nikon D50 DSLR
compared with a
B/W video camera
by David Walker, UK
Near
infrared photography with consumer digital cameras including DSLR's is well established,
with landscapes being a particular favourite subject.
After recently buying a Nikon D50 DSLR I was interested to see how it performed
with near IR, not so much for normal photographic subjects but for microscopy.
A summary of the common methods of near IR photography and microscopy for the
enthusiast are compared below.
|
Near IR Technique |
Light source |
Filters |
Sensor sensitivity to near IR |
Pros / Cons |
|
'Normal' photographic subjects with DLSR or consumer digicam. |
Usually ambient lighting, sometimes enhanced with near IR lighting. |
Special filters to block visible light but pass the near IR component. |
Exploits the finite sensitivity of a digicam colour sensor to near IR despite the camera's own blocking filter. |
Cons: Long exposures / tripod usually
needed. |
|
Microscopy with DSLR or consumer digicam. |
Near IR LED transmitter as light source. (*See Table footnote.) |
None if natural light ingress avoided. |
As above. |
Cons: Insensitive, long exposures. A parfocal visible / near IR set-up required to compose and focus. Or parfocal B/W video camera. Pros: Potentially higher resolution images cf the small VGA size video still captures. Stills work only with DSLR. |
|
Microscopy with black and white 'C' mount security style camera. |
Near IR LED transmitter as light source. |
None if natural light ingress avoided. |
Sensor often very sensitive as usually no blocking filter when used for night vision security with near IR supplemented lighting. |
Pros: Very affordable cameras. Much more sensitive than a colour digicam. Short exposures, low near IR light intensity. Video work possible. Cons: Small VGA size video still captures |
*Footnote:
In principle, tungsten lighting with visible light filters may also work but
haven't tried this. Any feedback from users on the efficiency of that approach
would be of interest. Note
added Dec. 9th 2005.
Thanks to the readers who remarked that this route is very workable and has
the benefit of retaining the normal microscope lamp. Quick trials with
my Nikon D50, 6V/15W tungsten lamp and recently purchased R72 filter suggest
that the D50 is much more sensitive. The peak emission of the LED used at 940nm
was probably too far into the near IR for the D50 camera to be sensitive. An
update to show the results is planned. Although did find the LED was much better
matched to the black and white security camera. With the R72 filter, I couldn't
find enough neutral density filters to reduce the near IR output to match the
B/W's camera sensitivity.
Near
IR microscopy for the enthusiast is very affordable with a consumer B/W
security camera which invariably are very sensitive to near IR which is
exploited for night security. The LED emitters cost pennies and the 'C'
mount cameras without lens can be bought for a few tens of pounds. My own
results with a security camera have been shared previously for near IR microscopy
and macroscopy. I was inspired to try from the earlier reports of microscopy
enthusiasts, notably Tony Dutton.
I
haven't seen any reports to date on near IR microscopy with a DSLR.
Near IR lighting
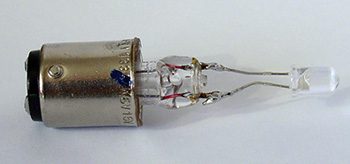
As described previously, a blown tungsten microscope bulb with glass envelope removed was used to support a near IR LED which allows the normal microscope lamp with field condenser to be used. Note that it requires an appropriate DC low voltage supply, not the usual low voltage AC microscope lamp supply which will blow the LED.

I
picked a 'high power infrared emitting diode', 'primarily for remote control
applications' from the Maplin
catalogue although the exact power
specifications are a bit scant for many LED's listed. (Product
code YH70M, peak max 940 nm, 100mW power dissipation, 5 mm envelope, cost £0.58.)
('Near infrared' covers the wavelengths just beyond the visible spectrum
typically quoted as 700-1400 nm, as distinct from longer 'infrared' wavelengths.
Source Wikipedia
'Infrared'.) Safety
note: As far
as I've been able to check (e.g. see this link)
these mW level power near IR LED's (not to be confused with lasers)
as used in remote control and security illumination are safe but still best
to err on the side of caution and not look down focussed beam when in use.
Black and white video camera
The
video camera
used was an unbranded high performance 580 TV line resolution model, 0.5 lux
which is available from security camera dealers for ca £75. They give noticeably
crisper images than the commoner lower resolution 380-450 line models. Image capture was with a trusty 'Snappy' capture
box; despite its age it's still one of
the finest and cheapest ways of capturing video stills.
Microscope set-up
If the near IR photography isn't to be completely 'blind', some visual aid is required! A dual near IR / visible lamp set up would allow composition and rough focus with DSLR viewfinder but would give no help setting up the near IR lighting and critical focus. So I opted for a roughly parfocal B/W video camera in one eyepiece ('V' image right) of a trino' head with DSLR ('D') on photo port. The video camera was used with Motic's relay lens for their Moticam 1000 digicam to give a roughly similar field of view with a 7x eyepiece. The power supply ('P') was homemade by my brother Ian. It's a simple variable DC power supply driven off four 1.5V AA batteries with appropriate dropping resistors and potentiometer. |
|
Test
images: Two whole mounts of insects with dense
exoskeletons
were chosen as these respond particularly well to near IR.
(Slides
prepared by author on a slide making course by the late and sadly missed Eric
Marson, NBS.)
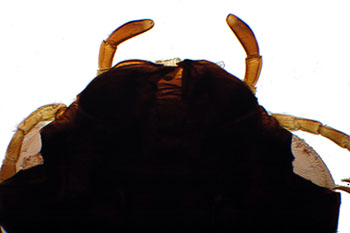
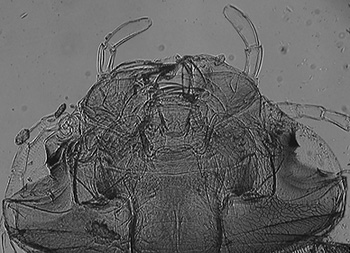
Head of water beetle: 3.5x objective, 7x eyepiece


Left:
brightfield Nikon
D50 (flash). Right: near
IR B/W video camera
The exoskeleton is almost opaque to visible light.
Near IR transmission is much better revealing internal detail. All lighting, composition and critical focus adjustments can be done by viewing on a TV or monitor. The video camera gives a crisp image, short exposure. The tonal range of near IR images are noticeably flat.
|
Right - the D50 is much less sensitive to near IR with same near LED emitter, so the extra quality of the DSLR isn't exploited with these exposure settings. Higher power LEDs may shorten the exposure. Out of camera the images have a distinctive purple hue but can be converted to B/W if desired. Critical focus was 'blind', by making fine focus adjustments and checking results. |
|
Head of cinnabar moth larvae: 3.5x objective, 7x eyepiece
|
|
|
|
Comparable results as for the first subject. Critical focus was tricky and much preferred the ease of use of the B/W video camera. |
|
Impressions
If a DSLR is possessed it's an interesting 'rainy Sunday afternoon' exercise to explore near IR photomicroscopy with the camera. The Nikon D50 has a CCD sensor, other DSLR's have CMOS sensors so the near IR sensitivity may vary widely between models. I would be interested to hear of other users microscopy trials either with DSLRs or consumer digicams. It is doable with the D50 but I don't see any merit in it for my set-up at least! It's far easier to use a cheap B/W video camera instead for near IR imaging which gives live preview for critical focussing on a monitor and far more sensitive than the DSLR with a typical LED emitter allowing live subject studies if desired. Note added Dec. 9th 2005. See footnote below table above. The DSLR is much more sensitive to the near IR spectrum from the microscope lamp with R72 filter rather than near IR LED emitter described. An update to the article is planned.
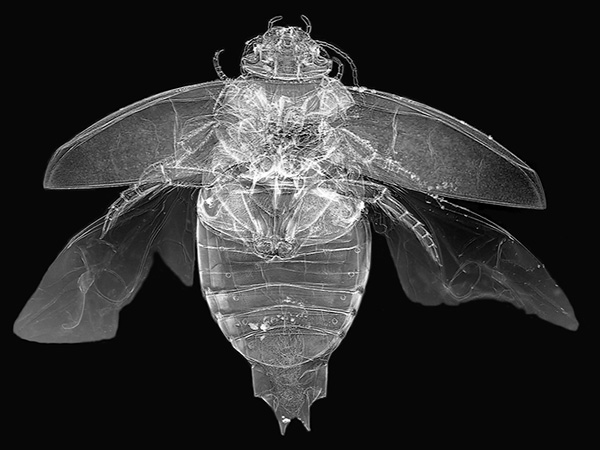
The DSLR potentially offers many more megapixels cf a VGA video camera capture and if a set-up assured critical focus, but for most work VGA would be fine. Consumer digicams may fare better, as some models have apparently become particularly sought after for their near IR capabilities (see links below). When larger images are required, VGA images can be stitched quite successfully although can require a lot of image work up for a seamless merge (see example below).
Comments to the
author
David
Walker
are welcomed.

Water
beetle, near IR with B/W security camera, Zeiss planachro 1x objective, Baker
5x eyepiece.
A stitch of four VGA images with tonal balance adjustments,
background fill
and digital negative to give an X-ray like effect.
(Slide
made by the author on a slide making course by the sadly missed Eric Marson,
NBS.)
Links to 'infrared' photography resources:
Everything you wanted to know about Infrared Photography but were afraid to ask..... by Clive Warren on the 'CoCam' website. An excellent in depth look which covers both film and digicams (to 2002) with notes on the performance of certain digicam models.
Infrared photography with a digital camera by J. Andrzej Wrotniak. A very clear description of the principles and application of the technique with examples from different digicam models.
Published in the October 2005 edition of Micscape.
Please report any Web problems or offer general comments to the Micscape Editor .
Micscape is the on-line monthly magazine of the Microscopy UK web site at Microscopy-UK
© Onview.net Ltd, Microscopy-UK, and all contributors 1995
onwards. All rights reserved.
Main site is
at www.microscopy-uk.org.uk
with full mirror
at www.microscopy-uk.net
.