In relation to microscopy, I am still a child in some respects; I have boundless curiosity and I keep asking “Why?” Unfortunately, I no longer have that seemingly endless reservoir of frantic energy that children have. When I think of microscopy, I think of that marvelous remark of Nietzsche: “The maturity of man–to have regained the seriousness that one had as a child at play.” My pursuits can be fun, even exhilarating and I can be looking through a microscope and suddenly blurt out loud “Oh, WOW!” and not feel the least embarrassed that I am talking to myself.
Children, beginners, and child-like amateurs such as myself are sometimes frustrated by the complexity and difficulty of preparing specimens for observing under the compound microscope. It is highly discouraging when one spends ½ hour or more preparing a slide and then finds that it is either boring or requires different techniques to get a suitable slide. It is, of course, essential that one learns the basic techniques of making an adequate preparation; otherwise one is simply wasting time. This essay is designed to provide some simple suggestions regarding specimens and techniques that with a bit of care will provide interesting material to observe and study. We’ll limit ourselves to 5 basic illumination techniques, all of which are easily available to the amateur: 1) brightfield, which is the standard system for observation, 2) oblique, which brings light to the specimen at an angle and produces interesting contrast, with some specimens, a quasi-3-dimensional effect; 3) darkfield, which can provide stunning contrast for certain types of specimens; 4) polarization, which structures the light beam in such a way that in certain types of specimens (called birefringent), different angles and densities show up in different colors; and finally, 5) Rheinberg, which uses combinations of colored filters to produce remarkable color contrasts. The best part is that you can try out all of these methods with relatively simple and inexpensive apparatus and then if you really get hooked, you can invest in some special high quality accessories.
1) Brightfield
This what most people think of as the primary method of optical microscopic examination and with the development of all kinds of new high-tech specialized techniques, traditional brightfield microscopy is often underrated and relegated to the status of a poor cousin. In microscopy in general, two major problems are contrast and resolution of detail. Naturally, much of this depends upon the quality of the optics–that’s inescapable, so the real issue is to have good (not necessarily, by any means, state-of-the-art) lenses and to learn how to tweak them to get the best performance.
The traditional methods for enhancing contrast and resolution for brightfield involve stains and filters. The standard filter is a blue daylight filter. These substage filters are inexpensive and effective. Less often a green filter is recommended. Traditionally, such filters are usually reserved for phase contrast work, but since the eye is especially sensitive to green, such a filter can, with certain kinds of specimens, significantly enhance contrast. There is a bewildering variety of filters and many of them are quite expensive, some of them costing hundreds of dollars each. Nonetheless, experimenting with filters can be pleasing, enlightening, and microscopically valuable. My recommendation is to buy a “book” of plastic filters from a supply company. I originally bought mine from Edmund Scientific and they come in 2 sizes and you can also find them at Adorama Camera which carries small size 1 3/4" x 3" for $3.95 plus shipping, but they say that their shipping price applies for an order up to $50, so you can order 10 books of filters and have a nice stock and only pay $6.84 shipping. Then, you can convince your friends how rare and difficult these are to obtain and sell the extra ones to them for $15 each. (Your enemies you can charge more.)
However, you might prefer the convenience of having 2 sizes and Edmund Scientific has 1 ½” x 3 1/4" for $7.95 for 100 different colors and 3" x 5" for $39.95 plus shipping. You can see them here.
These are considerably more expensive than when I bought them quite a number of years ago, but apparently inflation is inescapable. Nonetheless, in the long run, investing in such a “book” of filters is a bargain. “Trust me. Would I lie to you?” as Richard Nixon once asked. However, if you are a conservative experimenter (is that an oxymoron?) and want to start with just a few colors, you can go to a university bookstore or office supply company and buy a few of those colored plastic holders that students use to put their essays in for submission hoping that the cheerful colors will blind the professor to the appalling spelling, atrocious grammar, and the utter lack of content of their writing. When I was still teaching, there was an administrative rule that final papers and exams had to be retained for a calendar year in the event of a grade challenge by a student. As a consequence, I accumulated hundreds of these vinyl sheets. The only problem is that these are very thin, generally of poor quality, and have little color saturations, which means that if you want to use them as filters, you will need to cut 2, 3, or 4 of any particular color and stack them to get any satisfactory color saturation.
Another approach is possible if you have some old camera filters lying around or you might be able to find some at a yard sale. The problem with these is that they are usually mounted in glass and of a size that will probably not fit your microscope filter holder. In the long run, my recommendation is to purchase a “book” of the plastic filters; these are thicker than the essay covers, but still can easily be cut to size. These can also be used to make Rheinberg filters which we shall discuss later.
Staining is an art and a challenge. Most of these dyes were originally developed for the textile industry and there are literally thousands of them, hundreds of which have been tried in microscopical applications. Many of these dyes are difficult to obtain; some are extremely expensive and many are toxic in their concentrated, powdered form or in strong solutions–some being suspected or proved carcinogens and/or mutagens. The best and easiest approach for those with limited experience is to buy a few stains from a scientific supply house already prepared in solution in suitable concentrations. Some companies even offer sets of 5 or 10 solutions selected for bacteriological studies, protozoa, or plant materials. This may seem like an expensive option at first, but when you consider that to make your own solutions, you need 1) a balance that weights to 0.01 grams, 2) distilled water, 3) dropper bottles, 4) weighing papers or boats, 5) funnels and filter papers to remove sediments and/or precipitates. Then there are those potential, hidden unanticipated costs which might ensue when, at the very moment that you are weighing out the powdered stain, someone comes into the room and turns on the fan, and, caught off guard, you inhale some of the dust and your face and hands take on a vivid blue, green, orange or brilliant crimson hue and then you pay $1,500 for the ambulance which hands you off to the Emergency Room where they try to detoxify you, keep you overnight for observation, send you home with a bottle of pills and a bill for $14,250.17. (You’d think they could knock off the 17 cents!) So, you see, it really is cheaper to buy the solutions already prepared.
Which stain will be useful to you depends, of course, on not only the type of object or organisms, but also the particular structures you are trying to differentiate. To begin with, there are some items around the household that will work fairly well for certain specimens. For example, micro-paleontologists frequently use food coloring on the shells of foraminifera (forams) to increase the visibility of pores, spirals, etc. that may not be readily observed on what is often a bright, white surface. Naturally, biological stains can be used as well, but food coloring is cheaper and easier to obtain. Sometimes the biological dyes have a distinct advantage in that they tend to produce a more intense and vivid stain.
This same technique can be applied to fragments of the tests (shells) of sand dollars and other echinoids which have been bleached white to remove the spines.
Trial and error will tell you which stains provide the best contrast.
Almost everyone uses a ball point pen these days when they’re forced to sign their names and can’t use their cell phone to text it (yet). However, if you’re as old as I am, you may have some bottles of ink around and it can be had in a variety of colors–black India Ink, blue green, purple, and red being the most popular. Where on earth does one buy ink today in an electronic culture? I suggest trying a shop that sells artist supplies. You’ll also want a packet of brushes to apply the inks and stains, but don’t buy them from the art store; they’ll try to sell you camel hair sable, or Peruvian agouti hair brushes at an exorbitant price. Go to a discount store with a craft department and you can find packets of inexpensive, but quite serviceable brushes.
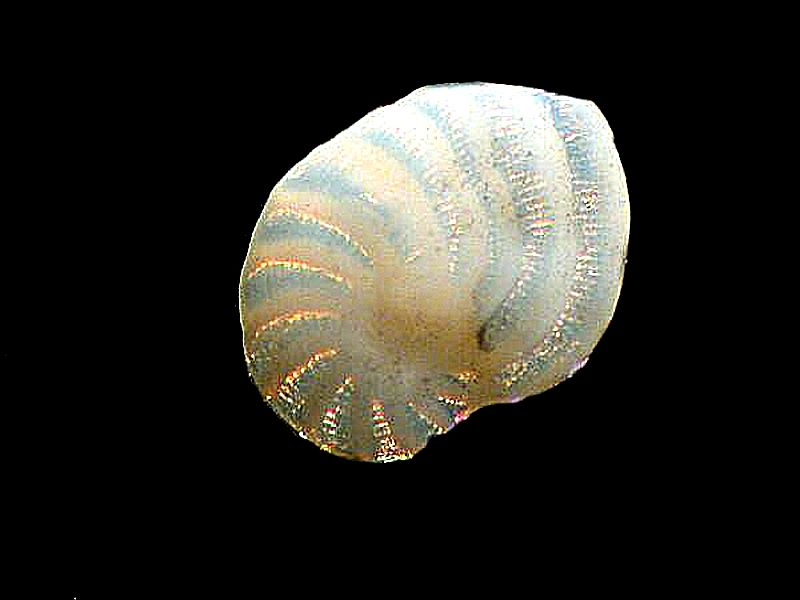
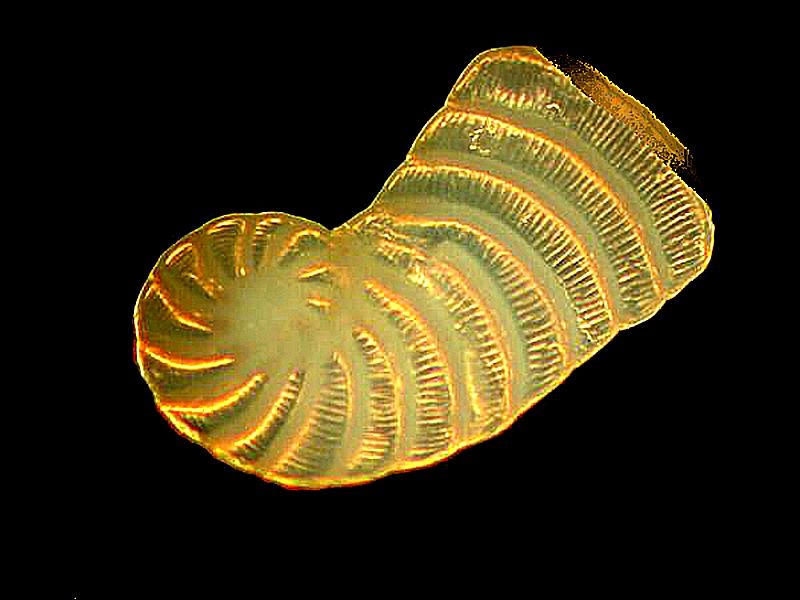
For certain types of forams; namely, those which are semi-opaque–that is, you can see some light through these, but not enough to clearly see the internal chambers–one can use a drop of mineral oil, cedar oil, or immersion oil to enhance the contrast and reveal some of the inner structure of the shell.
First 4 foram images using oil to enhance contrast.


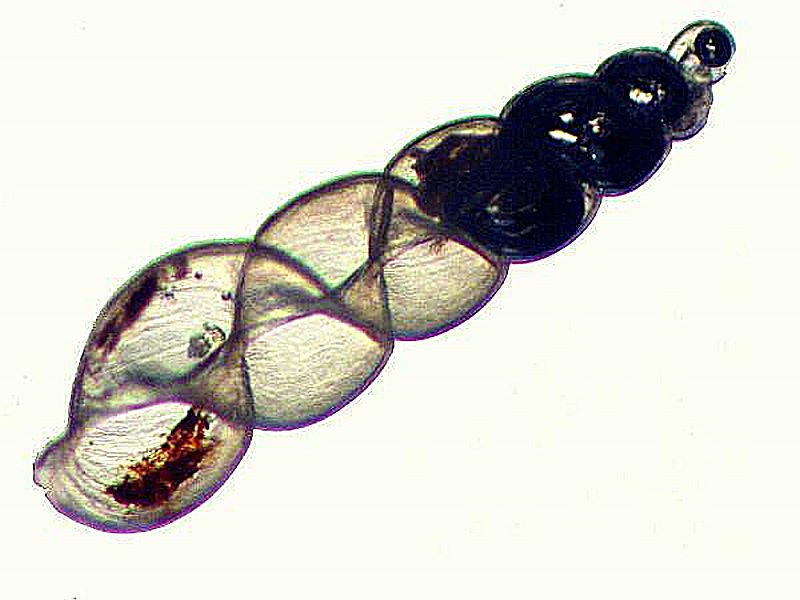
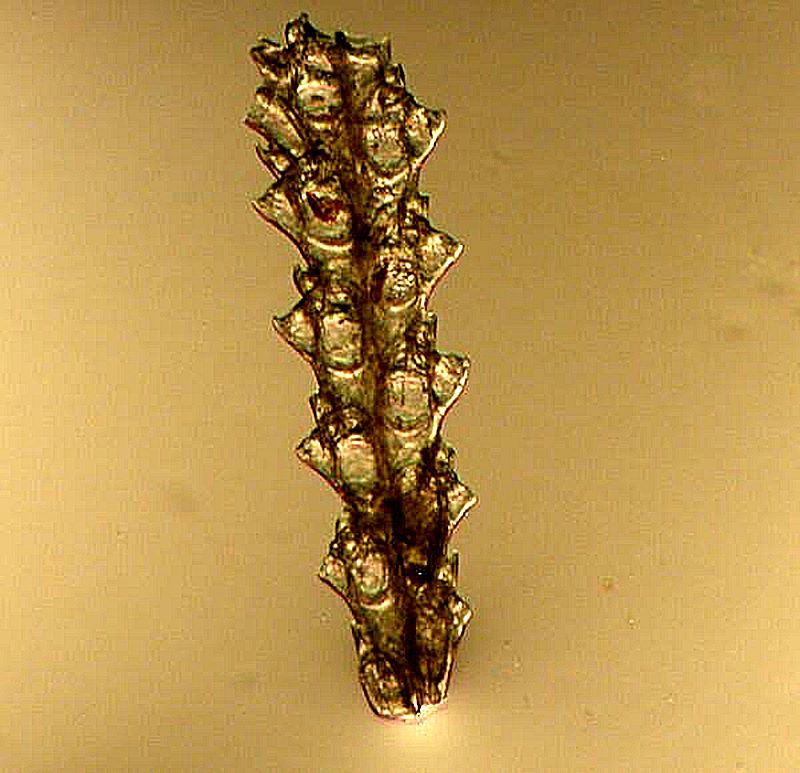
Next 3 images where the oil has been applied to other organisms’ calcareous shells. First, a tiny snail shell where the spirals are nicely visible, secondly, a portion of a bryozoan colony showing the internal chambers which were inhabited by the zooids, and thirdly, a portion of a sea urchin spine which very nicely shows the crystalline character of the spine.
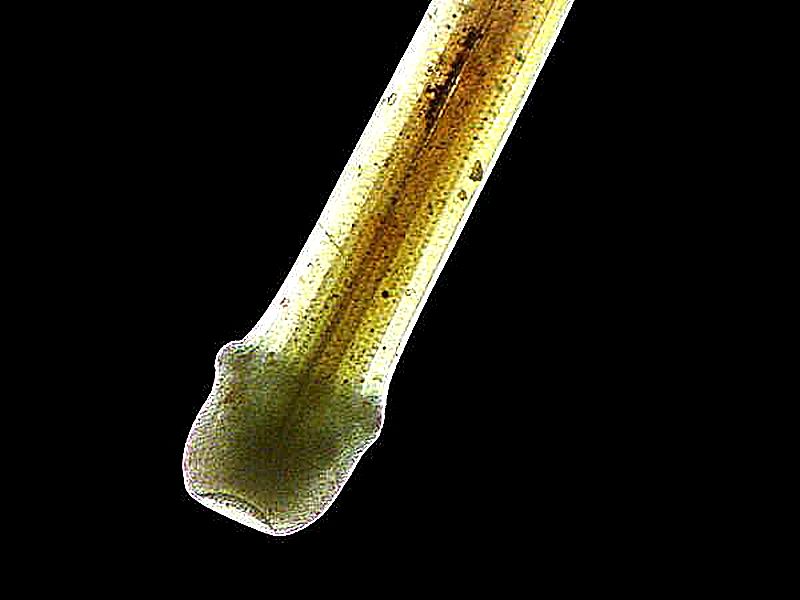
Staining presents many possibilities with such a wide variety of specimen materials that it is impossible to cover such a vast field in a short essay, but I will try to briefly cover a few basics. The first rule is to stick with the classic, tested, tried and true reagents that can be readily obtained from a supply house. From my point of view, it’s desirable to have Methylene Blue (a multi-purpose, polychromatic stain); a good hematoxylin stain, such as, Delafields’s or Harris (preferably the version without mercuric oxide); Alizarin Red S (which has an affinity for calcium), so is very useful for differentiating calcareous material; Janus Green B stains mitochondria; Neutral Red is a good contrast stain and reveals Neutral Red granules in some ciliates, such as Paramecium.
Many aquatic invertebrates are either contractile or distort rapidly when fixation is attempted. Protists are particularly problematic and my three favorite relaxants are 10% methyl alcohol, 1% Magnesium sulfate (Epsom salts) and 2% to 3% Copper acetate. Methyl alcohol is easily obtained at a hardware store, Epsom salts at a drugstore, and some biological supply houses will sell small quantities of copper acetate to individuals even if you are not associated with a university or research institution or if you know a local pharmacist, he or she might be willing to order a small quantity for you. I especially like Copper acetate as it allows quite delicate control and a gradual paralysis with minimal distortion. When reactivity is minimal, then a fixative needs to be added.
Magnesium sulfate is another exceptionally useful reagent which can be applied to both freshwater and marine invertebrates. It has the additional advantage that the commercial drugstore variety is as good or better for our purposes than the refined chemical; it’s cheap, it’s easy to take along on field trips, and it works from hydroids to polychaete worms to echinoderms and ascidians.
As for methyl alcohol, it’s a technique to get the organisms totally drunk and this stuff is poisonous, so don’t drink it–don’t even spill it on your skin. This reagent also has the advantage of allowing fine-tuning the effects somewhat by adjusting the concentration.
So, for brightfield illumination, experiment with filters and stains to enhance contrast and reveal detail.
Next, let’s briefly consider oblique illumination. There are special substage condensers that were made specifically for oblique illumination, but they were rare and expensive. For starters, you can use a stiff, heavy sheet of black construction paper. If your condenser has a filter holder, you can cut a circle of the paper that will fit neatly into the holder. You can use a compass to draw a line along which you can cut smoothly. Some compasses allow you to replace the pencil with a small, sharp blade which means that you can quickly cut a circle with a clean edge. The solid circle will, of course, not let any light through, so now you get to experiment. You can cut out a wedge, rather like a slice of pie, from the disk.
Another pattern that is commonly used is created by cutting a small arc along one edge.
If you consult some older textbooks on micro-technique, you will find drawings of traditional oblique stops. You should experiment with both size of cuts and position.
Another possibility that is more high-tech can also give some nice results. If you have a microscope with a phase condenser then, with a bit of practice, you can get some fine contrast simply by throwing the condenser out of phase and you don’t even have to be using phase objectives; in fact, it’s preferable not to.
Use a phase telescope or a Bertrand lens to make sure that the rings in the phase turret are properly centered, then very slowly rotate the turret to move the ring off-center. A very small movement can produce a dramatic shift. The full field will not be evenly illuminated and this, when properly “misaligned” will produce a pseudo-3-dimensional effect as well as enhancing contrast.
The third approach is darkfield which, I will warn you in advance, is addictive. A minor drawback is that it takes a fair amount of practice, patience and persistence to get good digital images with darkfield. For your first-time trial, I recommend taking a drop of a rich culture of Paramecium which should always be kept on hand, since it is such a wonderful and mysterious organism and is easy to culture. Again, you can make your own disks using construction paper and a sheet of sturdy, clear plastic. Cut the black center disk and glue it to a plastic circle you have cut. Each objective will require a different diameter disk. Again, older books on micro-technique will often provide details. The basic concept is quite simple; you want the disk to produce a black background so that the remaining light comes in at angles such that the specimens appear to glow and glimmer against the black background, especially when they are in motion. To get the best results you will likely have to engage in a fair bit of trial and error.
If you are fortunate enough to have an advanced microscope and the luxury of a separate darkfield condenser, then you really are a candidate for serious addiction. Such a condenser from a major manufacturer is a minor technical work of art and when properly aligned and adjusted can produce ocular intoxication. It is a tad messy to use; you have to place a drop of immersion oil on the top lens of the condenser and then slowly raise it until the drop comes into contact with the bottom of the slide which has your specimen on it. The oil drop needs to be big enough so that when you make contact, it fills the field of view and doesn’t contain any air bubbles, but not so large that it runs over the lens and down onto the condenser. In any case, after you finish your session for the day, you need to remove the oil from the condenser. There is considerable disagreement among the experts regarding what is a safe and effective way to do this. Most agree that alcohol is NOT a desirable cleaning agent for lenses. It is an aggressive solvent and over time can dissolve the cement that holds the lenses in place. The debate about the use of solvents, such as, acetone, toluene, xylene has been intense and there is a wide range of opinion. Two points of agreement are 1) if you use such a solvent, use as little as possible, and 2) apply it and clean and then remove as quickly as possible. There are some less aggressive commercial solutions which can be purchased and you may wish to try one of those. Some microscopists remove only the excess oil with a cotton swab and store the condenser in a dust-free plastic case. The risk with this method is that over time, oil may seep down into the other lens elements producing problems that usually can be dealt with only by a professional technician.
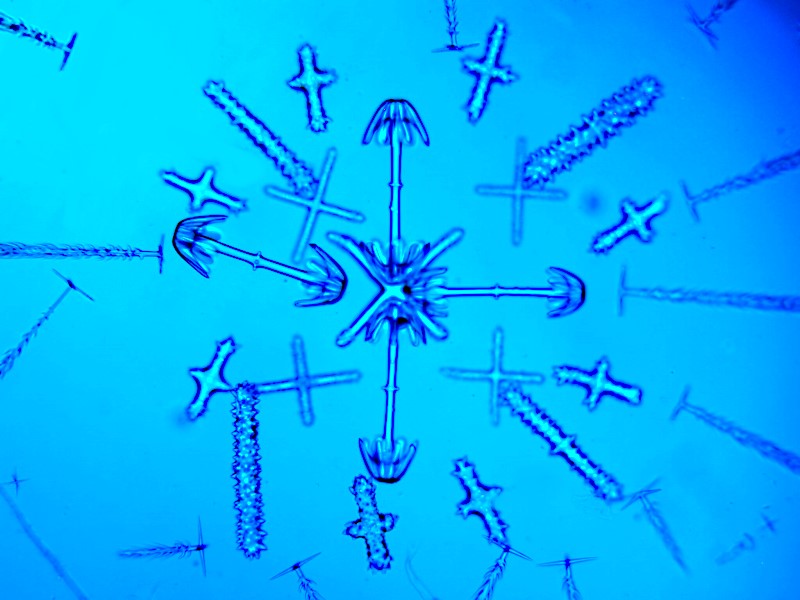
In the late 19th Century, Julius Rheinberg developed a wonderful contrast method using colored filters. Several articles on Rheinberg illumination have already been published on Micscape and so I will limit my discussion to just a few remarks and a few images to illustrate the technique. (If you do a search on MICSCAPE for Rheinberg, you will find a number of helpful articles.) Today, we are in the very nice situation of having access to a wide variety of colors in plastic sheets which can easily be cut and sized to fit almost any compound microscope. It just now occurred to me in writing this that I have never thought of trying to apply Rheinberg to a stereo-dissecting microscope. So, I cut some disks from a few of those cheap student essay folders and did a quick trial. Not very encouraging. I will try once more later with a different color combination, but I suspect that the results will be indifferent at best. In the meantime, here are 3 Rheinberg images taken with a compound microscope. This first one is a strew of siliceous spicules from a glass sponge of the genus Hyalonema. Because they are composed of silica, they would appear as simply transparent with brightfield illumination.
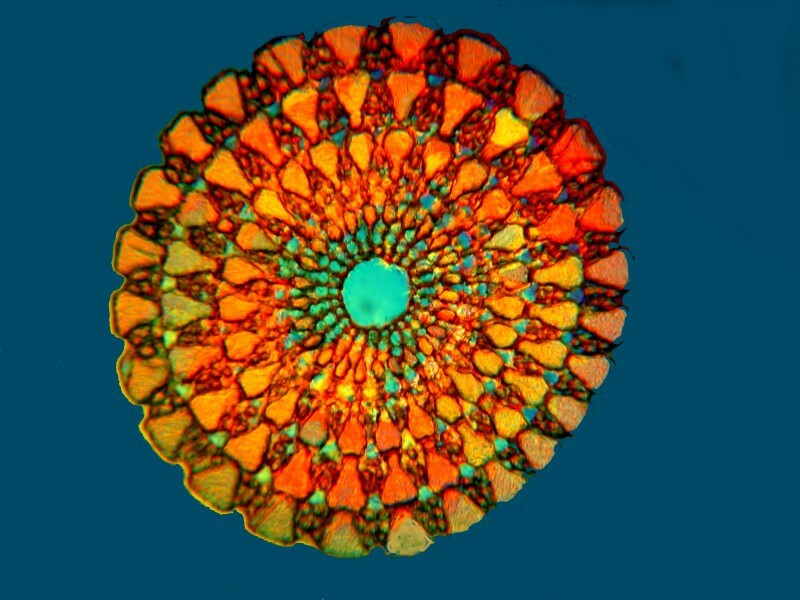
This second image is a cross section of the spine of a sea urchin. Since it is calcareous, it would be colorful with polarized light, but it is even moreso with Rheinberg.
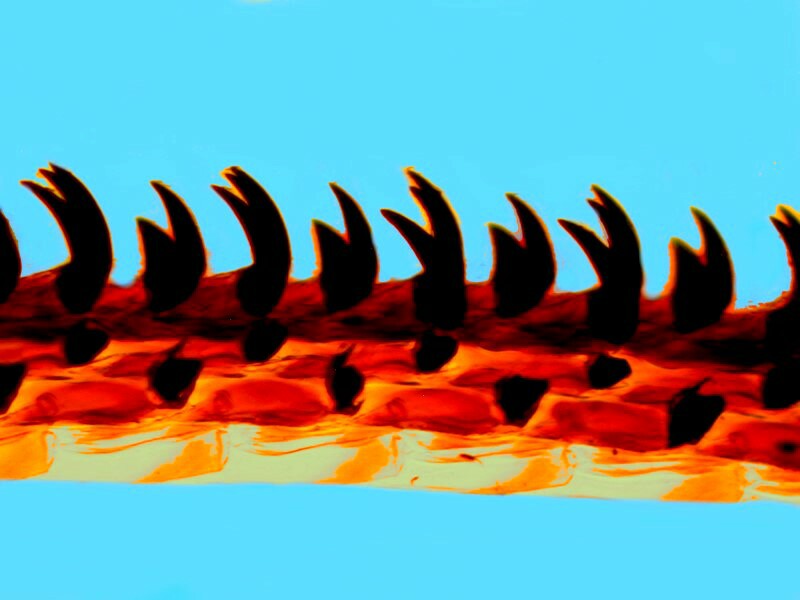
The third image is a section of the radula (tongue/tooth apparatus) of a snail. Using Rheinberg shows up detail that would not be as readily visible in brightfield.
Regarding polarization, most of you are already familiar with the basic principles and again, several articles on polarization have already been published on Micscape. As a consequence, I shall only give a brief oversimplified description and a few images. When light passes through a condenser, it comes out at a wide variety of different angles. Putting a polarizer at the substage in the light path transforms the light beam so that all of the rays are now parallel to each other. When the light now passes through certain kinds of specimens, which are described as being birefringent, differences in density, thickness, and angle bend the light waves at different angles and when these light rays pass through an analyzer, these differences show up in different colors. The difference between a specimen observed with ordinary brightfield illumination and polarization can be striking. Here are 2 examples. The first is a cross section of a pine needle with brightfield and the second is with polarized light.
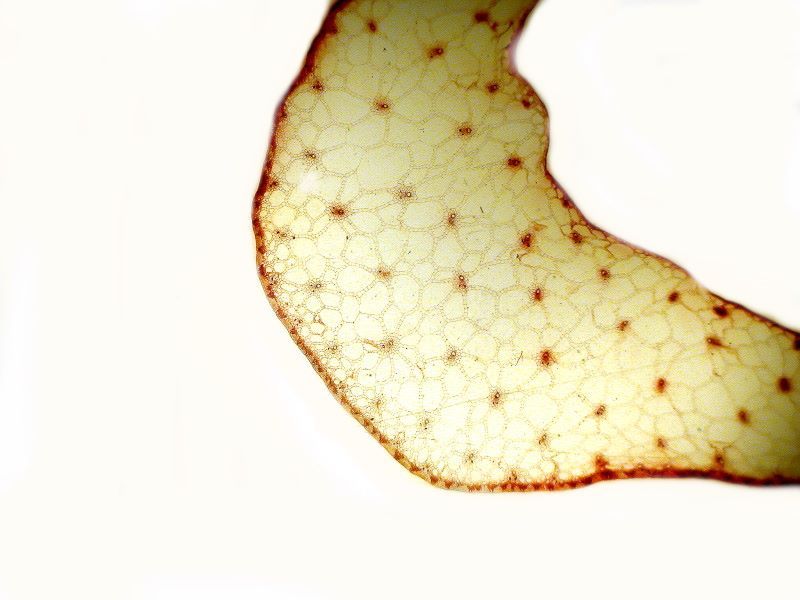
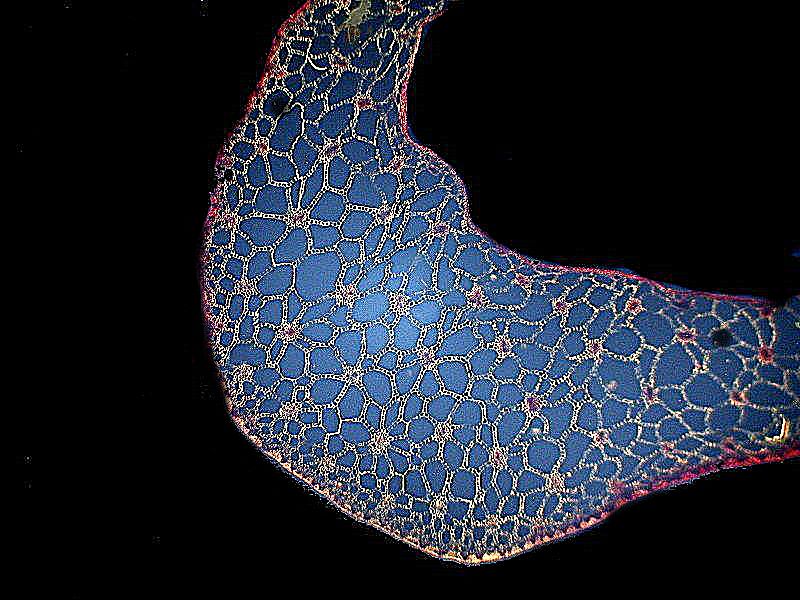
The second example comes from the genus Cucurbita which consists of the gourds and pumpkins. This was taken from a 19th Century slide and there was no identification beyond the genus, so I can’t tell you anything more about it.
The first image is with brighfield and the second with polarization.
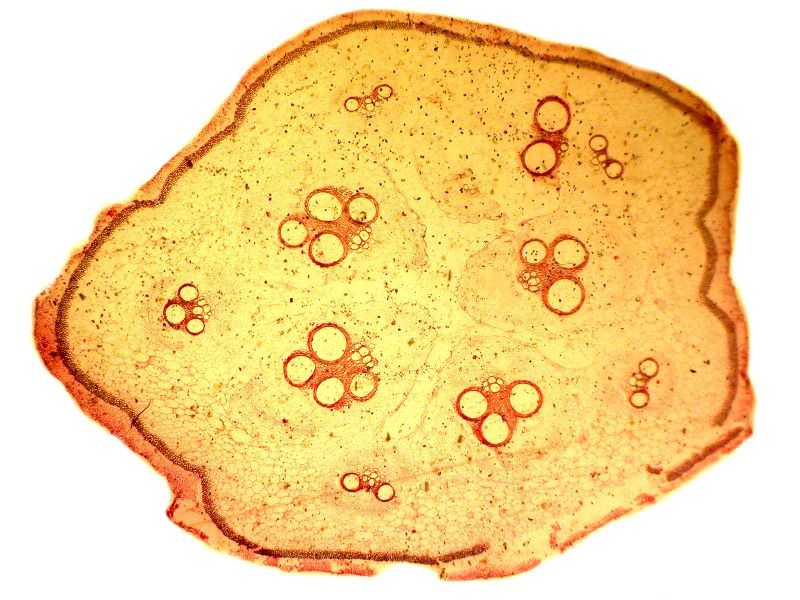
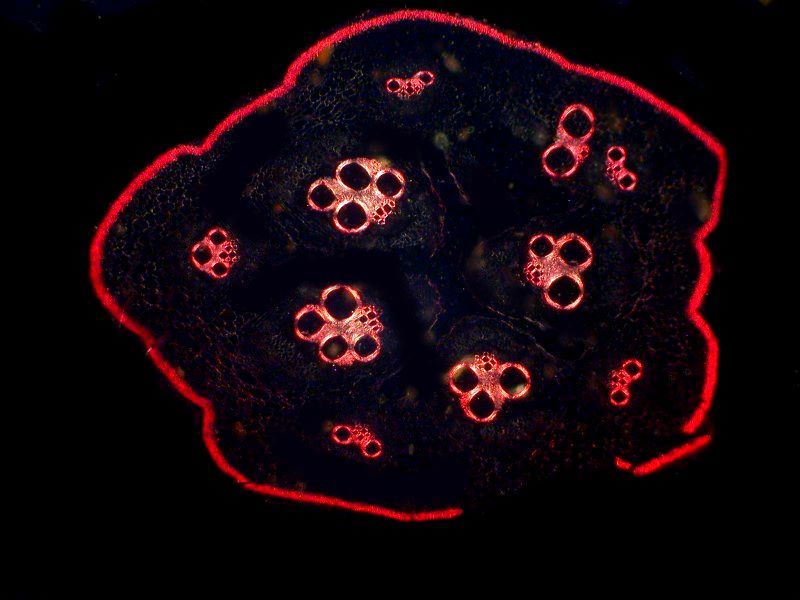
[Note: Even through the polarizer (substage) and the analyzer (above the specimen and objectives) may be made from the very same sheet of polarizing material and thus are, for all practical purposes, identical, the distinction is nonetheless of vital importance. Ideally, the polarizer and analyzer should both be of a very high quality, but if for financial reasons, you find it necessary to take cost-cutting measures, then make the sacrifice in terms of the polarizer; it is essential that the analyzer be of high quality. Even an inexpensive polarizer will generally provide reasonable parallel alignment, but once the light has passed through the specimen and the objectives, it is crucial to have high quality material that will translate the optical information resulting from density, thickness, and angular shifts with precision.
If you want to do a simple test to make certain that you have good quality polarizing material, you can take two filters (or cut them from a polarizing sheet) and hold them up to an ordinary incandescent light bulb so that you can view its filament. Rotate one of them until the polars are crossed. If you get extinction, that is, if the field is consistently dark, then you have good filters; on the other hand, if you get a purplish image of the filament of the bulb, then you know that the polarizing material you have is of mediocre quality. If you have or are considering buying an older, modular research microscope that has polarizing capabilities, another thing to watch out for is delamination. If there is only very slight delamination around the edge, there may not be a significant problem but, unfortunately, once the process has begun, it may often continue to other parts of the filter and finally radically degrade the quality of the image. When there is even slight delamination, especially in an analyzer, the best course is to replace the filter. With some systems this can be a difficult challenge for an amateur and may require professional (expensive) replacement.
Luckily, even with simply good, as opposed to excellent, filters, one can achieve spectacular and satisfying results, so long as you’re not trying to do critical research or win prizes or grants. Certain specimens can be greatly enhanced by the introduction of a compensator into the light path. If you are fortunate enough to have a dedicated polarizing microscope, then compensators should have come with it. If, however, you have a large, older, modular research microscope with slots that will accommodate an analyzer and compensators, they may or may not have been included and to purchase them as accessories, if you can find them, can be quite expensive. There was a company that made 2" x 2" plastic squares of material that were 1/4 wavelength and full wavelength at $4 each. Recently, I was checking on these for a friend and found that they are no longer available. For my purposes, the full wave plate is the most useful (not to mention the one which tends to give the most colorful results). It is also known as a Red 1 plate or a Rot 1 Plate (which is the German designation found on compensators from companies such as Leitz and Zeiss. Rot is the German word for “red” and rhymes with “note”). If, however, you can’t find any compensators, don’t worry. You can get some very nice, if somewhat random results, using the lid (or bottom) of a plastic Petri dish. There are so many different kinds of plastics these days that you may want to experiment a bit until you find a type that gives you the most satisfying results. By tilting the dish at various angles, you can vary the color patterns. I use this make-shift device frequently with my stereo-dissecting microscope and a neat, little polarizing accessory which I discussed in an article recently. The rim of the Petri dish in not a problem in this instance where there is plenty of working distance. With a compound microscope, however, working distance becomes much more of a factor especially with objectives having a magnification greater than 10x. Fortunately, there is an easy solution; cut off the rim of the Petri dish and what you have left is a flat, plastic disk that is quite easy to handle. Here is an example of crystals with and without my Petri compensator. The first image is with polarization only and the second combines polarization and a Petri dish compensator. To my eye, the colors in the second image are subtler and more pleasing.
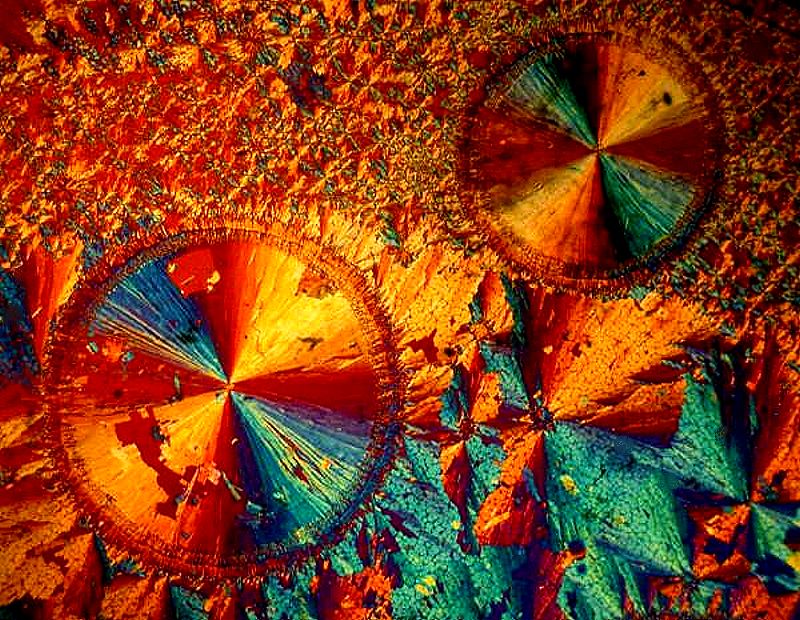
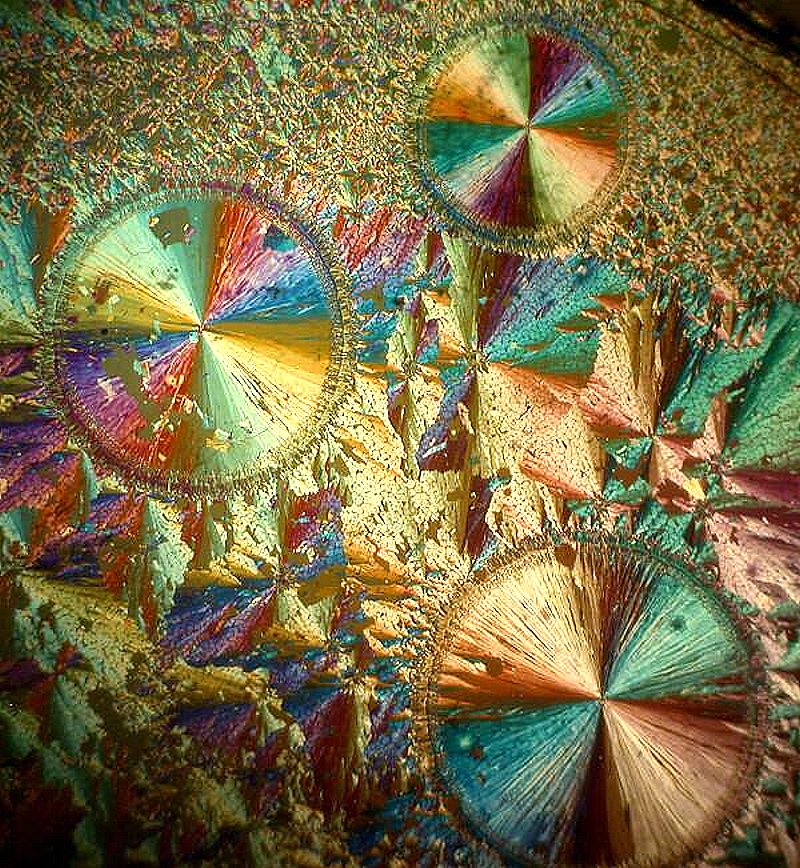
Experimenting with various types of illumination can be highly gratifying and provide not only enjoyment, but additional perspectives and information that enhance our understanding.
All comments to the author Richard Howey are welcomed.
Editor's note: Visit Richard Howey's new website at http://rhowey.googlepages.com/home where he plans to share aspects of his wide interests.
Microscopy UK Front
Page
Micscape
Magazine
Article
Library
© Microscopy UK or their contributors.
Published in the May 2021 edition of Micscape Magazine.
Please report any Web problems or offer general comments to the Micscape Editor .
Micscape is the on-line monthly magazine of the Microscopy UK website at Microscopy-UK .
©
Onview.net Ltd, Microscopy-UK, and all contributors 1995
onwards. All rights reserved.
Main site is at
www.microscopy-uk.org.uk .