|
Raspberry
Pi HQ Camera by Howard Webb (Bloomington, IN, USA) |
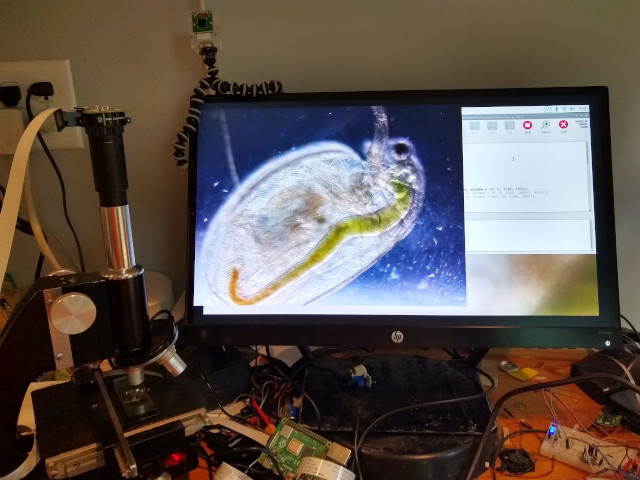
Over the years I have tried different USB and digital cameras, from the early Intel USB camera up to the Raspberry Pi model 2. While I have had some good results, they always left me a bit disappointed: either a limited number of pixels or my DIY mounts were awkward and difficult to align. Even with a cell phone, I was left with vignetting that wasted a lot of the available pixels.
When Raspberry Pi came out with a new $50 12.3mp HQ camera that has a C/CCS adapter, it looked like I finally had found something with plenty of pixels and standard interfaces. It easily paired with a C mount microscope adapter and its 0.5 lens meant the Sony sensor was fully lit.
There are always details that complicate things. Being a programmer and working with Raspberry Pis, this was an easy decision and simple project for me. If you are not familiar with the Raspberry Pi, this will require a bit more effort. In addition to the camera, you will need a Raspberry Pi computer, power module, SD card, HDMI cable and a monitor - and a microscope. The total cost is under $200; $35 for the computer, about $100 for a monitor plus extra parts. You also need a microscope. If you are not into DIY computers, the $30 adapter and an digital camera could give you equally good results. If you are already into Raspberries, and don't have a microscope, there are some interesting C mount microscope lens available for under $80. Having given you some warnings and options, I will get into the details.
Raspberry Pis have a full Linux operating system, and come with a Python programming environment, complete with a PiCamera library already installed. You don't really need to know Python, as there are examples and free code available (email me for my code). Thus, after loading the operating system onto a SD card, I only needed to write the camera program.
For my program, I started with a basic recipe and added a bit more code. I expanded the logic so the 'c' key would trigger the capture of an image to a file, and 'v' to capture several seconds of video. I have played around with adjusting the camera settings, but found that leaving everything as defaults works quite well.
My old Bausch & Lomb monocular has been my standard work-horse, and performed wonderfully for this project. Since I can control the focus and adjustments from the screen, there is no need for a separate camera port on the microscope.

These were some quick tests, more to
see what the camera would do than microscopy technique. These were
some quick grabs from my rain-garden rather than a deliberate effort to
find specific subjects. These are all simple wet mounts with no
further preparation.
Algae 10x objective, bright field (click for full size image)
Rotifer 40x objective, bright field (click for full size image)
Spirulina 40x objective, bright field (click for full size image)
Algae with clam shrimp shells, 10x objective, dark field, image stacking (click for full size image)
The other nice think about the Pi camera is the HD video.
Rotifer, 40x objective, bright field
Loxophyllum, 20x objective, dark field
For what I do I am finding the 12.3mp
to be quite sufficient - capturing plenty of detail without wasting
pixels on useless magnification (ie magnification without
resolution). I can throw an image up on a big screen TV (which can
also be used as a HDMI monitor!) and the image still looks sharp with a
lot of detail. There is always a desire for more pixels, and there
are DSLR cameras with 24mp and greater available, but for the price,
this gives me a lot to work with.
This digital set-up is also an advantage. I have some issues with my eyes (floaters and cataracts) so that normal viewing through my monocular microscope is not as enjoyable as it use to be. Being able to do all my work from a 22 inch monitor brings a lot of the enjoyment back, no eye strain or uncertainty of the focus. I can capture exactly what I am seeing.
I haven't done much microscopy for a
while, but this definitely will get me back hunting my favorite
specimens and working on my technique.
Technical Details Microscope: Bauch & Lomb monocular, 4x, 10x and 40x objectives.
Comments to the author - Webb.Howard AT gmail DOT com are welcomed.
Published in the September 2020 edition of Micscape Magazine.
Please
report any Web problems or offer general comments to the Micscape Editor,
via the
contact on current Micscape Index.
Micscape
is the on-line monthly magazine of the Microscopy UK web
site at http://www.microscopy-uk.org.uk/