Cheap
'n cheerful phase contrast with a LOMO Biolam or similar student microscope
by David Walker, UK
For the microscopy enthusiast on a limited budget a dedicated phase contrast microscope can be expensive and a maker's phase upgrade outfit can also be pricey even for student microscopes like the author's LOMO Biolam. However, as other enthusiasts have also shown, it is often straightforward to adapt a student microscope to limited but workable phase at modest expense. It just needs one (or two) cheaper examples of phase objectives that can often be picked up on eBay and the centering annular rings can be homemade for an Abbe condenser filter tray (see footnote below). It won't be as slick to use as a proper phase system but can give competent results and a way of assessing whether full phase is needed.
My occasional need of phase is satisfied by the route described below using a Biolam stand. Similar student stands may also be amenable to such an approach.
Choosing the phase objective: When I owned a dedicated phase microscope with four phase objectives, there was only two, the 20x and 40x that I used regularly, the 10x and 95x I rarely used. (This may differ for other enthusiasts depending on subjects studied). So for my Biolam I looked around for a cheap 40x phase in the first instance. A benefit of choosing a medium power objective is that the annular rings required are usually larger than for low power so are easier to make.
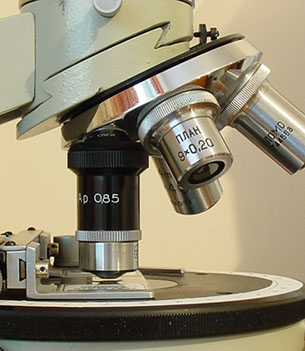
I avoided modern big name objectives and bought an older Zeiss Winkel phase objective off eBay with a very slight but inconsequential mark on the front element which kept the price very reasonable. The 42x NA0.85 objective gave the bonus of a higher NA for brightfield as well as a higher performance phase objective cf the typical achromatic 40x NA0.65 phase objective supplied in the LOMO upgrade kits.

A Zeiss Winkel 42x NA0.85 phase (dry) on the Biolam nosepiece. It's not parfocal with the LOMO objectives but by getting to know the working distance of each objective, interchange of non parfocal objectives is quick and safe. Even with live specimens lack of parfocality isn't a problem, as for extended viewing the subjects are gently immobilised so offers plenty of time for changing objectives and refocusing. (The 'Ap' on the objective I initially assumed to mean apo as stated by the eBay seller but this may not be the case. See this interesting Yahoo Microscope thread.)
Making the annular ring for the condenser: Various ways of making the rings to sufficient accuracy have been described, the route I prefer is to make a 'ruler' for the condenser filter tray and read off the inner and outer annular ring dimensions seen in the back focal plane of the objective that match the superimposed objective phase ring (see this Micscape article). In the earlier article I used a fine pen to make the ruler, but CAD software can do a much neater and more accurate job as shown below.
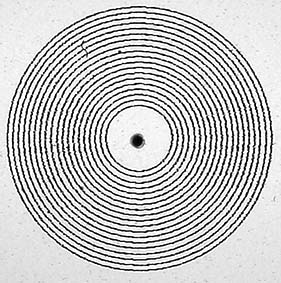
The 'ruler' used for the filter holder of the Abbe condenser. The rings are 0.5 mm apart and span 3 - 12 mm, a range most annular phase rings are likely to be. Printed out with CAD software and inkjet printer onto printable acetate sheet. The file in TurboCad TCW format is here if of use to others. (Right mouse click on link and save to hard drive. Most CAD packages should be able to import this format.) File prepared by Ian Walker, with thanks.
The annular ring boundary lines required can be printed onto acetate sheet with the already calibrated CAD drawing package. The black fill-in can be made with a printer, but I haven't found either an inkjet or laser printer to give a sufficiently opaque result. Some enthusiasts report sticking two printed out rings together to improve this. Another way to improve the opacity is to print out with the fill-in then carefully overpaint with a few layers of matt black paint using a fine brush and slide ringing table to give a completely opaque result. Painting almost up to the annular ring borders can be accomplished with a brush trimmed to a fine point and using thinned ink but avoiding the exact boundary to retain the printer's neat phase ring boundaries.
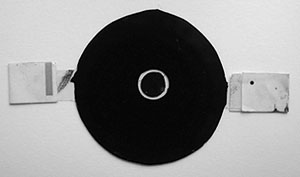
Phase annular ring made of acetate sheet, the tabs are paper labels on extensions of the acetate sheet. As long as the phase ring boundaries are concentric, exact concentricity of the annulus with the filter itself isn't vital, as this is readily corrected with the manual centering. It is possible to make smarter versions, but it doesn't need to look pretty to get good phase results!
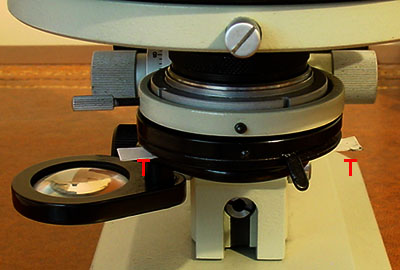
The phase ring in the LOMO Abbe condenser filter tray. Centering the ring using the tab's marked 'T' is quick and accurate. The only downside cf using a proper phase condenser with centering screws is to avoid jogging the filter when in use. The acetate sheet sits on a blue clear glass in the filter tray so it slides on the glass rather than sitting in the tray.
Using the phase ring: The ring is aligned in the usual way by inspection of the objective back focal plane with a phase telescope. The ring is not as accurate as the correct maker's ring and phase condenser but slight changes in the LOMO Abbe condenser focus corrected for these. Slight imperfections in the annular ring's circularity may give less than top notch phase cf a proper phase outfit, but I've been pleased with the results and give that extra satisfaction that can be gained from 'homebrew' cf. using 'off the shelf' solutions!
I prefer a proper phase telescope as it's a one off purchase and such a useful accessory e.g. for polarisation studies, although enthusiasts have reported homemade low power telescope alternatives. Leica and Wild examples recently sold on eBay for ca $40 each, so lesser brands should be cheaper.
Some results with the 42x objective. After using a Cooke phase microscope for many years I believe the results are comparable at this mag. My Sony S75 digicam doesn't cope well with critical focus photomicroscopy so have defaulted back to video stills from a 'C' mount colour security style camera, with Snappy video still capture box.
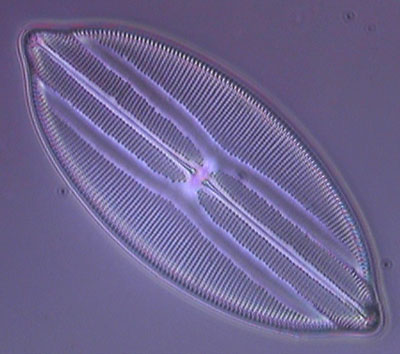
The
diatom Navicula lyra mounted in Hyrax. The visual image gives crisp resolution of
detail but the video still
can't quite resolve the detail at this mag. 'Test plate 8 forms'
made by and with thanks to Klaus
Kemp.
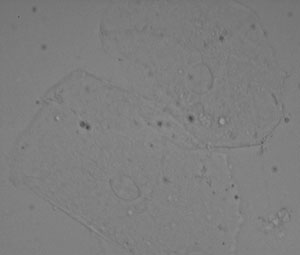
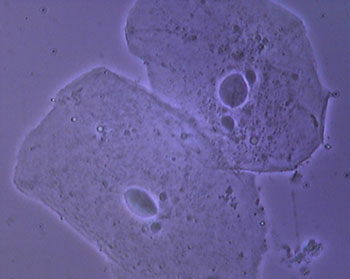
Left:
Epithelial
cheek cells unstained, brightfield with the 42/0.85 phase objective.
Right: The same
subject but with homemade phase ring and Abbe condenser.
Comments to the author David Walker are welcomed.
Footnote: There's downsides of mixing maker's objectives of the same tube length, including potential lack of parfocality with other objectives and incompatibility with eyepieces owned. I'm use to having a mix of maker's objectives on a nosepiece and parfocality is not vital. Another approach is to seek out the 'scope maker's correct phase objective which will be parfocal and make the annular ring as described, thus still avoiding the need for a full phase kit. Even with the latter approach, homebrew phase is not guaranteed to work on all stands. With the Russian Abbe condenser an annular ring placed in the filter tray is nominally in focus in the back focal plane of the objective when the condenser is correctly set for brightfield, thus allowing correct phase adjustment, other condensers may not fulfil this requirement. This sort of approach works best when bargain basement single phase objectives can be found on eBay or club meets so no undue expense is incurred if it doesn't work, but this 'try it and see' method is part of the fun of microscopy for me!
Please report any Web problems or offer general comments to the Micscape Editor .
Micscape is the on-line monthly magazine of the Microscopy UK web site at Microscopy-UK