 |
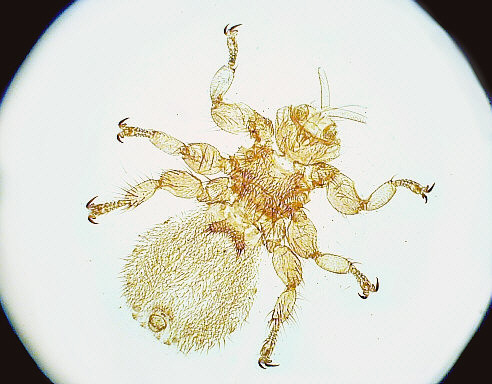
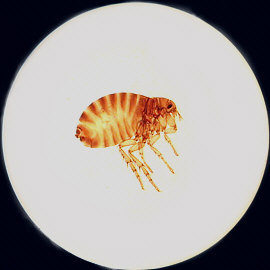
| Wild M20's field
here is over 12 mm and easily encompasses this sheep tick using
a x3 converter placed below a x3 achromat objective. Viewing quality is excellent. On-screen magnification here is approximately x11. |
| Reducing the image scale of low power objectives |
| A
very simple method of increasing the field of the lowest power objectives
without reducing image quality using 35 mm camera 'converters' By Paul James (uk) |
|
|
| Wild M20's field
here is over 12 mm and easily encompasses this sheep tick using
a x3 converter placed below a x3 achromat objective. Viewing quality is excellent. On-screen magnification here is approximately x11. |
Sometimes even our lowest power objectives such as the x3 or x2.5 provide too much magnification for some specimens which cannot be encompassed within the field of view. This has happened to us all at some time, and whether we are simply observing or more likely taking photographs through the instrument, a reduction in image scale would be very convenient.Here I describe a simple method which although unconventional works admirably, using a x2 or x3 lens converter of the sort used in 35 mm photography. They are normally placed between the camera's body and the lens, and increase the effective focal length of the camera's lens by factors of x2 or x3.
If this type of converter is placed between the specimen and the low power objective, the latter's effective focal length increases, which reduces the scale of the microscopic image, thereby increasing the effective field of view.
 |
 |
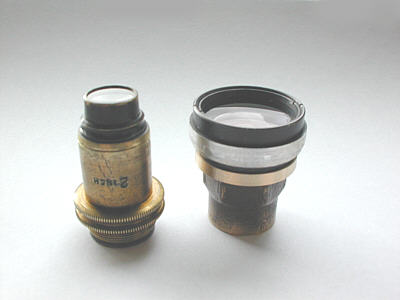
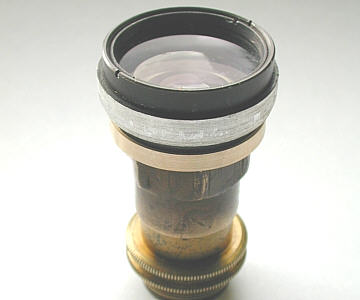
| Converter placed for initial trials | Converter's optics removed and mounted |
There are 2 points which must be satisfied to ensure success :-1) Your 'scope must be able to raise its limb (or lower its stage) sufficiently to accommodate the converter and still allow some adjustment in focussing just above the converter's lens. Both my 'scopes will easily accomplish this, so I feel most others will too.
2) Only objectives with sufficient working distance will cope, and this means usually those having amplifications of no more than about x4, x3 or x2.5 or less.
Brief methodology for initial experiments
The specimen is centred in the field of the lowest power objective, and then the objective is raised. The converter is placed over the specimen so that it is concentric with the optical system, and parallel to the stage . Focus very carefully when doing this for the first time, since both the objective and converter's glass elements will be in close proximity.
You will notice after experimentation, that if the converter is raised and the limb readjusted in focussing, the final image is smaller, and so we have a useful method of varying this reduction.
I am able to reduce the effective focal length of my x3 objective to as little as x0.5 *. I screwed in macro close up rings initially to support the converter above the specimen, and found the most desirable position of the converter before thinking about making a mounting plate to slip it over the objective.
* This depends upon your microscope's maximum spacing between objective and stage. A figure of an effective objective power of around x1 is possible with most 'scopes.
With care, no damage will result to any of the apparatus etc..
Results
Here is a typical example of the reduction involved with the Zeiss Photomic 1 using a x3 achromat objective with varying working distances and converters :-
 |
 |
 |
| Lowest power
using no converter
Objective power is x3 ( Human Flea 4 mm long ) |
with x2 converter
optic
Effective objective power is approximately x1.75 |
With two x2
converter optics.
Effective objective power is approximately x1 |
The following image was taken using a x3 converter in tandem with the x2 mounted on the objective as above. The image has been brightened deliberately to show the field boundary since the ringing is itself surrounded by black paint.
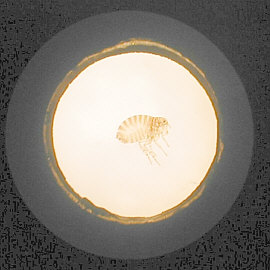 |
| This is about
as low a reduction as is
possible requiring maximum stage lowering. The effective power of the objective here is approximately x0.5 with a magnification on-screen of about x4 |
The quality of the entire field is extremely good, and I find no signs of any change in image quality even to the very edge of the field, but using two tiered optical converter units yields very slightly inferior edge of field quality, which in a typical self contained specimen is irrelevant.It is essential that the converter is parallel to the stage and also concentric with the optical axis of the objective, and any colour fringing noticed in the image is almost certainly caused by misalignments, though two element designs may show slight colour fringing , and field curvature.
Converters
By "converter" I mean an optical device housed in a cylindrical body used to enlarge the prime image from a lens used in a camera. I have no experience with reversible types, and suspect that they are physically too long to be of any use in this situation. But I may be wrong. The vast majority of converters seen second-hand are for 35 mm SLR's, and are designated a power factor of x2 or even x3.
If in doubt about about the suitability of a 'converter' you may possess, look through it at some print etc. and if it reduces the scale of the print, it will reduce the microscopic image too.
For those not in possession of a simple lens converter.........There have been a large number for sale over the last few months at Ebay (UK), and no doubt at Ebay (US) too. The prices have ranged from about £5 upwards, so they are quite reasonably priced in used condition. However, if you are quite serious about getting one for microscopy, I would recommend that you buy a multi-element type, as the simpler two element variety are adequate, but slightly inferior to their more sophisticated cousins. The latter can be more expensive though, and it may be best to obtain the cheaper type first and dwell upon your needs thereafter.
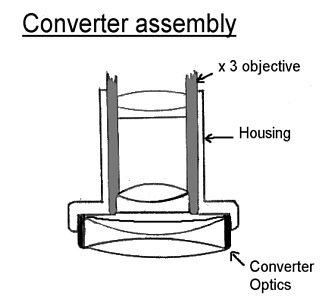
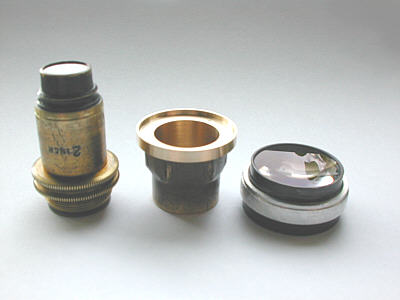
Mounting the converter to slip over the objective
Ideally, the converter can be adapted to mount on the objective in an easily pushed on/off housing.
I stripped my converter down to the bare essentials, leaving only the optics in their mount, then made a simple concentric housing fixture to enable the optic to be pushed over the objective, and below you'll see the parts which require no explanation :-
 |
 |
 |
 |
This extra work of adaptation is well worth doing, for you'll end up with a really useful and convenient method of reducing your objective's effective magnification from x3 for e.g. to about x1.75 or less using the optics from a x2 converter unit. Since this adapter will slip over the objective's casing, and remain fixed, albeit temporarily, its variable reduction facilities may have to be forfeited. This is not as inconvenient as might be imagined, since all objectives have fixed magnifications anyway.By making sure that your adapter houses the top element just far enough away from the objective's front element to avoid damaging each other, you'll obtain the maximum reduction in image size, being also dependent upon your limb's maximum height.
Some points and suggestions
1) The limiting factors regarding image reduction directly relate to the power factor of the converter, so a x3 will reduce the image scale proportionately more than a x2. The extent of reduction is limited by the limb's maximum height above the stage AND/OR by the minimum distance between the objective and converter lens optical assembly.
My Zeiss Photomic's substage assembly can be removed quickly and allow the stage to be lowered considerably, which helps reduce the image scale further, but the actual limit is governed by the close proximity between object glass and converter optic, i.e.. once they 'touch' no more reduction can take place.
2) It will be necessary to use a broader cone of light than most condensers can furnish. This is easily accomplished by removing the substage condenser and substituting it with some diffuser material and also a large lens such as a magnifying glass or a large aperture camera lens with a focal length of about 50-75mm :-
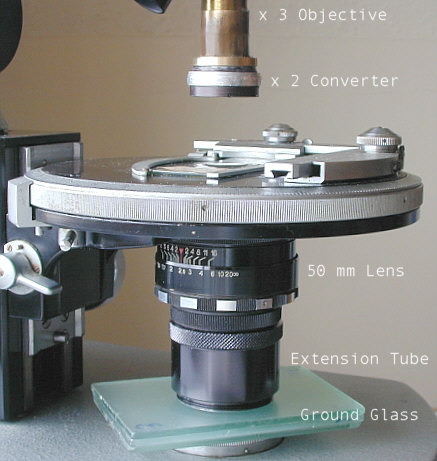 |
| This set-up works
extremely well. The lens, a 58 mm Zenith SLR f2
provides more than full width illumination, the ground glass tames the intensity well, which results in excellent imagery. The lens can be slightly offset to induce oblique lighting and therefore enhance detail. You might find it necessary to place the diffuser between the lens and extension tubes. |
3)Experiment before permanently mounting your converter, by finding which way up the optic suits your 'scope's optics best. You may find little or no difference either way ?4) Remember that the converter's concentricity and 'squareness' to the optical axis of your 'scope is utterly essential to maximise the best performance that this combination is capable of.
5) If required, two converter optical assemblies can be mounted together to further reduce image size, and this works well. Or the second converter can be left mounted in its original housing and placed over the slide, and the converter mounted on the objective focussed overhead.
The bottom line is that your objective array specification might well read now as :-
x 100, x 40, x 10, x 3, x 1.75, x 1, x 0.5
Thus fitting 7 objectives into 4 holes ?
Pro's1) Simple and easy to set up.
2) Extremely effective. The image quality I see through my x3 achromat objective plus converter, is indistinguishable from those without the converter. The cover glass sensitivity of my low power objective seems to be irrelevant in this situation, and can therefore be ignored.
3) Variable reduction too, depending upon altitude of converter above slide, the higher up the greater the reduction, but is limited by limb extension, converter design and also the minimum physical separation between the object glass and converter lens.
4) Converters are common and found easily, though finding a cheap one may take some time. Those having amplification factors lower than x2 would not be of much use.
Con's
1) Unless you mount your converter on the objective, its usefulness is limited because every time the stage/slide is moved, the converter moves also, misaligning itself with your 'scopes optics.
2) Parfocality is compromised, but this slight inconvenience is far outweighed by the quality image reduction potential at cheap cost.
All photo's taken using both Nikon Coolpix 800 and Olympus 830L digicams.
| Comments welcomed to the author Paul James. |
Please report any Web problems
or offer general comments to the
Micscape
Editor,
via the contact on current
Micscape Index.
Micscape is the on-line monthly
magazine of the Microscopy UK web
site at Microscopy-UK