|
The very basic compound microscope By Rolf Vossen, Netherlands |
Introduction
On a regular basis I look at the second hand market in my country for microscopes and parts. There is quite a long list of adverts when you search for “microscope” as many people have some optical devices to sell. The list contains a lot of “no-nonsense” compound microscopes; monocular microscopes that were intended for use in high school biology classes or otherwise. To avoid any confusion we have to draw a line here between toy or toy-like microscopes (often being advertised as “student” microscope) and proper microscopes. This article is about proper microscopes. By that I mean a microscope with a solid metal body and with achromatic standard RMS threaded objectives. Many of these particular microscopes are very basic; there’s no substage condenser with filter holder, no condenser lens built into the stage, no mechanical stage, and the illumination is provided by the good old mirror. Such microscopes are often very cheap as the maximum bidding for these items will usually not be any higher than 50 EUR or thereabouts. I expect that these kind of microscopes on average are being sold for not much more than 20-30 EUR. What can be seen with those simple microscopes? Actually, a lot. In fact, a beginner who is not really sure yet what the direction will be in the future should consider such a simple compound microscope. If it’s the wrong decision than there’s not much money lost and the microscope can be sold on for more or less the same amount of money. Beginners are often advised to buy a microscope with a whole list of specifications, this and that. I can imagine that some people who are starting out will be lost in all the features of their new microscope in the case they have a more advanced model. And what specifications does one really need? The more specifications, the more trouble shooting, the more distraction, the less observing time. Why not start out simple? Back to basics. By the time someone has mastered a simple instrument he or she will know better what to look for in a microscope. Furthermore that person will be much better prepared to work with a new fancy binocular microscope. The other day I saw an Olympus microscope being advertised for 15 EUR. I bought it and had a lot of fun with it before I sold on.
The microscope
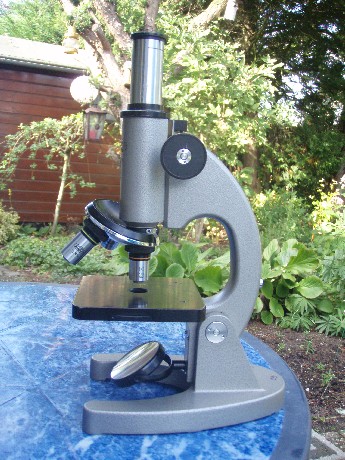
The Olympus microscope I bought is very basic, there’s not even a fine focusing knob! This particular model is quite frequently seen on the second hand market, sometimes being sold in bigger numbers coming from a high school or whatever place (fig.1). The scope is very light and small and would make a suitable travelling microscope. There is no substage condenser nor a condenser lens build into the stage. There is just a 5-aperture wheel diaphragm below the stage (fig. 2). While this is often seen as an inferior solution to an iris diaphragm it is in fact a very useful device. Like the iris diaphragm it blocks excessive light when the circular opening properly matches the objective and by rotating it a little bit further then the “stop” is provides a convenient way to achieve oblique illumination. Normally these wheel diaphragms don’t contain a frosted screen to diffuse the light to ensure an even illumination that can fill the objective’s aperture. This situation is far from ideal and resolution will suffer. A simple way to introduce a diffuser screen is to just insert a piece of white paper between the diaphragm and stage so that the circular opening is covered with the paper (fig 2). By using the concave side of the mirror the light will be more intense and will fill the aperture of a 40/0.65 objective easily. Another way is to use a piece of white paper and put it on the base or on the table under the microscope base. It will work as a reflective screen when a light is directed at it. This illumination method has already been described by Martin Canny in the December 2007 issue of Micscape magazine and I found it a very useful way of illumination without having to use the mirror.
Observations
I took pictures of several plant specimens and some pond water with a digicam on a tripod stand. The 10x eyepiece in the microscope was not a wide field high eyepoint type so the camera lens had to touch the eyepiece and maximum zoom (3x) was needed to avoid any vignetting. All pictures shown here were made using the 40x objective except figure 7 which was taken with the 10x objective. No image processing other than resizing was done after the images were taken.
Conclusions
A lot can be seen with a very cheap and basic monocular microscope like the one described though I would recommend a microscope with fine focusing. Microscopes like these can provide excellent brightfield images up to 400x magnification. With higher magnifications a condenser will be needed unless darkfield is applied with incident illumination (see my article in the September 2009 issue of Micscape magazine). Sometimes people tend to forget that compound microscopes at the lowest magnifications also can do an excellent job with bigger non-transparent specimens like complete insects and the like. With good incident illumination some nice images can be created from non-transparent objects.
A beginner should consider buying a simple microscope first to learn the skills and to find out what he or she wants before purchasing an expensive binocular scope. If it’s not going to work with a simple microscope then neither is it with a binocular research grade instrument. The interest and the fascination have to be there in the first place and then it doesn’t matter if one uses a high school microscope or an expensive laboratory microscope. Furthermore, acceptable quality pictures can be made with a simple microscope and a beginner can learn a lot about the microscopic world and about microscopy in general.
Comments
will be welcomed by the author.
The figures
Fig.1: Olympus student microscope.

Fig.2: Wheel diaphragm showing one opening covered with white paper.
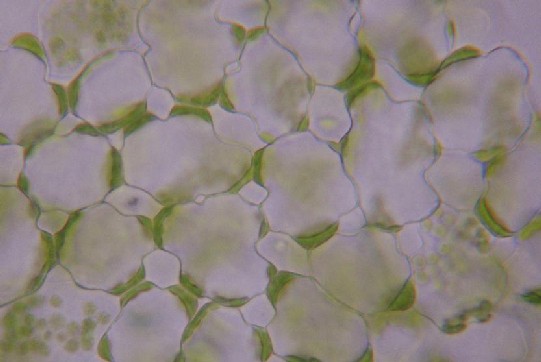
Fig.3: Epidermal cells of Valerianella locusta (corn salad) showing giant chloroplasts.

Fig.4: Chromoplasts seen in cells from a rose hip.

Fig.5: Starch grains from potato.
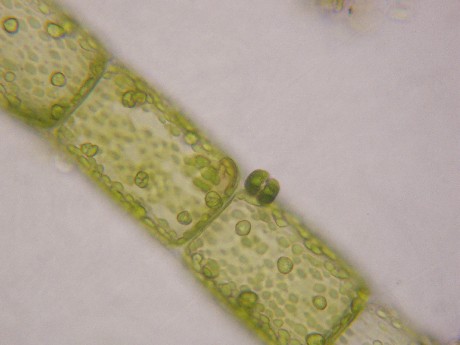
Fig.6: Filamentous algae.
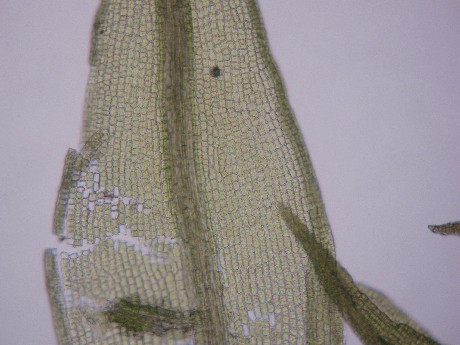
Fig.7 : Moss leaf.
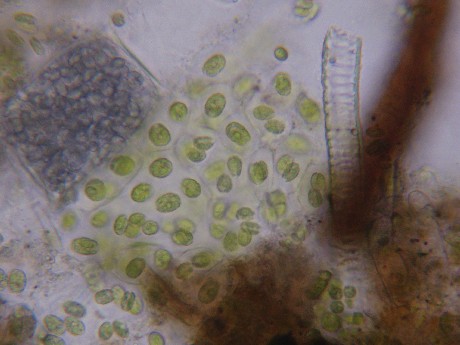
Fig.8: Mixed bag of different algae.
Microscopy UK Front
Page
Micscape
Magazine
Article
Library
Published in the October 2009 edition of Micscape Magazine.
Please report any Web problems or offer general comments to the Micscape Editor .
Micscape is the on-line monthly magazine of the Microscopy UK website at Microscopy-UK .
© Onview.net Ltd, Microscopy-UK, and all contributors 1995 onwards. All rights reserved. Main site is at www.microscopy-uk.org.uk.