The Novitiate’s Odyssey.
Episode Two: Willie in Wonderland; Through the Looking Scope…err Looking through the Scope.
by G. Joseph Wilhelm, Florida Keys, USA
It was the best of times, it was the worst of times. (A tale of two parties – Key West).
Before you ask, yes “Willie” is one of the many sobriquets bestowed upon yours truly but also one of the few that can be repeated in polite company. Among the most popular, are “The Kaiser” for obvious reasons, and after some time doing close order drill with a small assist tug during my stint as a harbor tugboat master in the Virgin Islands, I was dubbed with the two dubious monikers of “Captain Wildhelm” and “Blazing Throttles”. But that’s another sea story.
Update: As mentioned in my last article, I was using this venue to convey the fascinating world of the diminutive to my young cousin Shaun (“heir to be” to my microscopes) and to possibly instill an interest in the subject. I am now delighted to report that although he was at first somewhat ambivalent to microscopy and to being bequeathed my instruments, I now have his fervent assurance that after reading my previous article he now eagerly awaits my demise. Bless his heart. Being thus encouraged I shall continue to regale you with further adventures.
I had procured my menagerie of microscopes with methods that have established me as a shining example of bad rational thinking, the original intent being for display only. But I also demand that items in my collections be functional. Being sure that only minor adjustments, cleaning, parts etc. would be necessary to put them in working order, I was about to set about this task when my wife suggested I might enjoy doing some serious observations with them. It was at this juncture I discovered the Microscopy-UK web site and my world opened to a completely new vista, thank you very much.
All of my restoration plans were put on hold while spent some months positively gorging myself on Micscape’s veritable smorgasbord of articles in order to understand the potential and limitations of the equipment I had on hand. Actually having the microscopes in hand helped immeasurably with those seven aspects of microscopy I mentioned in the last article and I would touch on some of those as we go thru my scopes to select the best candidates for immediate restoration and functionality.
What type of scope is best to begin with?
The research.
Micscape articles scrutinized were:
“Guidelines on buying/choosing a microscope” by David Walker. This is an excellent definition of stereo, monocular, and binocular scopes.
“Microscopes” by Mol Smith (link?)
“How I choose and buy microscopes” by Gordon Couger.
Consensus: To simplify the collective opined beliefs; you should have two microscopes, one stereo and one compound (as a collector I am totally enamored with an opinion that advocates at least two of something). First is the stereomicroscope, which was considered best to start with. Here is what I have surmised as the logical reasons:
Simplicity. Easy to focus, only one knob, the low power magnification enables just a coarse focus mechanism to work perfectly and easily, just right for the beginner.
Immediate gratification. (I believe this to be one of the most basic principles for a happy human existence) The ease of operation allows the observation of even the most mundane of objects (a speck of dust, a bit of cloth, a subpoena), to be accomplished without complicated preparation or specialized lighting technique. No fussing about. Just putting the selected subject under the lens using a bright table lamp will produce the most amazing images.
Easy recognition and ability to relate to observed object. The relatively low magnification allows the beginning observer to easily put into context the images presented thru the lens. First of all, the image is upright, not reversed as with a compound scope and the observer can merely look at the subject au natural and then thru the scope without any serious confusion with a frame of reference. The subject is still recognizable, just larger. No better example of this concept can be found than in Mr. Brian Johnston’s exquisite Micscape presentations.
Lens working distance. The distance between the lens face and the object being observed is several inches. This allows for the insertion of dissecting tools, grubby fingers, and other subject manipulating devices such as the really nifty miniature horseshoe base double-jointed alligator clip specimen holder thingy and various incident light (meaning shined upon not shining thru) light sources.
It is a useful tool for further microscopic observations. Once the “line of desire” has been crossed to observe with magnifications greater than the stereoscope can afford, it becomes propitious for preparation of slides suitably discernable with a compound scope.
Next is the compound scope. These come in two basic varieties, the monocular (view with one eye) and the binocular (view with two eyes) and manifest the next step in furthering one’s microscopy interests.
The Research on compound scopes.
Articles in Micscape:
“The Compound Microscope – A brief introduction” by Gregor T, Overney PhD.
“Introduction to the Optical Microscope” by Ron Neumeyer
“Buying a Microscope and How to Use it” found in the Micscape Introduction to Microscopy suite of pages.
Although not available to me at the time, the Bruce Russell video referenced in Episode One would be an excellent addition here.
The Consensus
The obvious advantage here is higher magnification. The disadvantages (for the beginner) are the much more complicated: lighting techniques, specimen preparation and extremely small working distance at high magnification, (a high degree of focusing awareness is required here to make sure you don’t go crashing the lens thru a slide).
Binocular or monocular? The binocular version is less fatiguing and much easier to use, as we shall see.
The applications
A quick assessment of my scopes was in order so I began with the stereoscopes. Looking thru the San Francisco Tech (SFT) scope revealed clean optics and a sharp image. Then the Spencer stereoscope. The optics really needed a cleaning but the image had a completely different “feel” (for lack of a better word) to it. Much better than the SFT scope. I kept going back and forth between the two trying to determine why. Here is what I found.
The stereo microscopes use two sets of completely independent visual paths and lenses to focus on the subject at slightly different angles and gives us a three dimensional image (a pair of binoculars does the same thing but for distant objects). The alignment of these images is called collimation and if the instrument is not perfectly adjusted, the images will overlap somewhat like when you slightly cross your eyes. If the images are just slightly out of collimation the eyes will involuntarily correct themselves to form a collimated image just as our eyes do to naturally try and focus on the every day images we view directly. This unconscious correction will go virtually unnoticed if viewed for a limited amount of time or there is no direct comparison to an aligned image. After time the resulting eyestrain will become readily apparent and uncomfortable. The SFT scope was out of collimation and the Spencer was dead on the mark. I didn’t notice it until I had the two side by side. The difference was amazing, the Spencer was soooo… much more comfortable to view thru.
NOTE: A binocular compound scope also collimates the images but does so as parallel visual paths before the single objective lens thus giving a flat two dimensional view. Just like a telescope with one front lens and two eyepieces would do. (This makes me wonder, shouldn’t binoculars be referred to by the more accurately descriptive term “stereonoculars” and telescopes as “monoscopes”? Just a thought…I don’t think it will catch on)
So even if I can successfully realign the SFT scope the Spencer would still be the more versatile if a cleaning of the exterior and interior optics can be accomplished.
Which of the monocular compound scopes to refurbish? This was a no-brainer. The 1920s Bausch & Lomb was the only complete monocular scope of the lot and was fully functional except for the easily remedied seized inclination joint between base and arm. The 10X and 43X objectives appeared clear as well as the 10X eyepiece. I didn’t check the 97X objective for functionality other than an exterior inspection as I had no slide to view, it required immersion oil, which I did not have and the lens spring-loaded mechanism was seized. All of this was of no real concern as there were plenty of affordable after market lenses available of comparable or better performance. Since this was a monocular scope there were no collimation difficulties to deal with but upon examination of objects with the lower power objectives, a totally unanticipated visual bugaboo came to the fore.
Except for the notable likes of Vice Admiral Horatio Lord Nelson, Moshe Dayan and Rooster Cogburn, those of us with two good (but aged) eyes tend to use both for our normal regimen of ocular sensory input. Those mechanical contrivances that preclude the use of both eyes, such as telescopes, monocular microscopes and peep holes, force our visual receivers into an unnatural state. The recommended technique is to keep both eyes open and try to allow the brain to present the view through the instrument as the “dominant” image. The common practice of closing one eye to force this image puts a strain on the open eye to focus and can contribute to rapid viewing fatigue. In my particular case I was having great difficulty with allowing my brain to present the instrument image as dominant on its own (actually, allowing my brain to do anything on its own results in a less than satisfactory eventuality). I tried closing one eye but it made the other squint, a cupped hand over the eye worked but then I could not focus and manipulate the viewed object at the same time. My older microscopy technique manuals illustrated various hoods, shades and blinders that mounted on the scope or eyeglass frames but none were at hand. My optometrist held a black cup shaped disc attached to a wand over my eye when I read the eye chart and I thought this would be a solution but quickly realized I couldn’t afford to hire the optometrist full time.
What to do?
An eye patch! And I just happened to have one. A little rummaging around produced a really nice black leather eye patch with a leather band to tie around the back of my head. This had been anticipated but unneeded after my cataract surgery. Unused and perfect! It worked, but after a very short time there were some severe side effects, to wit:
While still adorned with this ocular accessory I caught a glimpse of my image in the mirror and was somewhat amused at the apparition. I seemed to be looking at another persons face. It was getting late, my energy was waning so I finished my after dinner aperitif of amaretto laced with coffee and further pondered my reflection. An eye patch for Pete’s sake. It was the quintessential badge of the seafaring rogue. I thought back to my own days on the sea in the Caribbean, the pirate stories and boisterous celebrations. I soon became caught up in the revere of my memories and was muttering “Arrrgh” and “Avast me hearties” for no apparent reason. I began searching for a peg leg and fifteen other fellows with which to stand on a dead mans chest. Unable to contain myself I grabbed a tri-corner hat and an 18th century cutlass from my collection and burst upon my wife in the living room brandishing my weapon and bellowing “PREPARE TO BE BOARDED”!
Now…Dr. Phil tells us that there are marriages that tolerate, endorse and even encourage such displays in return for certain intimate rewards. However, the prevailing interactive social protocols and policies in my abode do not make any provision for such aberrant behavior (I think it was the coffee). I was stopped cold in my tracks, very cold, by my wife’s spontaneous outburst of stunned silence and shortly thereafter I was de-patched, disarmed and further disciplined with one hand on her hip and with the other on the end of a gracefully outstretched arm and gently curving wrist she indicated with a delicate index finger the precise piece of living room furniture that was to be my accommodations for the evening.
It was this moment; in a rare flash of lucid cognizance I realized a monocular compound scope was not to be my choice for serious observations.
(I now had to have a binocular scope. The mere formation of this thought stirred the evil spirits of eBay once again but since having the shock therapy I was in more control of myself this time. I should have the results of this search by the next article.)
The restoration and test drive of the 1944 Spencer
Sounds like a car doesn’t it?
The view thru the Spencer was dim, grainy and not a lot of contrast. These are the signs of a really dirty optical train. Removing the eyepieces and looking down thru the tubes I could see the surface of the first prism. It was loaded with dust in a tacky light film. The eyepieces were also dirty inside and out and the plano convex field lens had its flat side facing down in one and the convex side facing down in the other. The objective lenses had the same dusty film as well as did the bottom prism face. Some disassembly was going to be required to reach all the surfaces on the prisms and eyepieces but not the objective lenses. I started looking at the recommended methods to clean these surfaces.
The Research
Articles reviewed were:
“Microscope objective lens cleaning – Best practice review” by Colin Duke
“Lens Myths” by Paul James
“Some thoughts on microscope maintenance and repair” by Robert Pavlis
“The clean microscope” by Zeiss Optical
The consensus
The jury remains out on the best technique for cleaning optical surfaces due to the variables of lens construction, coatings, types of dirt, dust, grease and other contaminants affecting the image. The Zeiss pamphlet states, “The choice for the best cleaning method depends on the nature of the optical surface and the type of dirt to be removed”. In the above listed articles the list of solvents was many and their possible harmful side effects to the optics was sometimes extreme. There were some contradictory opinions on materials and technique. The only constant seemed to be a gentle touch and the least amount of pressure and motion possible when direct contact between optical surface and swab/lens paper is the last resort. My final weapons of choice from the recommendations were:
Squeeze bulb to blow air
A very soft brush such as found in cosmetic departments
Kleenex
Lens tissue
Synthetic swabs (Not cotton Q-tips)
Distilled water
A mixture of 5-10 drops of a plain, basic liquid dish soap to 10 ml distilled water
91% Isopropyl alcohol
A benign, aqueous based commercial lens cleaning fluid i.e. Rexton lens and optical surface cleaner
A 10X Loupe or small 10X magnifying glass
The application
Disassembly was now the first order of business. The only technical information I had on the internals of this scope was a cut away drawing showing the prism arrangement of a similar scope from a 1929 catalog. Other than that basic information I was pretty much on my own. My background in dealing with the intricate and sometimes intentionally confusing trigger mechanisms of things that go boom in the night helped, and that, coupled with my high mechanical aptitude and rugged good looks should make this a doable effort.
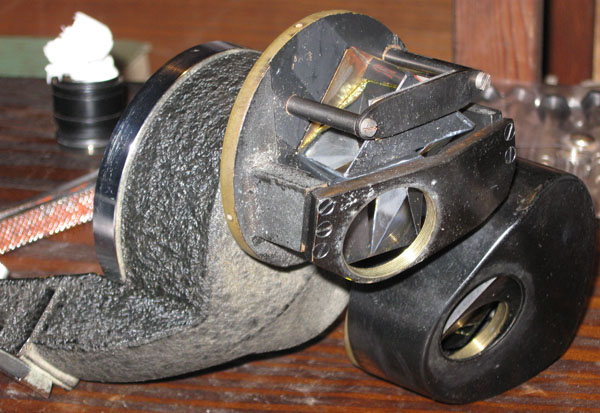
The intention here is to disassemble this instrument enough to clean the optics but not disturb the near perfect collimation. To get to the prisms, the black stamped metal covers under the eyepiece tubes must be removed. They are each held in place by three small screws and the eyepiece tubes, which are probably screwed into place. In order to undo the screws properly and with no damage I did two things. First I put a single drop of PB Blaster on each screw and let it set overnight (This stuff will loosen money from a Scotsman). Then in order to get full mechanical advantage and not damage the screw or surrounding material, I used a screwdriver that perfectly fits the slot as to width and depth (This is extremely important, if you don’t have one then grind or file one until it does. I have about 50 assorted flat bit screwdrivers for this purpose but I still occasionally have to grind a new one). After these were removed I gripped the right eyepiece tube and gave it a firm twist to the left and was able to unscrew it. Had to use a pair of padded pliers to coax the left one into compliance. The covers were removed and the prisms exposed. (Fig 1A)
Fig 1A Notice the very secure top mounting strap on the prism and the multiple screws on either end of the “bridge” that the eyepiece tube screws into. These appear to perhaps be part of the collimation adjustments for the eyepiece tubes (?) as the prisms are cemented together, probably in a jig.
The actual cleaning of the optics
(Why has it taken so long to get to this point?)
As the Zeiss pamphlet stated, we must understand the nature of the dirt. (This is akin to analyzing a National Enquirer article). Who knows when the last time (since 1944) this instrument was cleaned. The “dirt” seems to be years of accumulated dust and oily residue. No way to immediately determine if the contaminants have contributed to any etching of the optical surfaces. There seemed to be no fungus growth. I tried to take the most conservative approach by trying the least aggressive cleaning techniques in succession until victory was achieved.
A very time consuming regime was applied. First, was to simply blow away anything I could with a blast of air and then remove whatever dust or particles would adhere to a light stroke of a soft brush. As the brush became a bit oily after a single pass over a surface, it had to be cleaned with soap and water immediately before reuse. Then I placed a drop of the soap and water mixture on the prism surface facing up and with one end of the lens swab on an upturned finger and the other on the prism surface I was able to spread the drop with no more pressure than the weight of one end of the swab. The rational here was to emulsify any surface oils and suspend any dust particles so they could be blotted away with the Kleenex. This was followed with an identical treatment with the Rexton optical surface cleaner and blotting. A final wipe using the frayed/torn end of some lens paper dipped in alcohol and inspection with reflected light and the loupe completed the process.
The temptation to “scrub” the optical surfaces just a little itty bit with the swab was almost overwhelming but I was able to resist and just repeated the above routine as many times as necessary for each surface, sometimes four or five.
The end result, I am delighted to report, is a flawless optical path. There are absolutely no scratches, smears, etching or any other defect that I could discern with the loupe! One tiny spot totally outside the visual path at the edge where the prisms were cemented together was the only visible blemish anywhere.
I did a thorough cleaning of the wrinkle finish paint on the main body and placed a fresh spray of black enamel on the prism covers and the base. Left out in the hot Florida sun, it baked on as a hard durable finish. Finally the light was disassembled (Fig 2A) and cleaned and all the chrome knobs clips etc were soaked in a weak commercial solution (Foz or Ospho) of phosphoric acid for an hour. (Fig 2A) An extremely light coating of white lithium grease was placed on the threads of the eyepiece tubes and the focusing dovetail slide, rack and pinion. (Fig 4A) The inside of the prism covers were wiped with alcohol. The wayward field lens was reversed in the Kellner Ramsden eyepiece. (Identified as such from the illustrations in the 'Microscope Anatomy' section of the Molecular Expressions web site).
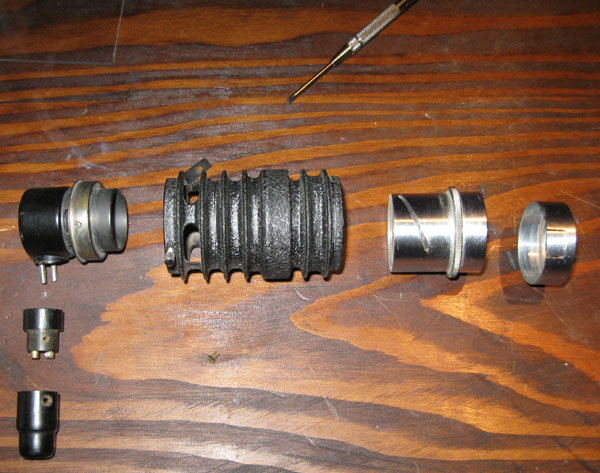
Fig. 2A
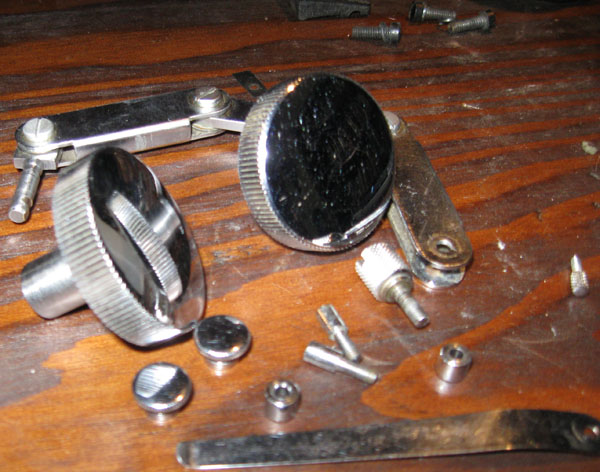
Fig. 3A

Fig. 4A
Reassembly was pretty straightforward and since I had no bulb for the light I cobbled together this light from spare parts in my shop. It works and I think it looks appropriate. (Fig 5A)
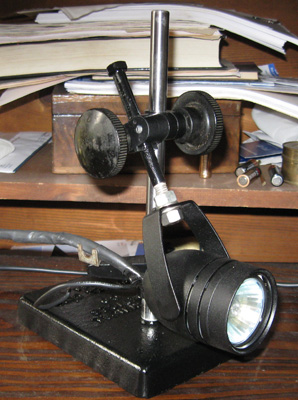
Fig 5A. This light took about 30 minutes to assemble from a $5 pawnshop tool stand and a “salvaged from I can’t remember where” 100W track light.
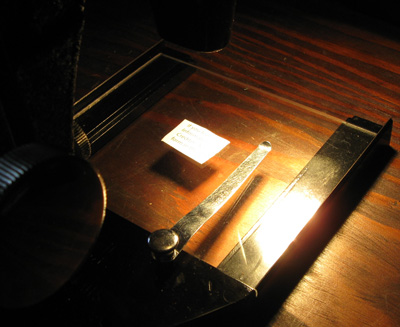
The Denouement
So, at last, a near factory perfect 65-year-old Stereo Microscope. (Fig 6A) I was happy as Chauncey with moonshine. I put a few test items under the lens and snapped a few pictures thru the eyepiece that don’t do justice to the actual image clarity (remember, I’m still new at this). Total cost with materials was under $60. (Figs 7A thru 11A).

Fig. 6A
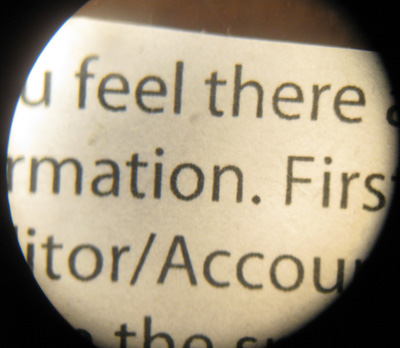


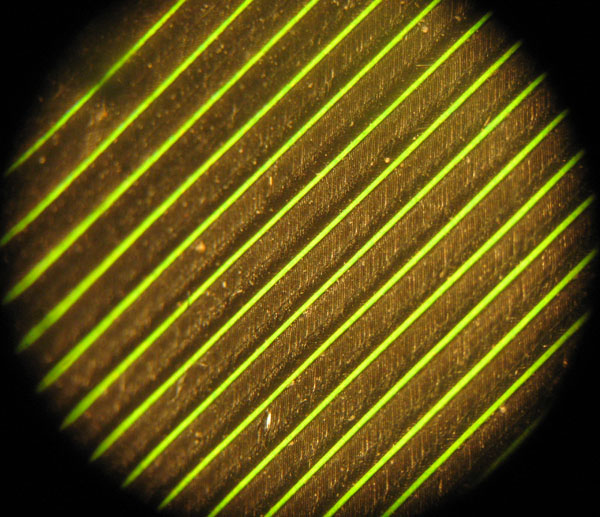
Figs. 7A - 11A
I feel I am on my way to becoming a world-class microscopist if I can stay off the couch. I already have some results for the binocular microscope but I will save them for the next article, as it will be a rather ambitious project.
So now I close this episode with a few final words in response to some of those kind souls who responded to my last article.
To those who were rather insistent that there were two items I needed “To get” i.e.
“A life” and
“A grip”
As to the former, I can state with some certainty that I am not writing posthumously and to the latter, after some checking I found I do have an old but still serviceable valise but why the interest in my travel accessories is beyond me.
To the gentleman who asked if I was a relation to Mr. Richard Howey:
First of all, my apologies to Mr. Howey. Other than the firm conviction that Mr. Howey would (and should) rebuff this association with some vigor I can assure you I possess neither his great literary endowment nor his distinguished scholar’s pedigree.
Mr. Roshak, your relevant information on the eyepiece tube diameter will be included in my next composition along with the RMS instructive.
Until next time, I am off for further jousting with reality and leave you with my mother’s advice, “Alcohol and calculus don’t mix, so don’t drink and derive”.
Comments can be addressed to me.
Please write. I am lonely.
V/r
G. Joseph Wilhelm
Published in the October 2009 edition of Micscape.
Please report any Web problems or offer general comments to theMicscape Editor .
Micscape is the on-line monthly magazine of the Microscopy UK web site atMicroscopy-UK
© Onview.net Ltd, Microscopy-UK, and all contributors 1995 onwards. All rights reserved.
Main site is at www.microscopy-uk.org.uk with full mirror at www.microscopy-uk.net .