You may have a microscope without built-in light source, like the majority of "vintage-type" stands and the simpler modern types. Or you may have a microscope that does have a built-in illuminator but this is either of an unsatisfactory type (say a 230V bulb with a ground-glass filter) or of low intensity. In both cases, you will wish to upgrade your hardware with a high-power light-source.
The problem is that such special microscope lamps offering Köhler illumination are definitely expensive and even then may not be quite up to par. One frequent shortcoming is that a frosted bulb is used in order to even out the illumination of the field of view. This will cause some glare, despite the fact that Köhler illumination is supposed to eliminate this.
Here's a recipe for a heavy-calibre microscope lamp that offers intense illumination permitting short exposures at high power even with polarised light, phase-contrast or DIC. In fact, its yield is such that you definitely should not use it for normal observation unless you switch in a very dark neutral filter.
With the advent of digital cameras, the conventional 36 mm equipment is losing favour among consumers. That means that there is an abundant supply of second-hand 36 mm slide projectors - and possibly you have one gathering dust. With an hour's tinkering, you can transform this into a heavy-calibre light-source. The changes are not permanent so you can still use it for projecting your colour-slides. Such a slide projector contains a bulb (both the 230V type or the low-voltage type will work), an anti-infrared filter, a couple of lenses called the collector, the holder for the slides and the projector lens. The simplest type of projector, where you have to change slides manually, works best.
Everything is left intact, all you need to do is: make simulated transparencies out of a piece of thin sheet metal combined with a piece of lightly frosted glass. Thin (1 mm) aluminium is easy to work and is available in hardware shops or shops catering for electronics amateurs. Sheet metal from tins is suitable but less easy to process, opaque plastic (cassette tape boxes) processes easily but I have no idea how long it will stand up to the heat - probably things will be fine because transparencies are not heat-proof either...
Mount the piece of lightly frosted glass at a position in between the collector of the projector and the slide holder. You can improve a piece of ground glass by rubbing some Vaseline or a drop of oil onto the ground surface.
Next, cut out "simulated transparencies" to fit snugly into the slide holder. Drill a 3 mm hole in one to start with, exactly in the centre (draw two diagonals and drill at the intersection). Put it into the slide holder, switch on the projector and focus until the image of the hole is sharp at a large distance (across the room). Do not change this focus afterwards. Take out the "hole transparency".
Set up the microscope and focus a suitable preparation with a 10x objective. Use a dark neutral filter, aim the projector so that its light beam strikes the mirror of the microscope, juggle the projector and microscope mirror until the field of view is evenly illuminated.
Slide in the "hole transparency", focus the microscope condenser until the hole is seen sharply in the field of view. Fine-tune position of lamp and mirror if necessary to center the hole in the field of view. Now for each objective, you will have to properly size (drill, file) the hole so that only the field of view is illuminated. The holes will vary greatly in size for a 10x and a 40x objective, for instance. That's all!
The principle is a modified form of critical illumination with a field stop as in Köhler illumination. The fake slide is used as a homogeneous light-source. The size of the light-source can be restricted to just the field of view by the "field stops" we've drilled in the sheet metal and this field stop is sharply focused in the object. The yield is very high and the colour-temperature will be about right for daylight-type film - if not you can add a light blue filter. If you have a discarded iris diaphragm, you can see if it fits into the projector.
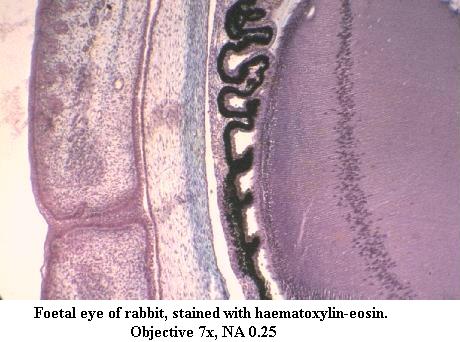
The photomicrograph shows what to expect: the field of view is evenly illuminated, contrast is good and the colour-temperature is OK. No digital trickery was used, the scan looks identical to the transparency.
All comments to the author Frithjof Sterrenburg are welcomed.
*****