Exploring handheld near infra red photography with a home modified Sony S75 digital camera.
by David Walker, UK
Although the rapid pace of change in electronics tends to bring higher specification consumer items at ever lower prices, one of the downsides is the rapid depreciation of some older equipment. A good example is consumer digital cameras—my first digital camera when they became more affordable was a Sony S75 3.3 Mpixel with auto / full manual control and was noted for its excellent fast Zeiss 3x optical zoom. Its cost was a tidy three figure sum nine years ago but had been sitting in a cupboard for some years since I upgraded to a much cheaper more pocketable model. I recently thought of selling it until I found that another boxed, immaculate example didn't even attract a first bid of £19 on eBay.
I've always been interested in IR landscape photography so wondered if it could be cheaply modified. There's a variety of approaches described for using digital cameras in this mode. These are summarised below (compiled from own experiences and resources linked to in table).
|
Camera type |
Method |
Pros |
Cons |
| Unmodified fixed lens digicam or digital SLR | Near IR filter on lens (e.g. Hoya R72) | Camera unmodified Requires just the filter |
Long exposures, see 'artechnic' resource for sensitivity loss with various cameras. Camera models can vary widely in their IR sensitivity, some older models can be better. Not suited for handheld work. On digital SLR, or digicam without optical viewfinder, there is no image preview. |
|
Professionally modified digicam or digital SLR.* e.g by www.maxmax.com or www.lifepixel.com who offer clean room conditions, autofocus correction and long experience *Fujifilm also offer multispectral IR/VIS/IR versions of some of their digicams, the Finepix IS10 and IS Pro DSLR (modified S5 Pro), but require special purchase procedures. |
Near IR filter on lens, (or on sensor if requested, for solely IR work)) |
Highest quality results Optical viewfinder preview with DSLR if IR filter installed on sensor. |
Expensive IR/UV filter needed to restore normal visible work, but may not give accurate colours in visible. |
| Home modified digicam or digital SLR | Near IR filter on lens, (or on sensor if suitable one made and bought) |
Much cheaper if devise a cheaper new filter, but can be expensive if professional filter purchased |
Potentially tricky conversion, may ruin camera, serious safety hazard with electronic flash. Homemade sourced filters maybe inferior. Harder to achieve clean conditions for dust free work. |
I have used a DSLR with IR filter for landscapes, but the long exposures and lack of image preview discouraged me as prefer to travel light and use handheld photography. As my Sony S75 clearly had little monetary value, I bravely / foolishly? thought I'd explore the last method above—the home modification to give handheld IR capability. There's a number of websites that describe in detail the modification of a range of digicam models; although my S75 was not mentioned it did make me appreciate the potential pitfalls (see resources). Disassembly can involve many fiddly and delicate cables, possibly some desoldering, the potential to electrostatically zap a sensitive component ... and if the built in flash has not been carefully discharged, the charged capacitors have the potential to seriously harm, even kill! But heh, life in Huddersfield on a dull winter's afternoon needs an injection of excitement, so without further ado I carefully disassembled my S75.
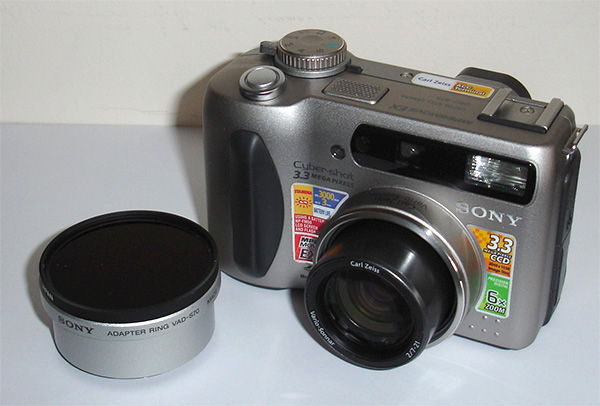
The Sony S75 was a model issued in 2001. It has a 3.3 Mpixel sensor with 3x Carl Zeiss optical zoom.
Shown with filter adapter and Hoya R72 IR pass filter, which is a very deep crimson and almost opaque.
Disassembly: I intentionally don't describe the procedure in detail, it's up to the reader to decide if they want to take the typical risks with their own camera (and life if they don't follow recommended flash discharge procedures—apparently the capacitors can retain their charge or a partial charge for a long time). The Sony S75 didn't require any special tools or desoldering, just a small cross head screwdriver, decoupling a number of fiddly but actually quite tough ribbon cables and two tiny plugs on three levels of circuit boards. It's an older more bulky camera which may have helped, although admit that disassembly/reassembly was near the limit of my dexterity skills, such as they are. The ribbon cables were only removed at one end and preformed so easy to spot where they reattached, the multitude of screws, some of different sizes, did need careful collating.
Sensor filter: The infra red filter seemed typical of those described on other cameras, a 12 x 11 x 2.8 mm multi layered glass plate. This came off easily when gently prised off the rubber seal around the sensor chip. In a rather forlorn hope, I did reassemble and try without any filter on. It still worked and now had IR sensitivity with an IR filter on lens, but as expected the lens focus didn't work at all either in auto or manual mode.
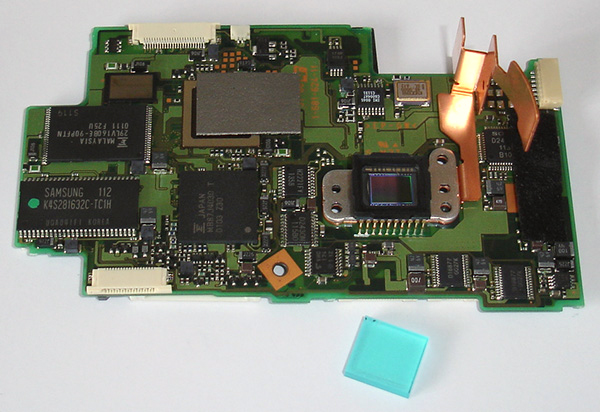
The circuit board with sensor (just right of centre on board) showing the original sensor filter removed.
The filter sits just above the sensor on the black rubber seal.
Sourcing a clear sensor filter: To maintain focus, the filter has to be replaced with a clear example of sufficient thickness. A variety of approaches have been described online for other models, some use suitable thickness glass, others build up microscope slides. My trials with microscope slides were messy, the 2.8 mm filter is thick for its size and needs careful glass cutting. But was also dissatisfied with the optical quality of the glass tried when inspected by 10x lens, as I wanted to retain the full potential of the excellent lens.
But one of my favourite online shops, Knight Optical UK, came to the rescue. They sell a wide variety of optical flats and one, a 10 x 10 x 3 mm for £15 seemed close enough in size and thickness to the required size and cheap enough to try. This was large enough to cover the active area of the sensor chip but didn't sit well on the rubber seal. However, the filter sat inside a close fitting recess in the lens housing, so secured with a little nail varnish in the recess. On rebuilding, the sensor seal hopefully butted up against the filter in recess to hold securely.
Cleanliness: The professional modifiers of cameras, especially those that cater for expensive DSLRs, advertise their clean room facilities and associated procedures for dust free installation. In domestic environments, this is trickier and any dust on the sensor or new filter will be very obvious. To keep dust to a minimum I cleaned the sensor, and both sides of optical flat with a cut down PecPad and Eclipse cleaner (a combination designed for DSLR sensor cleaning) before installation, with a final check with 10x hand lens to check the surfaces. The new filter was handled at all times with tweezers with Sellotape round the tweezer points to give a safe grip.
Does it work? A minor miracle, the electronics still all worked after reassembly and much to my delight the autofocus and autoexposure seemed to be behaving normally as well. So I duly put a Hoya R72 filter on the lens and went to the front window for a first IR test shot in the early evening sun.
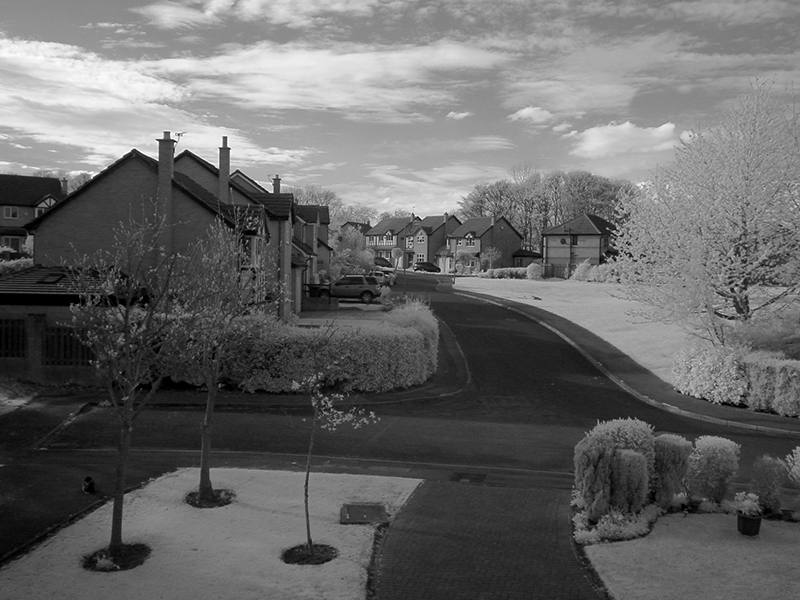
First IR test shot. The typical pale toned foliage and lawn grass contrasting with the darker materials suggested it was working well. Handheld exposures were now possible, 1/400th f2.8, ISO100 was used here. The images seemed sharp suggesting the new filter didn't disturb autofocus or the lens quality. The tonal range was good out of camera and only needed slight adjustment. Despite the almost black filter on lens, the image preview on LCD was very bright as the sensor was now fully IR sensitive.
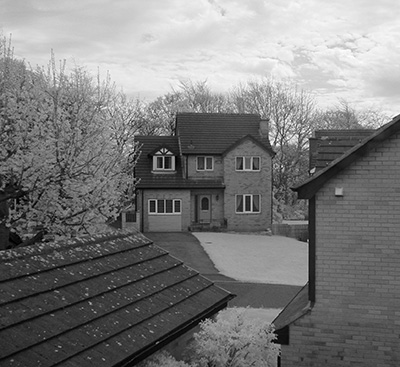
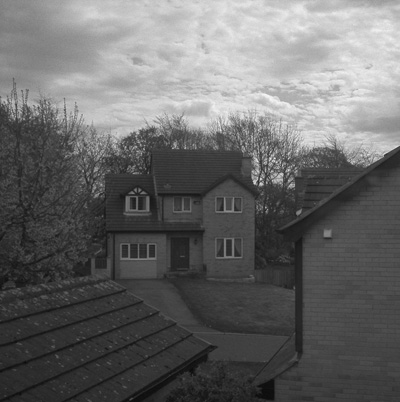
Comparison of near infra pass filter (left: Hoya R72) on modified camera with deep visible red (B+W 091, 'deep red') filter on an unmodified digicam (right). These filters work in different ways: the R72 records differing reflectance of near IR, i.e. light foliage and lawns. The visible deep red filter, transmits and lightens objects of or near its own colour and darkens complementary colours like grass and blue sky. In skilled hands the deep red can give dramatic results in its own right, but as here, albeit only a test shot, it can give rather muddy tonality.
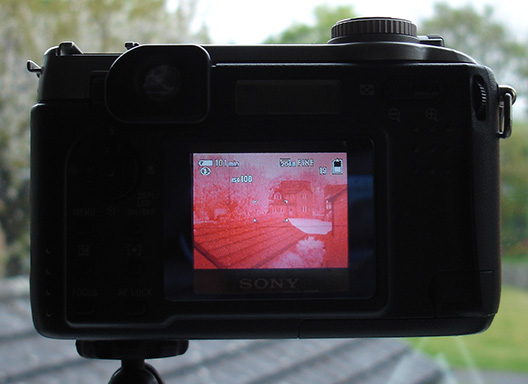
Live view of the near IR scene on the S75 with Hoya R72 filter attached. One of the advantages of converting a consumer digicam is that a bright image of the near IR scene is presented on the LCD, plus the option of using the independent optical viewfinder (coupled to the zoom in this model). Monochrome can be set in camera if desired to remove the pink cast of near IR images commonly seen with a colour sensor. Edit Oct. 2023. Since writing this article I have read annd adopted the practice of setting a custom white balance by pointing the camera at a grass lawn in bright sunlight. This is almost white in near IR and the Sony was able to remove the pink cast. A pleasing sepia tone can remain with an R72 filter.
If a digital SLR is converted to a clear filter on sensor, the optical viewfinder cannot be used as the image is being viewed through the almost opaque IR filter on the lens.
DSLR models with Live View on LCD screen may be able to be used for composition after conversion.
If a digital SLR is commercially converted, there is usually an option to put the IR filter directly over the sensor, in which case the reflex mirror with lens will give bright images in the viewfinder, as the filter is no longer on the lens.
Dust check: The recommended way of assessing dust on sensor is by photographing a white sheet out of focus with lens iris fully stopped down. I was encouraged to see that there were no obvious detectable spots.
Exploring and rediscovering the local countryside in near infra red
Near IR photography with a consumer digicam records the differences in reflectance of the subject to near infra red, just outside of the visible spectrum (ca. 700 - 900 nm) as distinct from 'thermal imaging' which occurs at longer wavelengths. Foliage and clouds can be highly reflective whereas stone, clear blue skies and non foliage parts of plants are not. As the graph in Wrotzniak's resource below strikingly shows, there is a marked increase in the reflectance of foliage as the wavelength increases below 700 nm into the near IR.
As my brother and I choose not to run a car, the countryside within close walking or cycling distance of Huddersfield was my usual haunt for walks. Being in a very urbanised area of the UK and close to one of its busiest motorways (the M62), the quality of the light is usually poor even at 750 feet in the Pennine hills. I can't recall the last crystal clear day in this area, a murky haze is the norm.
Infrared has some benefits for landscape photography, especially in this area, it can cut through haze but can also give starker contrast between the common drystone walls and close cropped green fields. In visible they are near the same tonality in monochrome and can give flat imagery. The superb IR imagery by skilled workers on the web and in books can give a good idea of what sort of subjects work well. The appeal of near infrared is that you're literally exploring a familiar area in a 'new light'.
The images below of the countryside local to me, don't aspire to have much artistic merit but hopefully demonstrate how different types of subjects respond to near IR. They were all taken at ISO 100 in fine jpeg mode, as higher ISO performance on these earlier cameras was poor. Processed in Photoshop Elements 7: 'Convert to grayscale' option, tonal levels adjusted where needed, 'bicubic sharpening' on resize.
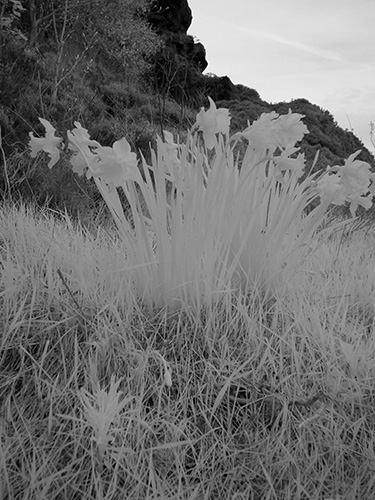
| What doesn't work: This photo of a clump of daffodils with yellow flowers would have distinct colour differences in the visible, but don't in near IR because the flowers, foliage and surrounding grass have similar reflectivity. Exposure 1/250th f2.8 in shadow of a rocky outcrop on a hazy early morning. |
|
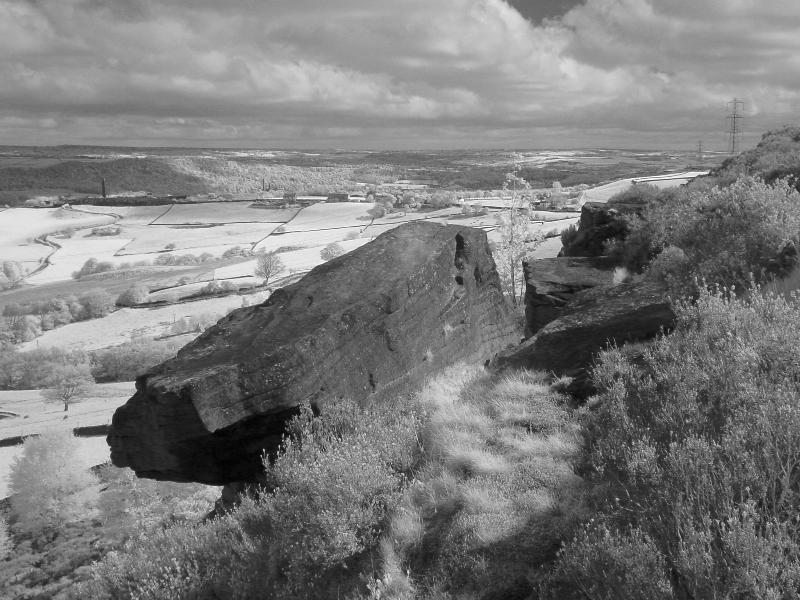
More successful is when the local millstone grit is contrasted with foliage in the landscape. Grass in the pastures seems most reflective so have to ensure these highlights aren't overexposed. This was a hazy day but the near IR has cut through this. Exposure 1/500th f4.5 on sunny but cloudy morning.
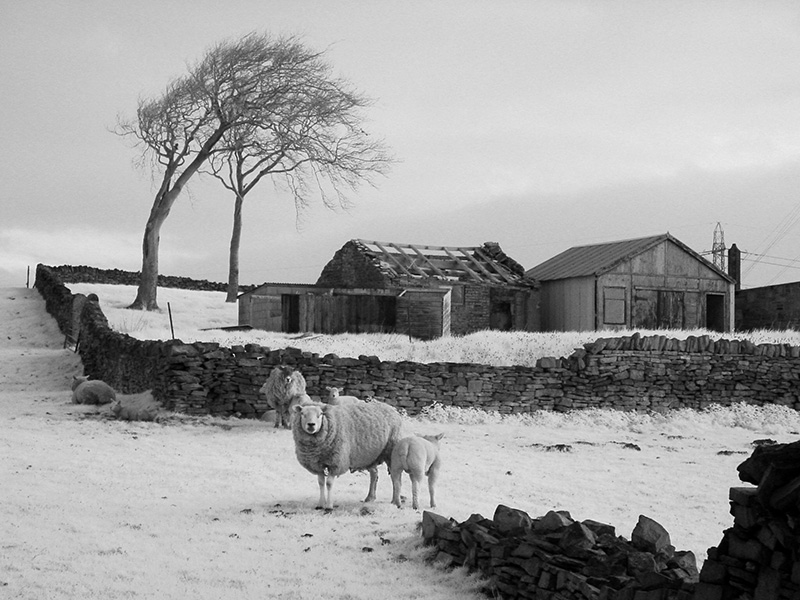
The dominant drystone walls in the area contrast nicely contrast with the pasture, in visible light in colour or monochrome they can be near the same tonality. Sunny days still seem to be required to get a good tonal range, this early morning shot with overcast skies gave rather flat lighting. Exposure 1/500th f2.8.
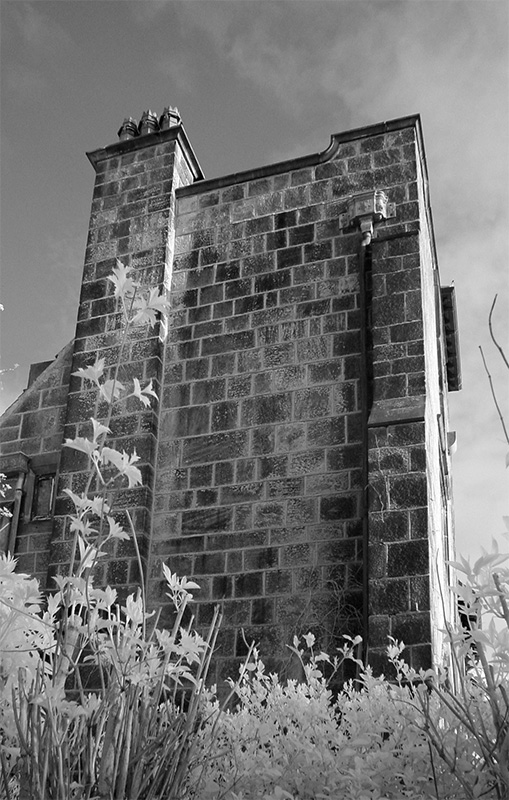
Contrasting the dark tones of architectural features and the light foliage can work well in near infrared.
Exposure 1/250th f2.8 on an early morning with weak sunshine.
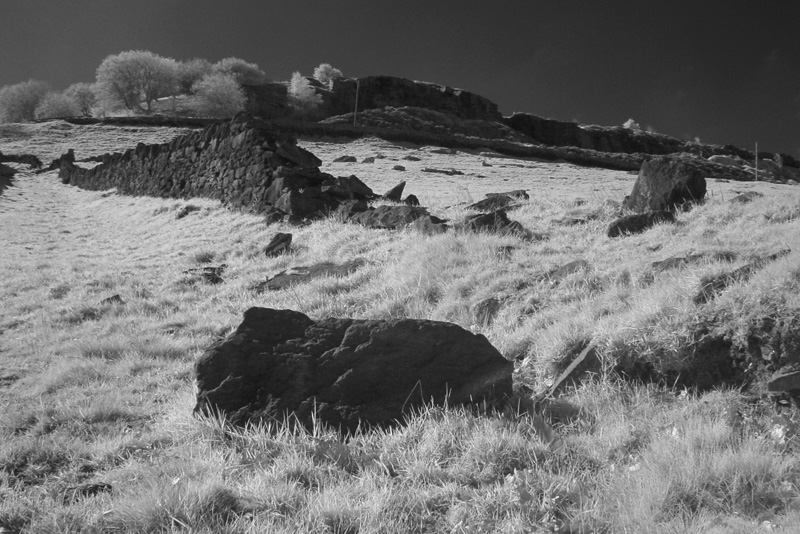
In near IR images online of wilderness areas eg in the US, the skies are often a rich black because of the lack of reflectance of blue skies. Perfectly clear blue skies are less common in this urban area of England, but this was an example, albeit no clouds. Exposure 1/400th f5.6 on bright morning.
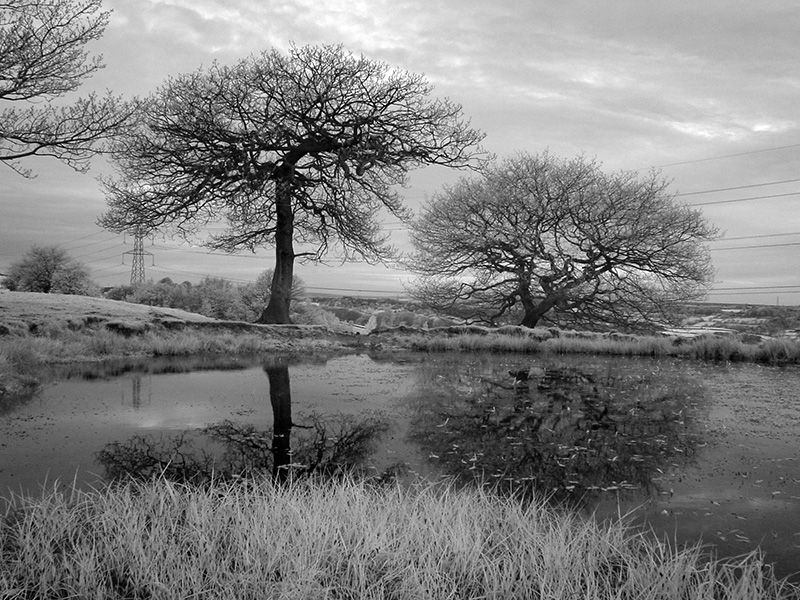
Water does not reflect near IR but can be a useful 'mirror' for white clouds in a black sky.
Exposure 1/60th f5.6 on a dull early morning.
Comments to date: The unused Sony S75 camera modified for £15 (I already had a near IR filter) has injected some fun back into photographing an area I knew too well. The camera's now modest 3.3 Mpixels suits web imagery and small prints. The key benefit for me of the modified camera is handheld work, allowing normal exposures and image preview. (Excellent work has been presented by users of suitable usually older unmodified digital cameras with IR pass filters and long exposures if this method suits.)
I'm also on a steep but enjoyable learning curve on how best to process digital near infrared images, skilled workers advise to retain the colour in the camera. There are a number of ways of converting color images to monochrome in editing software, the technique I have been using in Photoshop Elements, just simple grayscale conversion and levels adjustment is apparently not always ideal (e.g. see 'Northlight Images' article below). A disadvantage of using old modified cameras like my Sony S75 is the inability to save images as RAW files than the rather strong jpeg compression.
The reader interested in dismantling a camera (with appropriate safety precautions on flash discharge and care with static with electronics), may wish to keep an eye out for 'bargain basement' old digicams on eg eBay or carboot sales and explore if they can be modified. Initially I thought my bulky S75 may be easier to modify, but these have multiple circuit boards squeezed into the body. The newer smaller cameras may have just one board before access to the sensor. If the near IR blocking filters are thinner in these models, a wider selection of suitable filter replacements may also be available.
The branded infrared filters eg by Hoya and B+W can be expensive, but a wide variety of Asian suppliers on eBay now offer both the standard R72 (720 nm) equivalents and more specialist types (e.g. 760 and 800nm) for exploring deeper into the near IR for less than £10 each.
Comments to the author David Walker are welcomed and would be interested to hear of readers' experiences on digicam modification for near IR.
External resources
Wikipedia entry on infrared photography
Infrared photography with a digital camera - extensive resource by J. Andrzej Wrotniak, includes graph of near IR reflectance of common subjects.
Infrared (IR) basics for digital photographers—capturing the unseen - extensive resource on 'Digital photography for what it's worth' website.
artrechnic - extensive resource by Jens Roesner, includes valuable database of 'Infrared sensitivity comparisons' of his own and reader's cameras.
Kleptography - Canon G series IR conversion
'Convert your DSLR to infra red' - article in British magazine, ePHOTOzine, May 2008, with contact to UK conversion specialists.
'Sam's Strobe FAQ' - extensive resource by Samuel Goldwasser, describes the potential safety hazards and includes 'Safe Discharging of Capacitors in Electronic Flash Units'.
Northlight Images 'Black and white the digital way' - an illustrated overview of some methods for creating digital monochrome images.
