|
Oblique Darkfield Illumination by Thomas L Webster (Phoenix, Arizona, USA) Copyright 2005 All rights reserved. |
 |
||||||||||||||||||
|
A little over 2 years ago I was recovering from ill health and I decided to take up amateur microscopy to occupy my time. I started with a 1960s vintage Nikon S-series microscope, a handful of slides and coverslips, and a great deal of enthusiasm. As I explored the micro-world around me I became quite intrigued with various lighting techniques. One such lighting technique (probably the easiest for an amateur microscopist to create) escaped me...darkfield illumination. I cut darkfield stops, created darkfield wedges, and adjusted condensers up and down, but the best I could get with my Nikon S-series microscope was a sort of charcoal gray background. During all this time I drooled over the darkfield images published on the Internet. This year (2005) I decided it was time to get more serious with microscopy. I purchased a very used (but advertised as "newly serviced"!) Zeiss GFL microscope stand with an NA 1.3 aplanatic phase contrast condenser. After a couple of months of cleaning, lubricating, and with the generous application of "elbow grease", I had a fully functioning microscope. A couple of phase contrast objectives came with the microscope and I earnestly applied myself to learning the use of phase contrast illumination. Eventually, a series of articles in Micscape Magazine about COL (Circular Oblique Lighting) started me experimenting with COL. COL illumination, in its simplest form, is attained by using phase contrast aperture plates, off-centered in the phase contrast condenser, combined with non-phase contrast objectives. The resulting oblique brightfield illumination can be quite striking. The other day I was testing a newly acquired camera (Canon EOS D30 dSLR) on my microscope and decided to take COL to the next logical step..."oblique darkfield". Standard darkfield illumination relies on a black, circular patch stop to be centered in the condenser. The patch stop is sized just slightly smaller than the NA of the objective lens resulting in a thin, circular cone of light emitted from the sub-stage condenser. The sub-stage condenser is adjusted up and down to light the specimen against a dark background. (See Figure 1, below.) Because the patch stop is centered under the condenser and under the objective, the resulting illumination is flat and unrevealing of specimen contours and relief.
Oblique darkfield, on the other hand, relies on the aperture of a phase plate being off-center in relation to the sub-stage condenser and objective (see Figure 2, above). Light is emitted from only one side or the other of the sub-stage condenser, lighting the specimen with oblique light rays that do not illuminate the background. For the best darkfield effect, the aperture ring of the phase plate must sit outside the field of view of the objective so that only the most oblique light rays illuminate the specimen. Lighting produced by this illumination method is highly directional and emphasizes the contours and relief of the subject. (The Olympus Mic-D inverted microscope uses a similar process to create "pseudo-darkfield" illumination. Instead of moving a phase plate aperture off-center, the Oympus Mic-D microscope swings the entire condenser out of place to light the subject with extremely oblique light rays.)
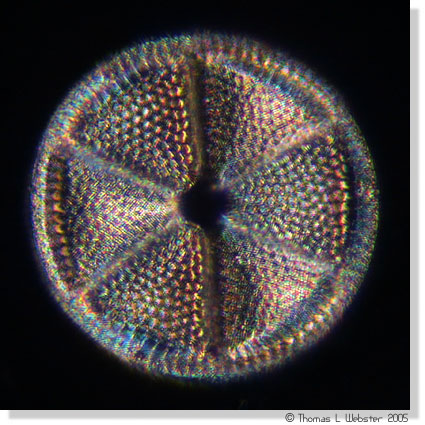
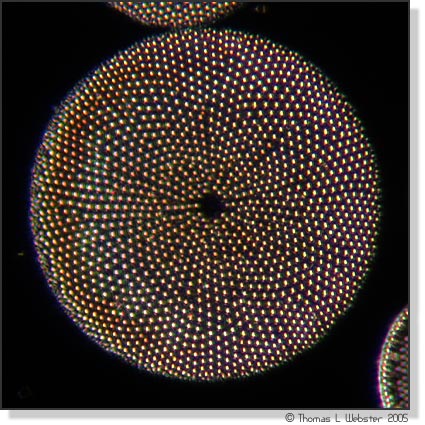
The highly directional light from oblique darkfield illumination is great for revealing the texture, the contours, and the surface relief of specimens. An added bonus is that the direction from which the light rays strike the specimen can be controlled simply by switching which side of the objective's field of view the phase plate is set off-center. My current favorite combination of phase plate and objective is using a LOMO 25x NA 0.50 Q-Plan achromatic objective with the phase #2 plate, set off-center, in the Zeiss phase contrast condenser. This combination of phase plate and objective yields a pitch black background and a high enough magnification of the subjects I photograph most often. As can be seen in the photos, above, specimen details can be displaced considerably by oblique darkfield illumination. This lighting technique does not lend itself well for use with image-stacking programs such as Helicon-Focus and CombineZ5. To produce stacked darkfield images, standard darkfield illumination will be preferred. However, 2 or 3 layers hand merged in Photoshop are quite doable, as can be seen in the image below, left. Here, I combined 2 images, photographed with 2 focus points, in Photoshop erasing away the majority of the out of focus images.
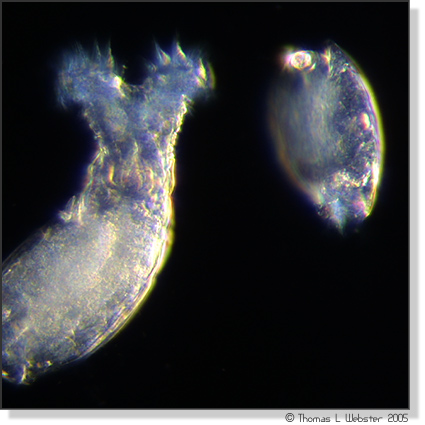
Oblique darkfield illumination can eat up a lot of light! The exposures for the fossilized diatom images accompanying this article were 4 to 5 times longer than my average brightfield exposures. That is the equivalent of 4 to 5 f. stops of extra camera exposure. This is an interesting illumination method for photographing live subjects as well. Using an electronic flash setup on my Zeiss microscope I was able to make this image of a bdelloid rotifer and loricate rotifer, above right. Normally, the flash exposure I would use with brightfield illumination would "freeze" the motion of the cilia. However, I had to use a much longer flash burst to overcome light loss so the cilia are quite blurred. No doubt, oblique darkfield illumination will lend itself well for many other subjects. In the near future I will be experimenting with different combinations of objectives and phase plates. Those of you who may not have phase contrast condensers can try placing various darkfield filters in the filter holders on your sub-stage condensers. The important concept is to place whatever type of aperture created just to the outside of the objective aperture. Some of you may be wondering why I could not obtain a suitable darkfield with my older 1960s Nikon S-series microscope. The stumbling block I ran into with the old Nikon stands was that the standard condensers available with these microscope stands cannot be centered under the objectives. It is important to be able to center the sub-stage condenser under the objective to obtain optimum results with any darkfield illumination method. Technical Details...All of the images accompanying this article were imaged directly onto the CMOS sensor in a Canon EOS D30 dSLR camera using a Nikon 2.5x projection eyepiece in the trinocular port of the microscope. The microscope employed is a Zeiss GFL with an NA 1.3 aplanat phase contrast condenser with the phase #2 plate set off-center and a LOMO 25x NA 0.50 Q-Plan achromatic objective. All of the fossilized diatom images were exposed using the microscope's internal tungsten lighting system. The image of the bdelloid rotifer was exposed using electronic flash. Density and contrast adjustments were accomplished through Photoshop 6.01. The author, Thomas L Webster, welcomes all comments and suggestions. Editor's note: Thomas is an administrator of the excellent www.amateurmicrography.net and www.photomacrography.net websites which have a range of articles and forums where readers can share and discuss images and techniques.
Microscopy
UK Front Page |
|||||||||||||||||||

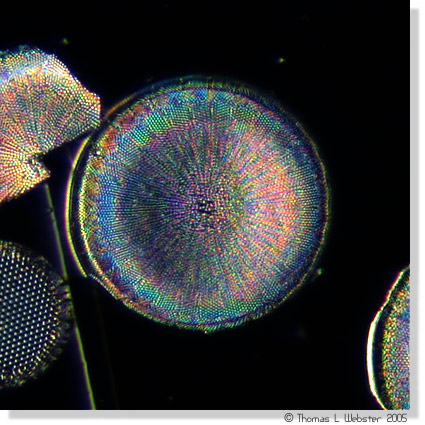 Phase contrast plate #2 moved to right of objective aperture.
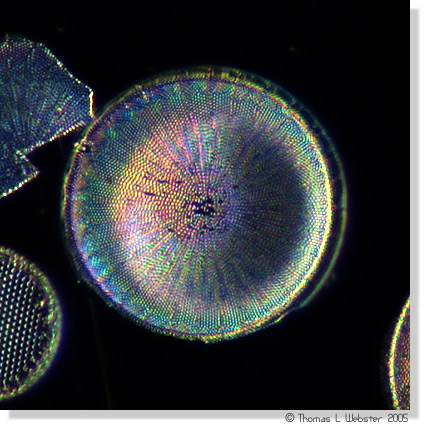 Phase contrast plate #2 moved to left of objective aperture.