
|
by Rene van Wezel, UK |
Phase contrast is an ingenious optical solution to an old problem: how to make (for example) a nucleus visible in the cytoplasm. Although the nucleus has a higher optical density (better: refractive index), they are both colourless and transparent, which makes it hardly visible. The usual practice is to kill and stain it, or to use an optical solution like oblique illumination. The latter technique makes especially the boundaries visible between the parts that differ in refractive index (RI), and gives a pleasing relief like image. But entirely satisfactory for the biologists that had started looking into live and unstained cells it was not.
It was the Dutch physicist Frits Zernike who came up in the 1930's with the solution of how to make use of the difference in refractive index. With his system, the nucleus shows up darker than the background because of its higher refractive index. In physicist terms: a difference in phase (by going through the denser nucleus) is transformed into a difference in amplitude (light intensity). It proved very useful and yielded Zernike a Nobel prize in 1953.
Figure 1: The effect of refractive index on visibility. Left to right, water (nD 1.33), immersion oil (nD 1.52) and Z-rax mountant (nD 1.7). The glass rod has a similar nD as the immersion oil, and hardly visible. In normal phase contrast, the colour of the glas rod would be darker (in water), similar (in oil) and lighter (in the high refractive diatom mountant).
The practical layout for phase contrast in a microscope is actually quite simple: in the condenser there is a black plate with a clear ring (annulus). This produces a hollow cone of light, which has to be matched with a similar sized phase ring in the objective. The direct condenser light is first of all reduced quite a bit in intensity by the grey phase ring in the objective, but there's also something done optically to it: a phase shift is introduced. Now, this optically altered condenser light recombines with the diffracted light (created always by the RI differences in the subject), resulting in a black and white picture. If the latter two sentences are going over your head, forget it. Or read up on phase contrast on the Molecular Expressions web site.
Anyway, all techniques have their niche. For phase contrast to work best you will need a perfectly thin specimen, as for thick ones the set-up will create a dark blurry image. Also phase contrast frequently creates bright halos around highly dense areas, which can obscure all detail. Although companies have thought out several solutions to these problems, it's not a one-size-fits-all.
The other (but not really scientific) disadvantage is that phase contrast principally gives a black-and-white image, which seems in this modern age quite uninteresting.
However, already in 1950 Frederick Grigg of the Royal Microscopical Society (Nature vol.165, p368/9) came up with an alternative arrangement, by using a dark blue background filter and yellow annulus. Result is a typical Rheinberg kind of image, with specimen standing out in yellow on a blue background. Moreover, the annoying halo that obscures detail around some objects will be very much less, if not gone.
Puritans will rightfully argue that this is not the right phase contrast, and that it is diluting the contrast that the technique is able to give. However also for this point Grigg came up with a solution: why not mounting polaroid sheet together with the blue background, excluding the yellow annulus? Then, with an additional polaroid on the illuminator base you are able to continually variate the brightness of the blue background until a point that the background is black and the system is giving proper phase contrast with a yellow annulus.
Grigg recommends the use of intense colour filters, like the Wratten gelatin filters that I have used here. Unfortunately, the size of the annulus is quite small, and it is difficult to cut it precisely with a pair of scissors. I found it far more convenient to use a set of laboratory cork-borers to punch out the right size rings. It is a bit difficult to exactly determine the size of the ring, but by looking in the microscope tube without the ocular, and closing the condenser iris until reaching the outer ring of the objective phase ring, will give a starting point.
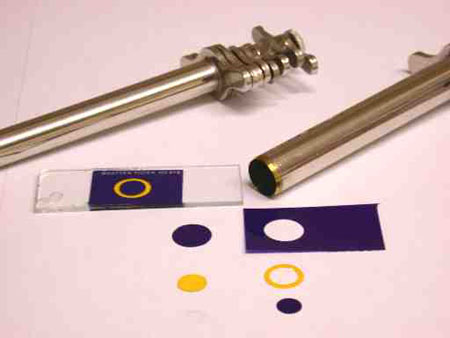
Figure 2: Preparation of the filters from Wratten gelatin material with cork borers. A finished annulus is mounted between 2 slides with Entellan.
For optical transparency, the filters are best mounted between two glass plates with a suitable mountant. I have mounted them between slides with Entellan, as the gelatin filters will not dissolve in xylene based mountants, although care had to be taken to avoid 'swimming around' of the different filter parts during hardening.
With the high prices of Wratten filters nowadays and in this computer age, it seems far more straightforward to produce the filters with an inkjet printer on transparency material. Although I have not done this myself, it probably will give satisfactory results when 3 or 4 of these filters are glued together with a water-based mountant (glycerine-jelly?). It is best to properly glue them together, as even clear transparencies don't seem to be very clear (which you will discover when making ocular micrometers by copying a ruler on a transparency). And some transparencies designated for inkjet printing have a very rough side for ink take-up, which probably has a bad influence on the image.
Scaling the image just before printing will make it easier to empirically determine the right size of the ring.
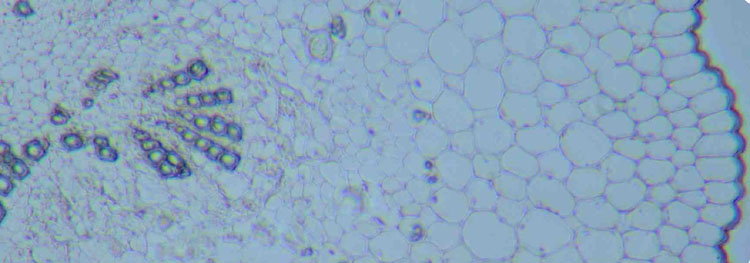
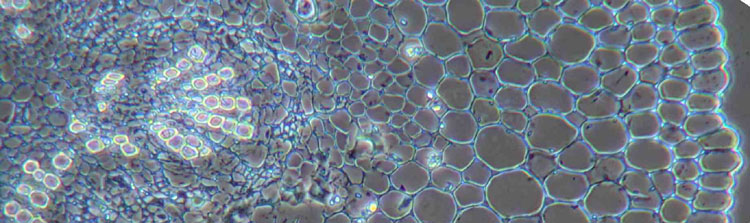
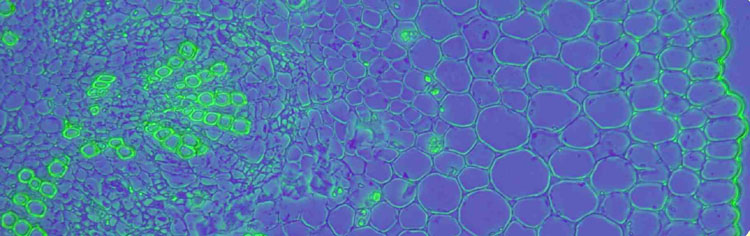
Figure 3: Transverse cryo-section of periwinkle stem (Vinca minor) in different modes of illumination. The section is mounted in glycerol and over 2 years old, therefore completely bleached. To gain some contrast, the section is illuminated with annular illumination (COL) NA0.3-0.4 (fig. 3a), proper phase contrast (fig. 3b) and colour phase contrast (fig. 3c). Objective: Wild 10/0.40 Fluotar.
For phase contrast, a normal condenser can be used, as it only has to produce a hollow cone of light by an annulus. Of course a special phase objective must be used, but it might be worthwhile to mention that this is the only necessity, so the amateur can get away with buying a phase objective secondhand. The typical pancake condenser supplied with phase-upgrade kits is certainly less fiddly in use, but not a necessity, and will limit you to the B/W phase contrast.As the NA of the phase ring is typically about half
the NA of the objective (e.g. the phase ring '2' for a 40/0.65 lens is around
0.3), often the condenser can be used low power: without the top lens. This
way, the annulus will have to be bigger and thus easier to make.
The ideal
place for this annulus is in the so-called back focal plane of the condenser,
where generally the iris is located. It is however not very critical, and it
can be put easily a cm or so below that point, like in the filter tray. When
working very carefully, the phase-filter can be made to fit exactly in the
filter tray, but I found it just as easy to sandwich the filter between two
slides and position it manually on the filter tray while looking in the
microscope tube without an ocular. The phase telescope would come in handy
for this, but is not absolutely necessary.
Grigg recommended several filter combinations that proved useful:
Annulus |
Background |
Yellow |
Blue or Purple |
Light-green |
Purple |
Light-blue |
Red |
The last combination might prove exceptionally useful for insect parts, with a greater penetration depth of the red light.
Of course, coloured filters in use on the illuminator base can also shift the colour balance, which is very much dependent on the transmitting curves of the different filters in use. For example a narrow yellow filter will remove nearly all blue, resulting in 'pure' phase contrast without the need for the polaroid solution
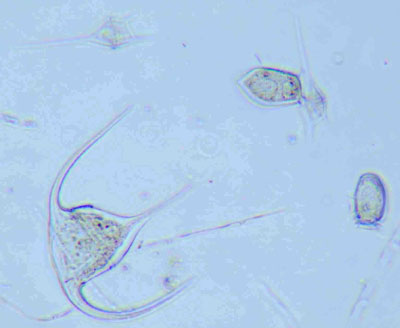
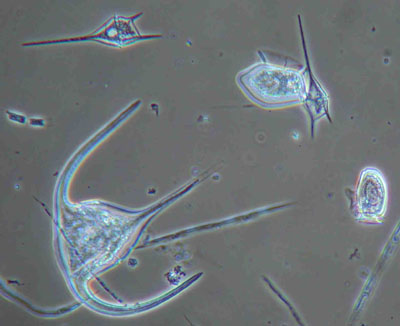
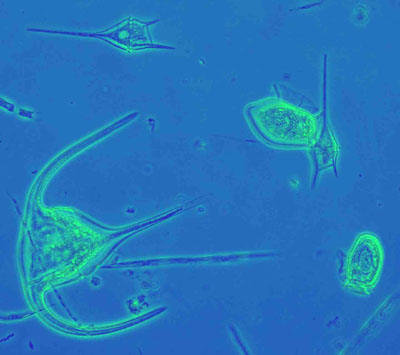
Figure 4: Marine phytoplankton (dinoflagellates) from the Irish SW coast. Mounted in glycerol-jelly. Similar illumination as in Figure 3.
Looking back on the hours of pleasure this set-up has given me while wading through slides with phytoplankton, one might ask why the microscope suppliers have not taken up the hint and produced the condenser plates, at least for the amateur market.
But maybe they will reconsider?
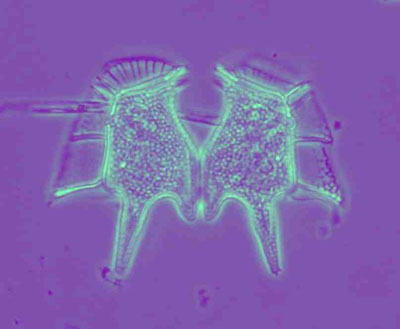
Figure 5: The Siamese twin from the sea: the marine dinoflagellate Dinophysis caudatum. From the Irish SW coast. Colour phase contrast, Wild 10/0.4 Fluotar.
Last remark: the pictures in this web page do not seem to do the technique of Colour Phase Contrast entirely justice. The digital camera (a Nikon Coolpix 995) does not seem to cope very well with the intense colours, and it is impossible to recreate the colours on screen.
All comments to the author Rene van Wezel are welcomed.
Please report any Web problems or offer general comments to the Micscape Editor.
Micscape is the
on-line monthly magazine of the Microscopy UK
web
site at
Microscopy-UK