|
|
|
||||
| When we study aquatic subjects under the microscope we often encounter a familiar problem. If we use a very small drop of water, evaporation quickly reduces the volume and for sea water, the increase in salt concentration and resulting crystallisation can kill the critters. In addition, the slide is warmed by infra-red radiation from the lamp, which accelerates the drying process. On the other hand, if we use a larger drop, it overflows from the slide, we wet our fingers and the microscope stage will need frequent wiping! Sea water also contains sodium chloride which will quickly corrode metal parts, particularly the steel and brass parts of your microscope. |
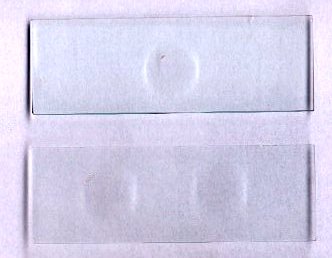
| To avoid these inconveniences, it's useful to have available a selection of well slides. Everybody is familiar with the depression slide shown below (no relation with a psychiatrist!) which have a slight hollow in the center. But this sort of slide, which contains less than one drop of water, is mainly convenient to avoid crushing thick subjects when you are using a coverslip. | |
|
|
It's easy to make well(s) on a slide using for example plumbing rings, 'machined' Plexiglas (perspex) plates and so on... Below are some examples you can make yourself. All the parts are glued on glass with two component epoxy glue. Use 'clear' glue in preference to opaque glue and use as little as possible. |
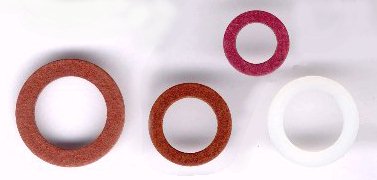 |
Plumbing rings: The red ones can be purchased; plunge them into varnish and allow to dry before gluing on a slide, to prevent them absorbing water. | |
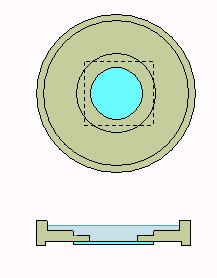
| 'Ring' slides made with plastic washers of various thickness': 3 mm and 1 mm. | ||
 |
||
| If you want to make a well with a depth less than 1 mm you can use mica washers. This mineral, (yes it's a 'stone'!), is easily cleavable into very fine sheets. You can obtain washers 0,2 or 0,3 mm thick. (The left hand washer in the image right is 0,3 mm.) | 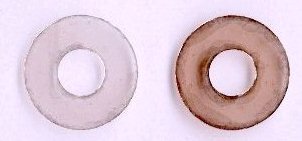 |
|
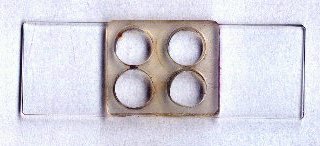 |
Using Plexiglas plate: You can drill 4 or 6 holes of 8 mm diameter into a 2 mm thick plate. This slide is particularly useful to distribute water contained from an eye dropper into each well. Critters you have aspirated will be necessarily in one of the 4 or 6 wells! Use a plate 2 mm thick (no more) in order to use an objective with a short working distance (10x max). | ||
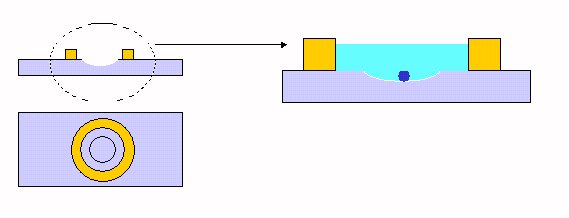
| Special 'eggs' slide: It's a combination of a depression slide and a ring slide. A concave depression is convenient because the egg(s) (of e.g. tunicate, sea urchin...) settle to the lowest point of concavity and remain centered. The height of the ring allows sufficient water retention to keep the eggs alive. |
 |
||
| Just a little trick: To more easily sort critters contained within a large eye dropper, use a white plastic plate to empty all the contents of the dropper into many little drops close to each other. Observe each drop with a 5x hand held magnifier and locate the swimming critters. When you find a drop including one, aspirate it with a pipette and put it on a slide or repeat the operation. It's the best way to sort agitated copepods for example... | |||
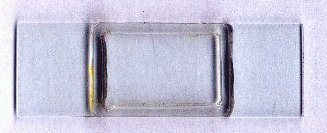
| Rectangular well: Drill four holes 3 or 4 mm diameter at each corner of a rectangular Plexiglas plate (2 mm) and join them with a thin saw blade or file as shown in the drawing below. It has a versatile working area and it's useful to sort critters if you don't have a low power stereo microscope. If you are careful, you can even use a coverslip which floats on water and remains centered by the Plexiglas edges. |
 |
||
 |
|||
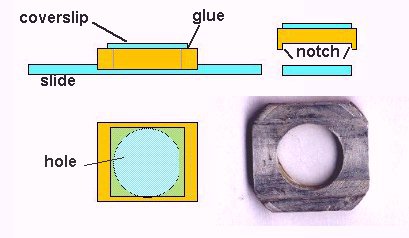
| A useful
cover to decrease evaporation: If the internal diameter of a glued
ring is less than that of a coverslip, (or for an ordinary slide without
a ring), you can make a special cover with a piece of PVC or Plexiglas
like that shown below. Drill a hole in the piece around 16 mm diameter
for example, and with a file make a notch on the underside of a size appropriate
to the slide width (26 mm) and on the top glue an 18 mm coverslip. This
cover protects a subject from drying but also avoids dust or other particles
depositing themselves on your precious specimen and you can always view
it through the coverslip with a low power objective. (I use it mainly when
leaving subjects for some hours in fixative or glycerine). It's convenient
too, to allow a slide you're studying to be left one hour or two on the
stage when you are taking a meal!
|
|
| Well
Plate: It's a variant of a Petri dish. Such glass dishes are very expensive
and plastic dishes are easily scratched, but you can make a good approximation
of their features by using a large ring (Plexiglas or PVC ) glued on a
40 x 40 x 1 mm thick glass plate used for professional mounts of 35 mm
slide film. Here I have used a Plexiglas ring machined with a lathe. Rub
down the corners and edges of the plate with low grade sandpaper to avoid
finger injuries!
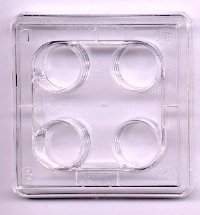
Note: In cellular cultivation, researchers use multi-well plates with 4, 6, 12 or 24 wells in a plastic box, (right hand picture). They are useful if you have an inverted microscope, otherwise the wells are too deep to use an objective on a compound microscope (except maybe 2 to 2,5 times objectives). |
 |
 |
|
| The right hand picture shows the design for a sample chamber for an inverted microscope, with a constructed example shown below. A 22 mm coverslip is glued on the bottom of a Plexiglas support machined with a lathe. Note that the bottom is slightly raised to prevent the cover slip base snagging on the microscope stage. |
 |
|
 |
Left hand image shows the bottom view. | |
| All these well slides are inexpensive (except maybe the depression slide) and you can make many copies of each design to comfortably sort pond or marine critters when you come back from a favorite sampling spot (... and to avoid wasting the rolls of paper towels used to mop up all the spilt water, as has happened to me!) |
|
Microscopy
UK Front Page
All drawings and photographs © Jean-Marie Cavanihac 2002. Published in the March 2002 edition of Micscape Magazine. Please report any Web problems or offer general comments to the Micscape Editor, via the contact on current Micscape Index. Micscape is the on-line monthly magazine of the Microscopy
UK web
|