Topical Tips 3 |
Topical Tips 3 |
We've all acquired tips, techniques, 'tricks of the trade' or perhaps made simple gadgets while pursuing the fascinating hobby of amateur microscopy. Why not share some of yours with us? They don't need to be original, but they'll be of interest to others who may not have come across them. Just send us a short note in an e-mail (contact in footer below), enclosing a scanned picture or drawing if you wish and we would be pleased to compile, upload and acknowledge your contributions.
This month:
An alternative use for A4 flatbed scanners - quite handy for scanning and cataloguing microscope slides, and creating digitised images of large slide mounts. Contributed by Dave Walker, UK. (Note added August 2004. The performance of a dedicated 35 mm slide scanner, a Coolscan IV ED for scanning microscope slides is presented in this article.)
A portable microscope using a standard eyepiece, objective and 16mm film camera extension tubes. Contributed by Chck Huck, US.
An alternative use for A4 flatbed scanners? by Dave Walker
1) Scanning microscope slides for cataloguing
Cataloguing microscope slides can be time consuming, especially transcribing all the details off the slide labels. A text catalogue can be compiled in this way but adding an image of the slide to the catalogue is also useful, especially if an attractive old Victorian papered slide or a large mount of an insect.
A4 flatbed scanners work quite well for scanning microscope slides for cataloguing and provide a very even white light across the scanner width. Ten to twenty slides can be gently put subject side down on the scanner plate in a neat grid of say 10x2 in a few minutes. The set can then be scanned, the image reduced and printed onto A4 paper to give a clear print out at 1:1 reproduction in colour or black and white.
A low scan of 300 dpi is fine to allow quick image manipulation. The slide labels, even handwritten ones, scan well so the scanner allows both text and image compilation of slides in one go. Gently placing a sheet of A4 white paper across the back of the slides before putting the scanner cover down, can give a better result if the internal reflecting pad of the scanner lid is dirty, marked or off-white.
Note: be very careful how you lay the slides down on the scanner and put the cover down. Any sharp edges on the cover slip or slide edges may scratch the glass or plastic glass plate if the slides are moved sideways. It is not suitable for scanning deep cell slides, thick mounts etc. where the slide or scanner plate could be damaged when the cover is put on.
If desired, text and page numbers can be added to the A4 scanned image before printing. The images themselves can be kept on file if desired as a computer based catalogue. If you plan to do a lot of slide scanning, it's very easy to make a template to position the slides very quickly and accurately (which will also help minimise the danger of scratching the glass plate). Just get a medium thickness piece of A4 white card, neatly arrange say 20 clean unused slides on the card and draw round them. Then neatly cut out the slide sized slots with a sharp knife. Place the card on the scanner glass plate and the slides can then be quickly dropped into these slots for scanning.
| A few minutes work with an A4 scanner and adding text in image software can produce a nice layout for printing out for a slide catalogue. Click on the image to see a larger version that would be used for printing. | 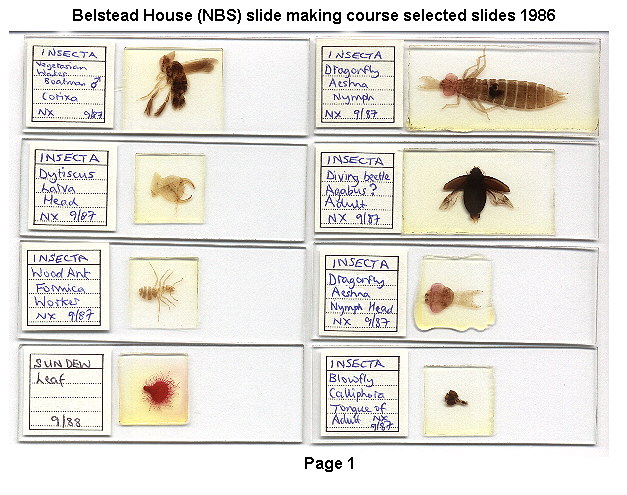 |
2) Creating digitised images of large thin mounts on microscope slides
An A4 scanner can also be used to give a digitised image of larger slide mounts eg. complete insect mounts or arranged sections if the subjects are thin section. These are not easy to photograph and evenly light in their entirety with most microscopes, so a special macro setup would be needed. I enclose a few images below of larger thin section mounts captured on an A4 scanner at 300dpi. I think a scanner gives quite acceptable images especially for use in 'web pages'.
Scanning one or more slides in this way takes barely a few minutes whereas a macro setup with good even lighting would be more laborious.
| An A4 scanner does quite a good job, especially for this sort of subject where showing form rather than fine detail is desired. The soft shadow created also gives a pleasing depth. (Nymph of dragonfly Aeshna sp. showing extended mask). | 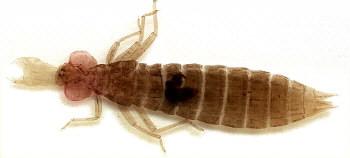 |
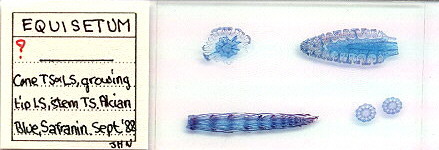 |
| An A4 flatbed scanner can't really capture the fine details of an arranged mount, but quite adequate for record purposes and for showing the general layout. Sections of a horsetail prepared by John Nicholls, UK. |
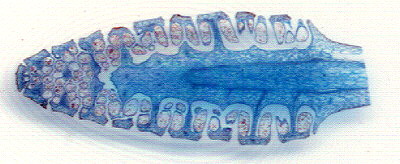 |
| Out of curiosity I scanned a small section of the above slide at the highest scanner resolution of 1200dpi to see how much detail a scanner can show. With a bit of image tweaking it's passable for web work (albeit some 'Newton's rings'), although a good 'macro' setup will easily outperform this ... scanning is quick and easy though! |
One final thought. I did try scanning suitable microscope slides with transmitted light using the slide scanning top of my flatbed scanner, but the results were very poor.
A portable microscope using a standard eyepiece, objective and 16mm film camera extension tubes.
Chuck Huck provided useful tips in the last Topical Tips. Here is another handy tip for making a portable microscope. Chuck writes:
Here is more information on using an eyepiece and an objective lens as a portable microscope. Use a full Bolex 16mm extension tube set, insert an eyepiece (10 or 15X) into one end and tape an objective (I use a 10X) on the other end, making sure all optics line up. Purchase a Dremel routing attachment (about $23 US) and use the main part to insert the tube assembly.
The bottom holds the objective lens nicely but you must use a ring that fits over the extension tube near the top and fits snugly in the larger hole at the top of the attachment. Such "donut" rings are made of rubber and can be found in science surplus stores, or one can be made out of a thick piece of rubber. A microscope slide fits nicely at the bottom of the attachment. Light can be from below or oblique. Although not rack and pinion focusing, there is a screw that is turned to move the tube assembly up or down for focusing. It works quite well, and magnification is estimated at about 100X (with a 15X eyepiece and 10X objective). A handy setup to travel with.
Chuck Huck, Warrenville, IL, USA
Editor - thanks Chuck for sending this useful tip.
*********************
Note that a variety of articles on simple techniques and home made projects for the amateur microscopist can be found in the Micscape Library (look under 'Novice' or 'Techniques').
Disclaimer: these tips are given in good faith, but no responsibility is accepted by Microscopy-UK, Micscape or its contributors for any damage to property or persons on using these tips. It is up to the reader to judge if a tip is appropriate and safe.
Compiled by Dave Walker.
Published in February 1999 Micscape Magazine.
Please report any Web problems
or offer general comments to the Micscape Editor,
via the contact on current Micscape Index.
Micscape is the on-line monthly
magazine of the Microscopy UK web
site at Microscopy-UK