Editor's note: As a follow-up to the author's two recent botanical drawing galleries, Gallery I and Gallery II, she has kindly offered this article.
To fit in the page, the original scans have been resized, inevitably with some quality loss. Please click the images to enjoy the originals. All images © Christina Brodie 2003.
Drawing under the microscope can be tremendous fun and produce excellent results. A few items of equipment that you will need are must-haves, but they will come in useful in a number of situations.
Equipment
You will need:
- A propelling pencil with an 0.5 H or HB lead for sketching and drafting, since the point is finer than an ordinary pencil and does not smudge. (This will be invaluable when you come to draw from prepared slides - see later.)
- Rotring® technical drawing pens for inking. I use a 0.35 or 0.25 size nib for outlining, to form a thicker, definitive line around the subject. Detailing and shading is done with a 0.18 size nib.
- Any type of paper with a smooth hot-pressed surface on which ink drawings can be made without the ink line spreading, i.e. Bristol board or even inkjet printer paper, which are suitable for monochrome work. If you wish to tint your drawing with watercolours, the paper must combine all the above qualities with a resistance to cockling or disintegration of the surface when wet, a brilliant white colour and sufficient absorbance of the ink for your drawn lines not to smudge easily when watercolour is applied. (I have yet to find a paper that fulfils all these criteria!) A4 is generally the best and most comfortable size to use.
- Tracing paper - invaluable for transferring original drawings without the risk of spoiling the original.
- Watercolours or pencil crayons, which can be used to tint the drawing if desired.
- Some means of measuring your subject, such as a ruler and dividers for macroscopic objects, and/or an eyepiece micrometer for microscopic objects. A magnifying glass might also come in handy for larger subjects.
Drawing macroscopic objectsYou can use a stereomicroscope or compound microscope where the specimen is illuminated by incident light.
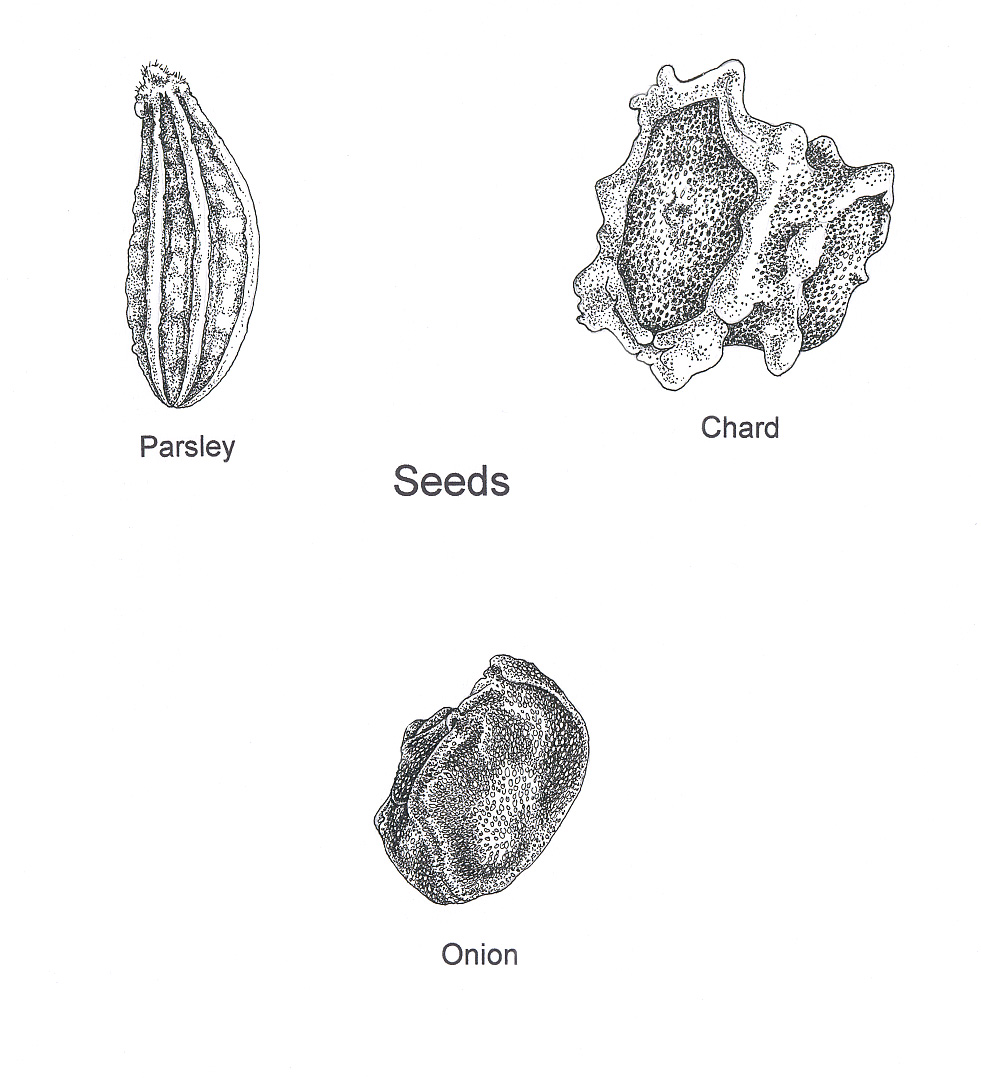
The basic form of a macroscopic object can be seen with the naked eye. Before examining my subject under the microscope, I examine it under a magnifying glass. I take measurements along the length and width of the subject with dividers, especially where there is significant variation in its size and shape, and make a quick sketch of the subject annotated with these measurements in their correct positions. The final drawing can then be made to the correct proportions.
I do this since I may want to use eyepieces other than my eyepiece micrometer, which is x10, and cannot use those particular eyepieces for measurement. Also, some objects are larger than the area capable of being viewed down a microscope, and may need to be moved around to obtain a view/drawing of the whole subject. In the process, proportions can become altered, which is why preliminary measurement is so important.
I then place my specimen on a slide (I use a compound microscope where the specimen is illuminated by incident light) and make an enlarged and more detailed version of my annotated sketch on a sheet of A4 paper. This is done freehand. I record any structures and textures I come across, and also add shading and colour in pencil crayon. Select what you want to draw - you may want to draw an image of the whole subject, or only a small part of that subject, such as a particular structure or a textured area. Experiment with views at different magnifications.
When you have completed the detailed sketch, you will need to make another sketch that shows the correct proportions. Scale up the measurements shown on your first, annotated sketch, sufficiently for you to be able to comfortably create a detailed drawing in pencil/ ink, for example x10 - x25. Take another sheet of paper and, using the values for the scaled-up measurements, create a skeleton drawing of your subject from horizontal and vertical construction lines. This will look absolutely nothing like your final drawing, but it is merely to ensure that the proportions are correct.
Using the skeleton framework, begin to work from your second, detailed drawing. This is unlikely to be an exact copy; you are likely to find that parts of the subject need to be lengthened or widened accordingly. Your resulting drawing will be in proportion; it can at this stage be labelled with the amount that it has been scaled up by, for example, x10 or x15. Transfer all the information in the first two drawings to this third drawing. This drawing can be used as a reference drawing when you are inking the final drawing up.
You can make a tracing of the drawing at this stage and transfer it to the paper you intend to do the final drawing on - if mistakes are made during inking, this will save having to redo the reference drawing.Now comes the fun part - inking. Using either a 0.35 or 0.25 nib, depending on the size of your subject, outline it and any major structures that are part of it with a continuous line. It is important that outlines are continuous, since this serves to differentiate one structure from another. Use your reference drawing throughout to avoid mistakes. For outlines that are interspersed with fine hairs, I make the outline dashed and draw the hairs in with a finer nib later.
Next, begin to shade using a 0.18 nib. You can shade using a number of hatching techniques but the ones that I have found most useful are:
Stipple technique - using your reference drawing, begin to shade in the darker areas using a number of tiny dots. These should be perfectly rounded and should not tail off. Work into lighter areas and then into darker areas again to build up the shading. Dont try to indicate colour by using shading - indicate the form of the subject only. Colour can be applied later. This is the shading technique most often used in scientific illustration, since it allows a wide range of detail and tones to be portrayed. Short strokes can also be used for detail such as fine hairs.
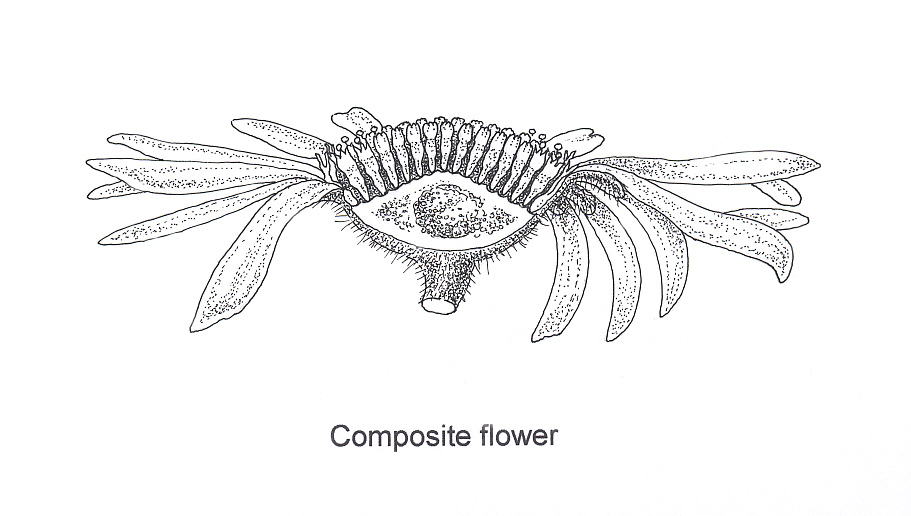
Vertical lines - I found these appropriate for my drawings of Daisy family flowers as I wanted to create a hand-tinted woodcut effect. They blend into one another to create an illusion of shade.
Its easy to overdo shading, so take your time! Stand back from time to time and consider whether all the parts of your subject are clearly portrayed.
You can also colour the drawing using watercolours or coloured pencil. However, watercolours will need to be used with discretion. They should be applied sufficiently wet so as to allow for even coverage, but not so wet as to smudge your drawn ink lines. The colours in my drawings of Daisy family flowers are somewhat brighter than the colours in the actual flowers are - I exaggerated them somewhat, in order to make the images stronger and brighter. Coloured pencil can be used to back up watercolour, but the intensity of the colours can be a little weak when coloured pencil is used on its own.
Drawing microscopic objects
For portraying sections and microscopic objects up to about x600, a favourite tool of mine is the camera lucida. These are apparently like gold dust, although Brunel Microscopes do stock them from time to time. My camera lucida is of the prismatic type with a mirror at the end of a long arm, that fixes onto the eyepiece. Instructions therefore apply to this type of camera lucida.
Before fixing the camera lucida to the eyepiece, I will select the part of the slide that I want to draw. I do this for two reasons:
Firstly, a section may be larger than the field of view at the magnification I want to draw it at. I will therefore draw only a part of it. There is no need to draw the entire section, simply enough of it to enable one to form an idea of the structures that are present.
Secondly, the camera lucida will further restrict the field of vision; thus the area that you want to draw must be carefully selected and the slide very precisely positioned. The camera lucida also makes the field of vision appear darker, so you will need to take this into account when drawing very small objects. Generally I have found mine unsuitable for drawing objects at greater magnifications than x600.
Place a piece of A4 paper in front of the microscope. Fix the camera lucida to the eyepiece, and check that your view down the hole in the top of it is satisfactory. Still looking down the eyepiece, tilt the mirror with one hand (not your drawing hand) until you can see an image of your piece of paper in front of the microscope, together with the image from the microscope slide, which should be superimposed. Move your drawing hand, holding a pencil, into the field of vision. The image of your hand, which will be doing the drawing, and that of the section, should be equally clear; the illumination of both the microscope and the piece of paper you are drawing on may well need to be adjusted if one image is brighter or clearer than the other.
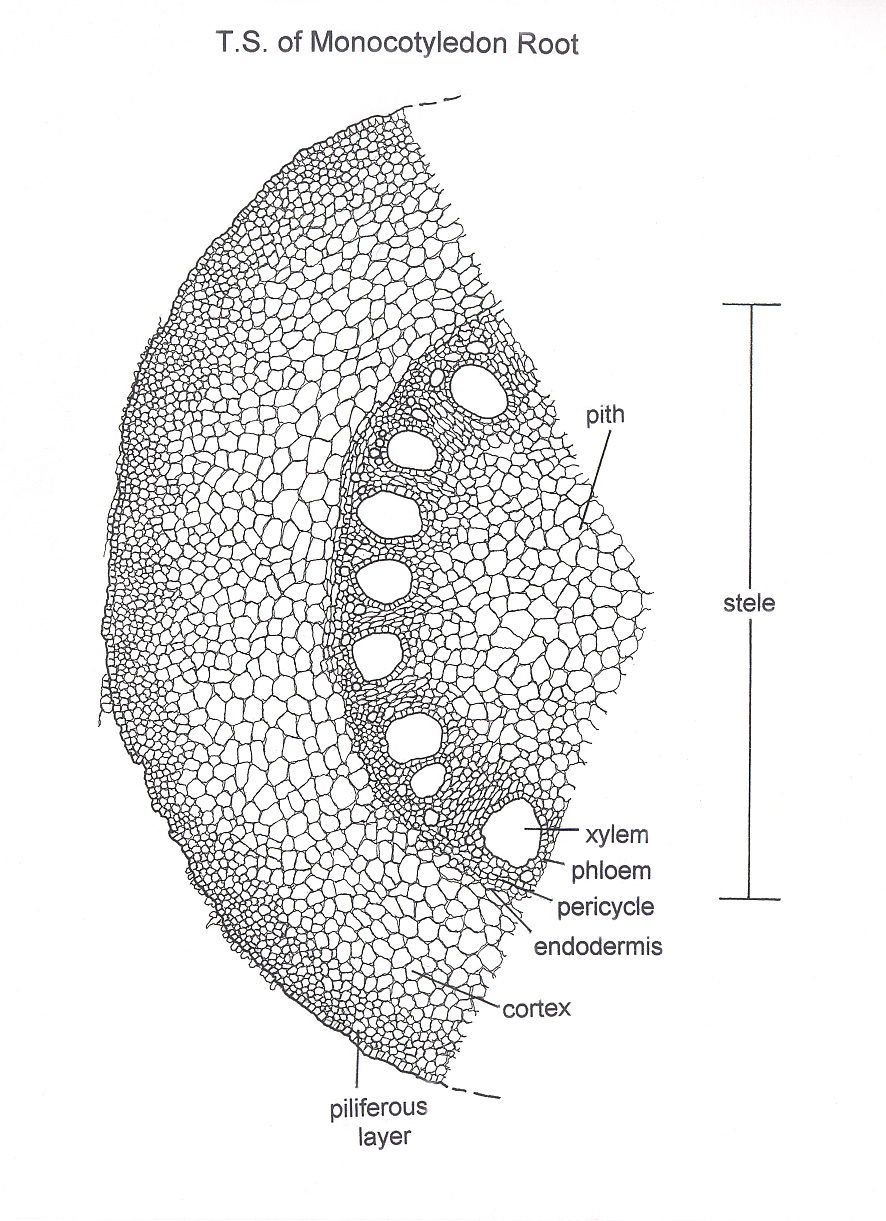
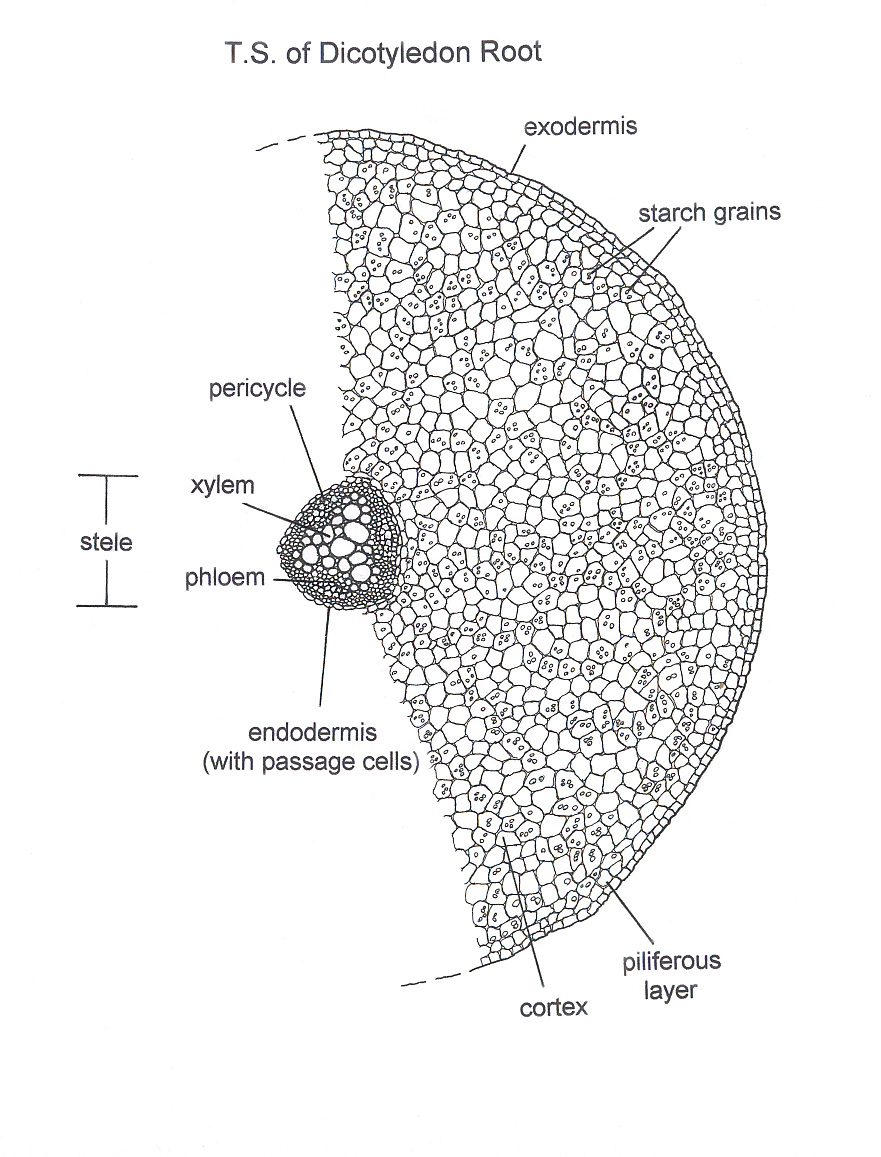
Using the "projected" image of the section/object that you can see down the microscope to help you, "trace round" its outlines in pencil, on the piece of A4 paper. Draw in the main outline of the subject first, then proceed to fill in the detail, which in sections will probably mostly consist of cells. Larger sections can easily take hours to complete; this technique is not for the impatient! The resulting drawing can then be traced onto a separate piece of paper, if desired.
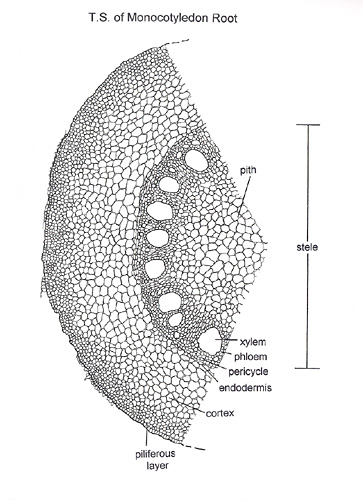
Inking up will proceed in a similar manner to that used for drawing macroscopic objects, except that generally less shading is used; I use virtually no shading on sections. Outlines and areas of thicker tissue, such as xylem, are done with a 0.35 nib, whilst supporting tissue such as parenchyma would be done with a 0.18 nib. Any shading on subjects, such as pollen, should be done using the stipple technique described earlier.
Colouring your drawing is appropriate if it represents the natural colour of the subject; however, drawings of sections and stained material should not be coloured.
The camera lucida technique will give you accurate proportions. However, your drawing will not be to scale unless you measure, i.e. the length of a part of the subject with the eyepiece micrometer and draw a scale next to your drawing that corresponds to the length of that part, divided into increments (i.e. a scale of 500 µm divided into 100 µm increments).
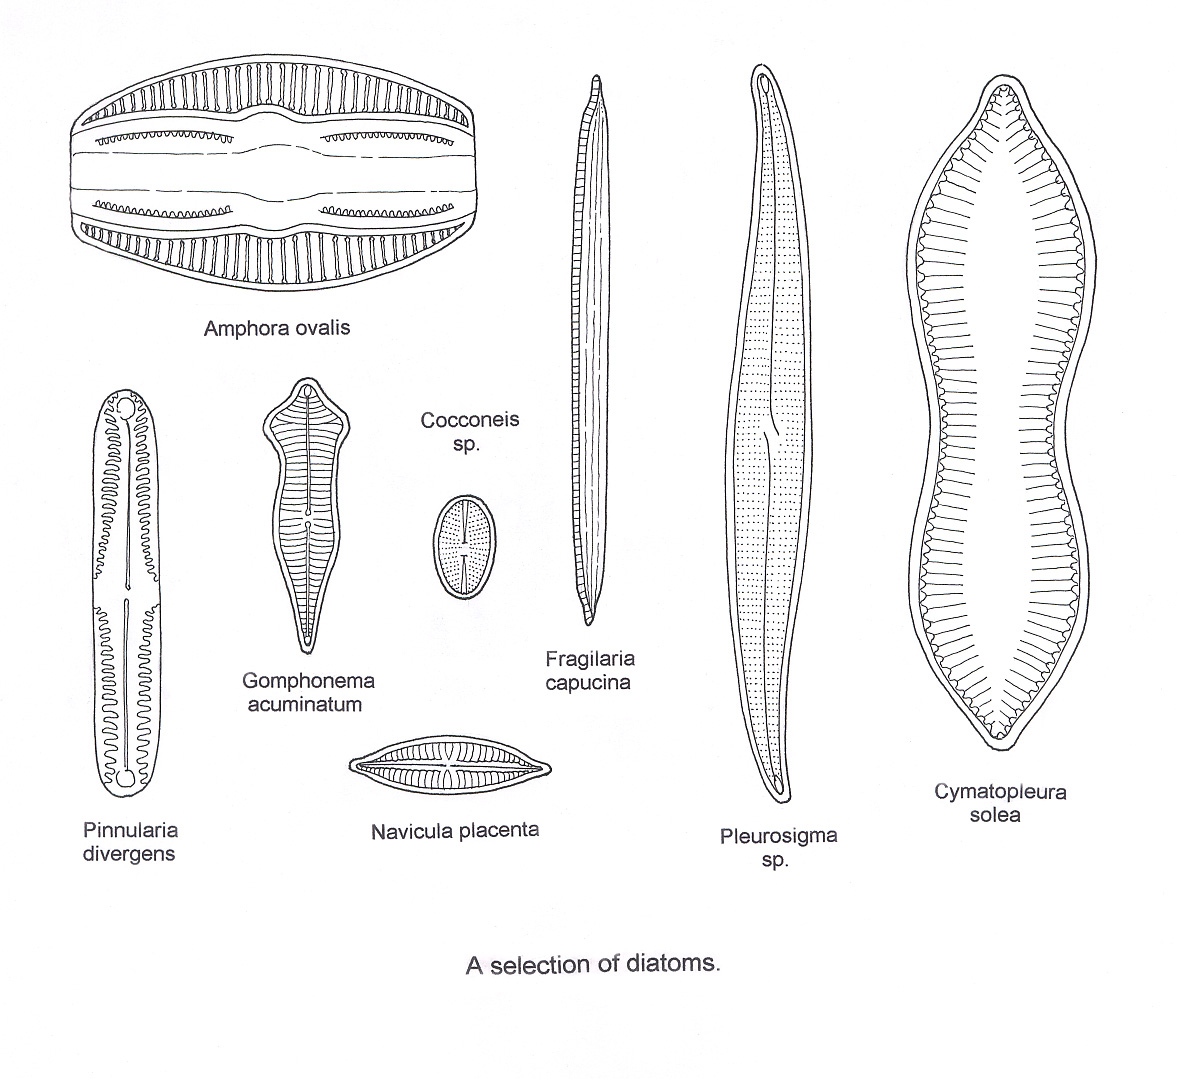
Objects that are best viewed at > x1000, such as some diatoms, are best drawn using only the eyepiece micrometer, since using the camera lucida makes the image too dark to see detail.
In the same way as you would make an annotated sketch of a macroscopic object, make a detailed sketch of your subject looking down the microscope and using the eyepiece micrometer as a ruler. Measure the length and width of the subject where there is any significant variation, marking the measurements on your drawing.
Next, scale up the measurements you have made using the eyepiece micrometer - > x1000 is ideal for diatoms. Make a skeleton drawing on a separate piece of paper, using horizontal and vertical construction lines, to help you get the correct proportions. Then construct your reference drawing around these lines. You can trace this drawing onto a separate piece of paper if you wish. Ink up your drawing and colour as described for objects drawn with a camera lucida.
Use of reference books
I am in favour of using reference books to help you, but these should be used as a learning aid only, to aid your understanding of the subject. You should aim to record only what you yourself have observed, and not aim to draw in structures that you cannot see. On the other hand, you may be able to observe more than the illustrator of your reference book, or perceive structures to be different from those illustrated! Bear in mind that your drawing is a record of your individual observation and interpretation. Not all drawings in reference books are alike, which proves the point.
Enjoy your drawing under the microscope!
Christina Brodie
January 2003© Christina Brodie 2003
Comments to the author, Christina Brodie via her website www.queen-christina.com are welcomed, or if there are requests about image use or if interested in her other artwork.