 |
|
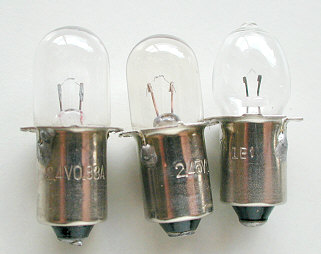
between 2.3 - 2.45 volts and current ratings of 0.8 - 1.25 amps |
| When
the light goes out
DIY light sources for temporary or permanent use. By Paul James (uk) |
This article is written to establish some hope for those readers who have found themselves in the unenviable position of finding no replacement bulb for their older microscope. It basically concerns those who have in-built illumination
Power requirements?
A little history first: Light output power from microscope bulbs has often, if not always, been dictated by the requirements of standard film photography and also the requirements of specialist instruments such as the metallurgical microscope, which needs a more intense light source than its brightfield equivalent. The good news is that our brightfield 'scope can come back to life with surprisingly little light input, because our eyes are very sensitive to light.
Standard bulbs found in most 'scopes have power outputs ranging from about 15 to 30 watts or even more. This is grossly in excess of what is normally required for direct viewing, and I'm sure that many readers, like myself, find unbridled brightfield illumination rather overbearing. I was therefore motivated to use a lower light output from a filament bulb. Halogen bulbs are too bright and have excessive heat outputs which did not appeal to me.
A most unlikely light source for the Microscope
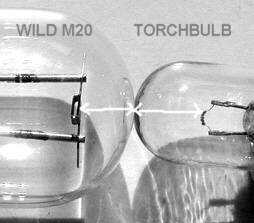
I therefore thought it a challenge to try to apply some simple DIY technology to replace the existing bulb from a Wild M20 with an easily obtainable alternative.........the humble torch bulb. The principle reasoning behind this is twofold: Firstly these very small bulbs can fit easily into the existing housing with some skill and imagination, and secondly they are so cheap and readily available. Thus I have a ready made substitute should the need arise.
Here we have three
typical bulbs found in hand torches of various sizes :-
|
|
|
between 2.3 - 2.45 volts and current ratings of 0.8 - 1.25 amps |
Is the Torch Bulb bright Enough ?
To find out if these bulbs were suitable, I wired up the potentially brighter 2.45 volt/1.25 amp version and placed it temporarily in the lamphouse, so its filament coincided with the original one. To my surprise the output of light was more than adequate, and its colour was also ideal too. You might be amazed also that the output power is only about 3 watt! However this bulb, shown above centre and below is ideal, and is easily available and costs pennies. It is physically much smaller than the original M20 bulb which will therefore allow some scope when making a housing for it.
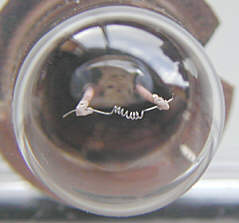
Glass top clarity and filament distance
It is
highly desirable that the upper surface of the bulb chosen, be as clear
and smooth as possible, for rather obvious reasons. The image below shows
a bulb well suited for this, though some have rather lumpy peaks and which
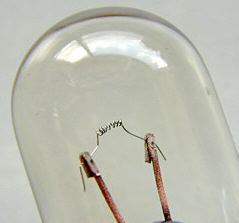
would cause poor imaging by the lamphouse condenser. The
bulb below has an ideal glass cap, and fortunately the distance between
the filament and the glass cap is sufficiently small to allow intimate
positioning to lamphouse condenser for focussing:-
 |
 |
 |
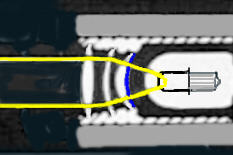
The Bulb Holder
The 'new' bulb must
fit precisely so its filament is at the same point as the original bulb.........any
deviation from this will result in uneven field lighting. The diagram below
shows the torch bulb superimposed over the original bulb, The face of the
first lens (blue) is the one which is usually ground to act as the SOURCE
and thus diffuses any irregularities of the filament's grid or coil shape
:-.
 |
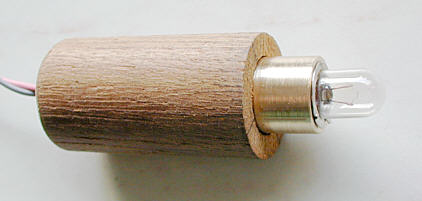
My first attempt at
making a bulb holder insert worked well. It involved finding a metal tube
to house the actual bulb, and then turning a teak 'cylinder' with hole
to house this tube :-
 |
 |
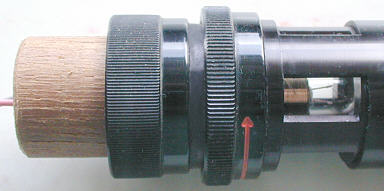 |
Very simple though this might appear, it works very well. The teak used came from a small offcut and was chosen because it is stable, and has an innately waxy surface to allow smooth focussing in the lamphouse. Simplicity and accuracy are the key elements to success.
There are many ways of holding a bulb for the same purpose, so you may have other ideas and skills to make the insert.
Electrical work
Because of the varying supply voltages etc., in different microscopes I'm not going to give any specific advice for the electrical work, save that those with variable 6 volt AC units already in place can readily adapt the wiring to the new bulb. All that is required is that a voltmeter should read the working voltage when the bulb is under load when setting up . The position of the variable control knob should then be marked clearly for the low voltage bulb.
Re-establishing full field illumination with new bulb
Assuming that a suitable lamp holder has been designed and made, and that the bulb is capable of being fitted close enough to the lamphouse condenser, then the next step is to set up the illumination system for trials. Initially the bulb will be out of critical position, but nevertheless will still be capable of illuminating, albeit crudely, the field sufficiently for the following setup.
1) Place a slide on the stage and focus the 'scope using a low power objective in brightfield....... x10 is ideal..
2) Remove the slide.
3) Close the lamphouse/field iris until just visible at the edge of the field.
4) Focus substage condenser so this iris is fairly sharp and that the source, usually the diffuser element in the lamphouse's optics is also in focus. The fact that these are not quite in the same plane is not too important.
Thus the specimen, field iris and diffuser source will be perceived in the same plane. The next job is to focus the bulb to obliterate all uneven light across the entire field
5) Now alter the bulb holder's position carefully until the field is evenly illuminated.
Problems
Any uneven lighting across a x10 objective field must be the result of the filament's off axis position. Twisting the holder might cure this, or packing one side of the metal bulb holder so as to induce axial repositioning of the filament. Once accomplished, the holder can be marked externally to indicate its position in the lamphouse, so that it can be refitted speedily, with its initial accuracy if and when necessary.
If after careful focussing and axial alignment, the image of the filament is not entirely obliterated over the source ground surface of the lamphouse's condenser, you might have to treat the bulb's glass cap as follows.......... Using a piece of very fine wet and dry emery paper, very gently stroke the top of the glass cap uniformly, but very lightly and try the bulb again. This works well, though slight loss of illumination intensity may be noticed, but will not affect the practicality of the setup.
Limitations
Though a torch bulb, or any other small light source, will not produce 15 watt or so output of light, it should be sufficient for most visual purposes, and certainly will provide enough power for the majority of observations. Phase contrast and oil immersion work might find this a wee bit shy of light output.
As a matter of interest here is a series of light sources arranged in increasing intensity, based on unit area. The figures are the relative values of brightness compared with blue sky:-
Blue Sky ( 1 ) ..........Candle ( 1.2 ).........Paraffin lamp ( 4-8 ).......Carbon electric filament ( 300 ).......Tungsten electric filament ( 1000 for single and 5000 for typical grid form )......'Pointolite' electric arc ( 12,000 ) ................ ........Sunlight ( 800,000 ).
Conclusions
The humble torch bulb works well as an illuminating source, and most importantly could bring back to life an old unused instrument. Shining a bright torch light down the lamphouse tube in a casual attempt to obtain success will only lead to frustration and failure. The filament has to be at the focal position of the lamphouse condenser which throws the focussed image of the source onto or very near the substage iris plane and nowhere else. Understanding the rudiments of brightfield illumination such as Köhler's is essential if you are attempting to rebuild or even make a lamphouse from scratch.
Having made a practical alternative to the
Wild M20's official lamp house bulb, I can at least use it if my bulb fails
until such time as a replacement can be found. A stitch in time !
| All comments welcomed to Paul James. |
Please report any Web problems or offer general comments to the Micscape Editor.
Micscape is the on-line monthly magazine
of the Microscopy UK web site at Microscopy-UK
WIDTH=1