The basic set-up for 'top lighting'
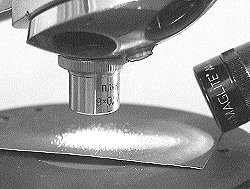 A very simple
set-up using the author's modest Russian Biolam microscope is
shown right where a 9X objective is being used to study sand.
Here's a few tips.
 Simple
'top lighting' with a compound microscope
... or
how to study subjects you can't get light through!
by Dave Walker
A wide variety of subjects can be studied by shining light from above rather than from below with a compound microscope. This article explains the very simple techniques to use, and shows some of the fascinating subjects you can study ... including 'looking' at the digital information on an audio compact disc (CD).
The basic compound microscope that many amateurs like myself use is primarily designed for use with transmitted light. Thus thin and/or transparent specimens are studied on a microscope slide and lit from below. However, there is a wide variety of subjects that can be studied by top lighting (incident lighting). These include opaque or solid subjects that cannot be viewed by transmitted light such as minerals, textiles, coins, printing, whole flowers or insects etc.
If you have a stereo microscope you can of course view these subjects in 3D, the correct way up at powers from 5X-40X or more. But if you don't have a stereo microscope, a compound microscope with low power objectives can also be used to good effect despite the lack of 3D and shallower depth of focus. Some subjects such as the CD disc require a magnification of 200X to show the digital information, which is beyond the reach of most stereo microscopes, but easily achievable with a basic compound microscope with a 20X objective.
The basic set-up for 'top lighting'
 A very simple
set-up using the author's modest Russian Biolam microscope is
shown right where a 9X objective is being used to study sand.
Here's a few tips.
Use low power objectives e.g. 3.5X-5X and 8X-10X, (occasionally a 20X for some subjects) as these have sufficient clearance to allow light to be shone on the subject and have a reasonable depth of focus. (If you don't have a very low power objective at 3.5X-5X it's well worth investing in one, as a total magnification of 35X-50X is very useful for viewing many subjects in both transmitted and incident light).
Use a bright light source. If
you use an external lamp for transmitted light microscopy
this is probably fine, especially if it is variable
intensity and is focusable. But if you don't have one
like this, I've found the focusing small torches of the
'MagLite' design (as shown above) are fine if held in a
simple stand . A small spot desk lamp is probably just as
good, although it does help if the beam is quite narrow
to avoid glare.
A few basic guidelines when studying subjects
Unlike stereo microscopes, compound microscopes don't have much depth of focus, so the subject should be fairly flat, or if e.g. part of a flower, cut and shaped a little to present a flattish subject.
As the subject may not necessarily be on a slide, you may find it's useful to remove the stage clips (or add-on mechanical stage if you have one) to provide an easy platform to move the subject.
To protect the stage and to provide a moveable base for the subject, a square of black card (as used for the sand shown above) and white card is useful. Depending on the subject it may look better against a black or white background.
Experiment with various
angles, heights and direction for the lighting. It helps
if the light is on some sort of adjustable stand for
this. I use a small laboratory retort stand and tripod
clamp, the type found in school laboratories.
What to study
It would be easier to list what not to study! Although top lighting with a compound microscope doesn't quite have the versatility of a stereo microscope it can still be used to good effect particularly at higher magnifications than your stereo' may be capable of. Here's a selection of things below.
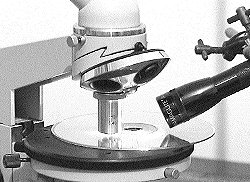 Compact
discs (CD's) - this is one of my favourites as it is one
of the few ways of actually 'looking' at digitally encoded
information. This requires the use of the 20X objective, which
should have a millimetre or so of clearance when focused to allow
shallow lighting. The simple 'MagLite' torch is usually still
bright enough for visual studies. Experiment with the direction
and angle of the lighting, to see the detail most clearly.
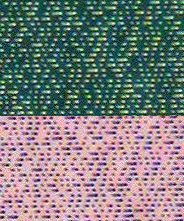 It is
helpful to focus first on a speck of dust or scratch on the CD
surface then slowly focus down until the 'dots and dashes' are
seen. The composite image right shows the visual image of the CD
(upper) image) and also the 'negative' (lower) created in image
processing software. (The Russian 20x NA 0.40 achromatic
objective was used with 7X eyepiece).
It's also worthwhile looking at a music record by top lighting (either a whole record or part of one if you don't mind cutting one up). The record shows music encoded in analogue rather than digital form and hence serves as an interesting visual comparison e.g. for school students learning the different ways of encoding information.
Click here to read an illustrated article 'Microscopy around the home' which discusses how the information is stored on CD's and LP's in more detail.
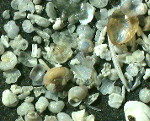 Sand - is a fascinating
subject to study as there are so many different types. If you can
obtain a sample of some of the famous sands containing fossils,
they are particularly interesting. The image left shows a famous
sand from Dog's Bay, Connemara in Ireland. One tip when studying
sand is to sprinkle only a very small amount on a piece of black
card, this allows an uncluttered view of individual particles to
be seen. Click on the August
Nature Walk to learn more about studying sand.
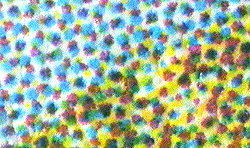 Printing - many aspects of
the printed word and image are worth studying by incident light.
A low power objective e.g. 3.5X-5X is usually sufficient. The
image right shows a landscape image on a stamp at the boundary
between the sky and the ground using a 3.5X objective.
Interesting comparisons can be made of the different printing techniques used for magazines, stamps, newspapers etc. to produced monochrome or coloured images. Or you can study how the quality of the text produced from laserjet printers and inkjet printers differs and how the output from the latter is effected by the quality of the paper.
Other subjects - many man-made subjects that can be studied like coins, textiles, electronic chips and circuits, record player needles have been covered in the Microscopy in the Home Series. A wide variety of natural objects that can be studied like flowers, insects, mosses etc. have been covered in the Monthly Nature walk series.
The subjects don't need to be opaque or solid. A number of subjects usually viewed by transmitted light can also reveal additional features and structures when viewed by incident light. These include diatoms, parts of insects etc. It's also worth trying both incident and reduced intensity transmitted lighting at the same time. Just experiment and see .... which is after all part of the fun of amateur microscopy!
A note on more advanced incident lighting
Incident lighting is a very valuable technique for certain specialist areas of microscopy, although it is outside the scope (and probably the pocket!) of most amateurs. Special incident light objectives and lighting units are available for many research microscopes. The objectives are often quite bulky as they incorporate optics designed to both light the subject and focus the reflected light off the subject for viewing.
Incident light (including incident dark-field) is used for example in metallurgy where the surfaces of metals can be studied. Specialist metallurgical microscopes are often inverted microscopes e.g. where the flat metal subject (often highly polished and etched to show surface detail) is placed on the stage and studied from below via the optical train mounted beneath the stage.
If any readers have access to these more advanced incident light techniques we would be pleased to display an image, ideally with a little explanatory text, on our 'Image of the Month' page.
Comments to the author Dave Walker welcomed.
Also read John
Wojtowicz's article on oblique and axial illumination.
Please report any Web problems
or offer general comments to the Micscape Editor,
via the contact on current Micscape Index.
Micscape is the on-line monthly
magazine of the Microscopy UK web
site at Microscopy-UK